

Most anti-aging makeup advice gets it backwards. The techniques that actually work aren’t about covering more. They’re about choosing better formulas, smarter placement, and a lighter hand.
Knowing how to apply makeup to look younger comes down to understanding how the face changes with age, and adjusting accordingly. Volume loss, skin texture shifts, fine lines, fading lip color. These aren’t problems to hide. They’re factors to work with.
This guide covers everything from skincare prep and foundation finish to concealer placement, blush, eye techniques, and the setting habits that keep it all looking fresh without going flat.
What “Looking Younger With Makeup” Actually Means

Looking younger with makeup is not about hiding your age. It’s about working with how the face changes over time to keep skin reading as fresh, awake, and luminous.
The face loses collagen and volume as it ages. That leads to dullness, uneven tone, and features that appear slightly dropped or flat. Makeup, when applied correctly, uses light and color placement to push back against those shifts.
The core principle is simple: dewy, luminous skin reads younger than flat, matte skin. Every product choice and technique in a youthful makeup routine flows from that one idea.
Mintel’s 2023 Mature Beauty report found that 40% of mature beauty consumers describe their own makeup application skills as “basic.” And most techniques taught years ago, heavy powder, apple-of-cheek blush, full-coverage matte foundation, are now working against them.
There’s also the overuse of coverage to think about. Heavy foundation doesn’t mask age. It sits on top of skin texture, fills in fine lines, and ends up creating a mask-like effect that draws more attention to what it’s trying to hide.
The goal isn’t to look 25 again. It’s to look like the best, most alive version of yourself now. That means choosing formulas and placements that restore warmth, lift, and that skin-like glow that fades with age.
Search interest in mature makeup techniques rose 30.3% on Google in the US from April 2023 to March 2024, according to Spate data, which shows how many people are actively looking to update how they approach this.
| What Ages You | What Helps | Why It Works |
|---|---|---|
| Heavy matte foundation | Skin tint or light coverage | Lets skin texture show through naturally |
| Full powder all over | Targeted powder at T-zone only | Keeps glow, reduces caking |
| Low blush placement | High cheekbone blush, blended up | Mimics lifted, youthful structure |
| Thick liner on waterline | Tight-lining or skipping liner | Opens the eye instead of shrinking it |
Skincare Prep Before Makeup Application

What you put on your skin before any makeup determines everything. Foundation applied to dry, unprepped skin will crack, pill, and settle into lines within an hour.
Dermatologists confirm that proper hydration and priming prevent makeup from settling into fine lines. A study published on ResearchGate also found that foundation products themselves can have a measurable impact on skin moisturization, but that doesn’t replace proper skincare prep first.
Moisturizer and Eye Cream
Moisturizer is non-negotiable for mature skin. It temporarily plumps fine lines from below and creates a flexible, hydrated surface that foundation can move with instead of settling into.
Look for formulas with hyaluronic acid, glycerin, or peptides. These pull moisture into the skin rather than just sitting on top of it.
- Apply eye cream before concealer. This one step reduces creasing under the eyes dramatically
- Let it absorb fully before moving forward (about 60 seconds is enough)
- For very dry skin, press moisturizer in with your palms rather than rubbing it on
Charlotte Tilbury’s Magic Cream is a popular choice among makeup artists working with mature clients specifically because of how it preps the skin for a smooth, luminous base.
Primer Selection for Mature Skin
Hydrating primer, not pore-filling primer. Silicone-heavy, pore-filling formulas can cause makeup to pill and slide on drier, more textured skin over time.
The right primer for aging skin does a few things at once:
- Adds a layer of slip so foundation glides instead of grabs
- Softens the appearance of fine lines without filling them with product
- Extends wear without relying on excess powder later
Charlotte Tilbury’s Flawless Filter works particularly well here because it adds luminosity while prepping the skin, reducing the need for extra highlight products later in the routine. To get the most from it, learning how to use a makeup primer correctly makes a real difference in how long your base holds up.
SPF as Part of the Routine
SPF before makeup is important, not just for sun protection but for how it affects skin over time. UV exposure accelerates uneven tone, age spots, and loss of elasticity, all the things that make the skin look older.
Apply SPF as the last skincare step, before primer. Let it settle for a minute before moving on. Skipping it to save time is the kind of habit that costs you years later.
Foundation and Coverage Choices for Mature Skin

Foundation is where most people go wrong. The instinct is to reach for more coverage to hide what’s changed. But on mature skin, heavy coverage almost always makes things worse, not better.
Every makeup artist who tested foundations for mature skin in Marie Claire’s 2024 round-up agreed: lightweight formula is the key factor. Thinner, more flexible textures move with the skin and don’t dry out or accentuate fine lines the way denser formulas do.
Finish Matters More Than Coverage Level
Dewy and radiant finishes read younger. Matte finishes, especially on dry or textured skin, can highlight fine lines and create a flat, tired appearance.
| Finish Type | Best For | Avoid If |
|---|---|---|
| Dewy / Luminous | Dry or mature skin, dull complexions | Very oily skin or humid climates |
| Satin / Natural | Normal, combination, or mature oily skin | You want a strong glow |
| Full Matte | Oily skin under 40 | Mature or dry skin (can settle into lines) |
Skin tint vs full-coverage foundation: for most everyday situations, a skin tint gives a more youthful result than heavy foundation. It evens tone while letting the actual skin show through, which is what reads as fresh and natural.
How to Avoid Cakey Foundation on Mature Skin
Cakey foundation is almost always a prep or application problem, not a product problem. Well, sometimes it’s a product problem too.
Application tool matters a lot. A damp Beautyblender or similar sponge presses foundation into skin rather than dragging it, which creates that skin-like finish that brushes can’t always achieve.
- Apply in thin layers. Build coverage only where you actually need it
- Skip foundation entirely on areas with good skin tone
- Match your shade at the jawline, not the hand or wrist
- If foundation is oxidizing and going darker, try a formula with different base ingredients
Bobbi Brown’s Jones Road What the Foundation was designed specifically around this problem. The formula uses sodium hyaluronate to plump fine lines and delivers a second-skin finish that’s neither too dewy nor too flat, making it one of the more consistently praised options for mature skin over 35.
For more on applying foundation and choosing the right application method, technique makes more difference than most people expect. A sponge application in particular changes the final result significantly on textured skin.
Concealer Placement That Lifts Instead of Ages

Most people use concealer the wrong way for mature skin. The instinct is to cover everything. The result is usually a thick, creased mess under the eyes that looks worse than no concealer at all.
Less product, better placement. That’s the whole strategy.
The Inverted Triangle Method
Instead of dotting concealer directly under the eye in a half-moon shape, extend it downward in an inverted triangle that points toward the cheek.
This does two things at once: it brightens the under-eye area and creates a subtle lifting effect on the midface. The brightened triangle draws the eye upward, which is the entire point.
- Use a shade that’s 1-2 tones lighter than your foundation, but not too light
- Peachy or warm-toned concealers cancel the blue-grey cast that develops under the eye with age
- Pat in with a ring finger or damp sponge, never rub
Going too light creates a grey reverse shadow effect, especially in photos. Warm peach tones are almost always more flattering for under-eye brightness on mature skin than pure white-toned concealers.
For more on how to use concealer for different concerns, technique depends significantly on what you’re trying to correct.
Setting Without Creasing
Setting powder under the eyes is the most common mistake in mature makeup. Powder in that area collects in fine lines by midday and creates exactly the crepey, aged look you’re trying to avoid.
Options that work better:
- Baking lightly: a tiny amount of translucent powder pressed in and left for 30 seconds, then dusted off
- No powder at all: a good setting spray can hold concealer in place without the texture issue
- Targeted powder: set only the outer corners or the spot where concealer tends to slide, not the entire under-eye
The NARS Light Reflecting Setting Powder is often recommended for mature skin specifically because its formula diffuses light rather than absorbing it, which keeps the under-eye looking fresh rather than dry.
Blush, Bronzer, and Contour for a Lifted Look

Blush is probably the single most underused product in mature makeup routines. Skin loses natural color and warmth with age. Without blush, even well-done foundation looks flat and tired.
Celebrity makeup artist Kasey Spickard describes blush placement on mature skin as being “almost underneath the eye, more toward the center of the face, then moving up toward the apple of the cheek.” This placement adds volume where the midface naturally loses it.
Cream Blush vs Powder Blush
Cream and liquid blush formulas are generally better for mature skin. They provide a smoother, more natural finish and are less likely to settle into fine lines, according to Professional Beauty. Powder blush can cling to dry patches and emphasize texture when overapplied.
That said: powder blush isn’t totally off the table. If you love powder, use a finely milled formula and apply with a medium brush for more controlled placement.
For a detailed look at cream blush vs powder blush, the choice comes down to skin type and the finish you want. And applying cream blush correctly on mature skin takes a slightly different approach than most tutorials show.
Learning how to apply blush based on your face shape also changes the result. Placement that works for an oval face can read completely wrong on a rounder face.
Placement for Lift

Blush goes high, then back. Apply above the apples of the cheeks, sweeping upward toward the temples. This direction creates lift rather than roundness.
Two fingers placed alongside the nose is a useful guide: keep blush behind that line and up toward the temples. Avoid bringing it too close to the nose or dragging it down toward the jaw.
Bronzer and Contour on Mature Skin
Heavy contouring reads as shadow on mature skin rather than structure. The face already has natural shadowing from volume loss. Adding more can make features look sunken rather than defined.
Warm bronzer instead of cool contour is usually a better call. A matte, warm-toned bronzer dusted lightly at the temples, along the hairline, and very lightly under the cheekbones adds warmth and dimension without the hardness of full contouring.
For tips on how to apply bronzer without it reading heavy, technique and shade selection both matter significantly on mature skin. And if you want to try cream-based sculpting, using cream contour gives more control and a softer result than powder.
Eye Makeup Techniques That Open and Brighten
The eyes change more visibly with age than almost any other feature. Lids become heavier. The brow drops slightly. The waterline thins. Crow’s feet appear, and the skin around the eye gets thinner and more crepey.
Most eye makeup tutorials are designed for younger, unhooded eyes. What works at 25 actively makes eyes look smaller and more tired at 50.
Liner Choices That Open the Eye

Thick liner on the lower waterline closes the eye. That’s fine at 22, but on mature eyes it can make them look smaller and more heavy-lidded than they actually are.
Tight-lining (applying liner between the lashes on the upper lid, not above them) defines the lash line without adding visual weight. For those who want more definition, how to tight-line eyes takes a bit of practice but the payoff is significant.
- A nude or flesh-toned pencil on the lower waterline opens the eye by making it appear larger
- White liner in the inner corner brightens the whole face
- Skip thick liner on the lower lash line entirely if your eyes feel heavy
For full guidance on eye makeup for older women, placement and formula choices are quite different from standard tutorials.
How to Apply Eyeshadow on Hooded or Mature Eyelids

Hooded lids eat eyeshadow. You apply it, close your eye, and half of it disappears into the crease. The standard crease-and-lid technique usually just creates a muddy line on mature, hooded eyes.
The fix: open your eye while you’re applying shadow, not just when you’re checking. Blend upward beyond where you think the crease is, so color is still visible with eyes open.
Matte transition shades work better than shimmer on crepey lids. Shimmer draws attention to texture. A soft matte shadow in a warm, medium tone diffuses across the lid without catching on fine lines.
For detailed makeup for hooded eyes, technique changes a lot compared to standard eye looks. Similarly, applying eyeshadow on mature skin benefits from a slightly different product and brush approach.
Brows and Mascara
Brows thin and lighten with age. Sparse brows make the face look older than wrinkles do, at least in terms of the instant read. Filling them in is one of the highest-return things you can do.
Use a fine-tip pencil or powder, not a felt-tip marker. The goal is hair-like strokes that fill gaps, not a solid drawn-on shape. Follow your natural arch and avoid going too dark.
For mascara: focus on the upper lashes and curl before applying. Curling lifts the entire eye and makes lashes appear longer without adding thickness that can look clumpy. For any issues with clumpy mascara, the fix is usually formula-related or about how much product you’re loading onto the brush.
Lip Makeup That Adds Volume Without Bleeding
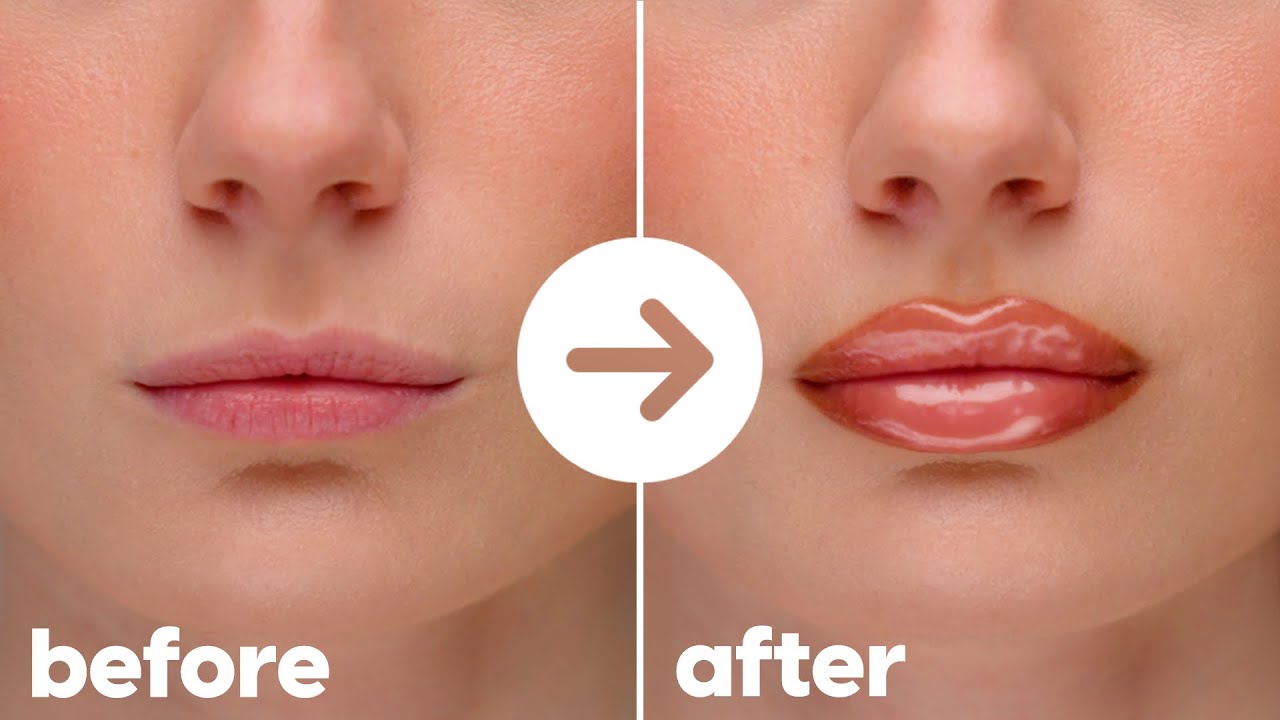
Lip volume decreases as estrogen declines during and after menopause. The vermillion border (the defined edge of the lip) also softens, which is exactly where lipstick starts to feather and bleed.
Lip liner sales grew 28% in Europe in the first half of 2024 compared to the same period in 2023, according to Circana. That kind of growth tracks with how many people are rediscovering it as a practical tool rather than a trend.
Lip Liner as the Foundation, Not the Finishing Step
Line first, then fill. Tracing the lip line and filling the entire lip with liner before applying any color gives lipstick something to grip and dramatically reduces feathering.
Shade choice matters here. A warm neutral that’s slightly deeper than your natural lip color works in most situations, regardless of what shade of lipstick goes on top. If the lipstick fades, you’re not left with an obvious ring of dark liner.
- Slightly over-line the upper lip just outside the natural vermillion border to restore definition
- Long-wear or waxy formulas stay put longer than soft, creamy pencils
- A clear liner works for those who want prevention without color
Charlotte Tilbury’s Lip Cheat liner is consistently recommended for mature lips because the formula holds its position without drying out the lip surface. Applying lip liner correctly is the single highest-return step in any mature lip routine. And if you’re dealing with feathering regularly, knowing how to stop lipstick from feathering goes beyond just liner choice.
Formula Choices for Thin or Aging Lips
Matte lipstick dries and contracts on the lip, which makes thinning lips look even thinner. Hydrating formulas with a satin or gloss finish reflect light outward, visually adding volume.
Satin and cream finishes are the practical middle ground: enough hydration to look plump, enough pigment to last a reasonable amount of time without constant reapplication.
A touch of lip gloss placed at the center of the lower lip, not all over, catches light and gives the illusion of more volume without sliding or feathering. Applying gloss this way, just at the center, is cleaner and more flattering than coating the whole lip.
For a fuller guide on lipstick ideas for thin lips, product and technique go hand in hand. And applying lipstick on thin lips benefits from a slightly different approach than standard tutorials cover.
Color Choices That Don’t Wash Out
Celebrity makeup artist Bobbi Brown has noted that the most common mistake after 40 is removing color from the face when it’s needed most. Natural lip color fades with age, and too-nude shades can make the face look flat.
The fix: go one shade warmer and one shade richer than feels comfortable. Berries, corals, and warm roses read as natural and alive on mature skin in a way that pale nudes rarely do.
Matching lip color to gray hair is its own consideration. Cooler, brighter shades tend to work better here, but the right undertone depends on your complexion. For help picking the right lipstick color overall, understanding your undertone makes the shortlist much shorter.
| Formula | Best For | Avoid If |
|---|---|---|
| Satin / cream | Everyday wear, thin lips | You need all-day wear without touch-ups |
| Hydrating gloss (center only) | Adding volume, layering over liner | Lines around mouth are deep |
| Matte | Oilier skin, longer events | Very dry or thin lips |
| Tinted balm | Casual wear, skincare focus | You want visible pigment payoff |
Setting the Makeup for Longevity Without Dullness
Setting is where a lot of mature makeup routines fall apart. Too much powder all over creates the dull, flat look you just spent the whole routine trying to avoid.
Celebrity makeup artist Katherine Dorn recommends using spray between makeup layers and again at the end, with powder used sparingly as a precision tool on specific areas, not as a full-face setting step.
Where to Use Powder and Where to Skip It
Powder is a targeted tool, not a blanket. Applied selectively, it controls shine without killing the luminosity that makes skin look youthful.
- T-zone and chin: fine for powder if needed
- Under eyes: skip it entirely, or use the absolute minimum
- Cheeks and cheekbones: no powder, keep the glow
- Around the mouth: avoid, deepens fine lines
For applying setting powder in a way that doesn’t flatten the skin, the technique matters as much as the amount. And translucent powder specifically works better than tinted formulas for mature skin because it won’t alter the carefully chosen foundation shade underneath.
Setting Spray as the Primary Finishing Step
For dry or mature skin, setting spray is the better default, according to L’Oreal Paris and multiple working makeup artists. It melts powder and liquid products into the skin rather than sitting on top of them, creating a more natural finish overall.
Three to four spritzes from about 12 inches away is enough. Hold the bottle far enough back for a fine mist, not a torrent. Too close and it disrupts the makeup underneath.
Charlotte Tilbury’s Airbrush Flawless Setting Spray is a consistent recommendation for mature skin specifically because it locks longevity in while keeping the airbrushed, radiant finish intact. Learning how to apply setting spray correctly takes the guesswork out of this step.
Mid-Day Touch-Ups Without Overloading
Layering more powder mid-day over makeup that’s already settled into lines makes things worse. Blotting papers absorb oil without adding product, which keeps the face looking fresh without the buildup that causes caking.
If shine comes back and blotting isn’t enough: a light spritz of hydrating mist (even plain thermal water spray) revives the look without disturbing the base. This works especially well for very dry skin types where midday dullness is more of a concern than shine.
For keeping everything intact throughout the day, knowing how to make makeup last all day covers the full picture, from prep through touch-ups.
Common Mistakes That Add Years

Most of these are habits carried over from years ago that made sense at the time. The face changes, the techniques need to follow.
Makeup artist Ashunta Sheriff, who has worked with Jennifer Hudson and Alicia Keys, identifies the core problem as outdated habits applied to skin with different needs. The application errors that look polished at 25 are often the same ones adding years at 50.
Foundation and Coverage Mistakes
Using one opaque shade all over is one of the most aging moves on mature skin. It creates a flat, mask-like effect that contrasts with the natural variation in skin tone, drawing attention to everything underneath.
Build coverage only where needed. Let the actual skin show through everywhere else.
- Full matte coverage all over: flattens the face and settles into every line
- Shade too light: creates an ashy or ghostly finish, especially in photos
- Skipping foundation matching at the jawline: leaves a visible demarcation line
For anyone dealing with the frustrating problem of makeup that shifts and changes color throughout the day, stopping foundation from oxidizing is worth looking into before switching products entirely.
Eye Mistakes That Make Eyes Look Smaller
Thick liner on the lower waterline. Dark shadow dragged all the way to the inner corner. Heavy mascara on bottom lashes. All three of these shrink the eye and emphasize dark circles and crow’s feet.
Lower lash mascara in particular draws attention to under-eye darkness. Makeup artist Vincent Oquendo confirmed that model Bella Hadid deliberately skips lower lash mascara for this reason. Small change. Big difference.
And blending matters more than most people give it credit for. Harsh lines age a face instantly. Soft, well-blended edges are what separate a polished look from one that reads as heavy or dated.
Lip and Blush Habits Worth Dropping
Skipping blush entirely. This is arguably the single most aging thing you can do to a makeup look on mature skin. Skin loses natural warmth and color with age. No blush means the face reads flat and pallid even with everything else done well.
Too-pale lip color has the same effect. Nude shades that drain warmth from the face look great in theory but often read as washed-out in practice on skin that’s already lost some of its natural pigment.
Feathering lipstick that bleeds into fine lines around the mouth is a sign of missing or wrong-formula liner, not a reason to avoid lip color entirely. The solution is using a lip liner correctly, not giving up on color. Choosing the right lip liner for your lip tone and formula makes this step much more manageable. And understanding how to make lip liner last means you’re not reapplying every couple of hours.
For a full picture of what to avoid, the guide on cakey makeup looks covers the most common culprits and how to fix them before they happen.
FAQ on How To Apply Makeup To Look Younger
What foundation finish makes mature skin look younger?
Dewy and satin finishes read younger on aging skin. They reflect light softly, which minimizes fine lines and restores the luminous skin quality that diminishes with age. Matte formulas tend to settle into texture and flatten the face.
Does primer really make a difference on mature skin?
Yes, but only the right kind. A hydrating primer smooths the surface and gives foundation something to grip. Silicone-heavy pore-filling formulas can cause pilling and slide on drier, more textured skin over time.
Where should you apply blush to look younger?
High on the cheekbones, sweeping upward toward the temples. This placement mimics a lifted face structure. Applying blush low on the apples of the cheeks, as many older tutorials suggest, adds roundness rather than lift.
Is cream blush or powder blush better for aging skin?
Cream blush is generally better. It blends into skin rather than sitting on top, avoids clinging to dry patches, and delivers a natural, dewy flush. Different blush formulas suit different skin types, but cream wins for mature skin.
How do you stop concealer from creasing under the eyes?
Skip heavy powder underneath. Use a peachy, warm-toned concealer patted in with a damp sponge. Set only the outer corners if needed. A light mist of setting spray holds concealer in place without the texture that powder creates.
What lip products help thin lips look fuller?
Lip liner filled across the entire lip, a satin or cream lipstick, and a small amount of gloss at the center of the lower lip. Matte formulas dry and contract, making thinning lips look even smaller. Hydration adds visible volume.
Should you use setting powder or setting spray on mature skin?
Setting spray is the better default. It melts makeup into skin for a natural finish without emphasizing texture. Use powder only where needed, like the T-zone. Avoid it under the eyes and around the mouth entirely.
What eye makeup techniques open up aging or hooded eyes?
Mascara on upper lashes only, tight-lining instead of thick liner, and matte eyeshadow blended upward past the visible crease. Skip lower lash liner and heavy waterline pencil. Both shrink the eye and draw attention to dark circles.
What makeup mistakes add years to your face?
Heavy matte foundation, skipping blush, excess powder, thick lower lash liner, and pale lip colors that drain warmth. Most are habits carried over from years ago. Adjusting placement and formula makes a bigger difference than switching products entirely.
How do you keep lipstick from feathering around the mouth?
Use a long-wear lip liner to outline and fill the entire lip before applying color. Waxy or waterproof formulas hold the color in place. A hydrating lipstick over the liner reduces migration significantly compared to matte formulas.
Conclusion
This conclusion is for an article presenting how to apply makeup to look younger, and the core takeaway is straightforward: technique matters more than product count.
A hydrating primer, a skin-like foundation finish, lifted blush placement, and a proper lip liner do more combined than any single anti-aging product on the market.
Dewy skin reads younger. Cream formulas blend better. Setting spray beats heavy powder on mature skin almost every time.
Small adjustments to eye placement, concealer technique, and brow definition compound quickly into a noticeably fresher result.
The goal was never to look younger than you are. It’s to look alive, warm, and like yourself at your best. That’s entirely achievable with the right approach.

She started writing on the site after fielding the same questions from clients and friends often enough to just write the answers down: which red won't turn orange on a warm undertone, how to keep lipstick from feathering into fine lines, why a "12-hour" formula rarely survives dinner.
Every review on the site follows the same rule she uses with paying clients: wear it first, then decide if it's worth recommending.
- How to Choose Setting Powder for Your Skin Type - August 1, 2026
- How Long Does Eyeliner Last Before It Expires? - July 28, 2026
- What Is Contour and How Do You Apply It? - July 25, 2026


