

Summarize this article with:
Most people own a concealer. Far fewer know how to actually use it well.
Knowing how to use concealer correctly changes everything: under-eye dark circles, blemishes, skin discoloration, and even face-shaping techniques all come down to shade, formula, and placement.
This guide covers it all, from choosing the right concealer shade for your skin tone and undertone, to applying it under the eyes, over acne, and as part of a contouring routine.
You’ll also find out which formulas work best for different skin types, how to set concealer so it doesn’t crease, and the most common mistakes that are easy to fix once you know what they are.
What Concealer Does

Concealer is a pigment-rich cosmetic product applied to specific areas of the face to hide discoloration, dark circles, blemishes, and redness. It is not the same as foundation.
Foundation covers the full face with lighter, more spreadable pigment. Concealer is thicker, more concentrated, and goes on targeted spots only.
A Beauty Buddy consumer survey found that over 80% of concealer users apply it to brighten the under-eye area and cover dark circles. Around 64% use it to correct skin discoloration, and 56% apply it specifically over blemishes and acne.
According to the same survey, 69% of participants use concealer daily, making it one of the most consistently used products in a makeup routine.
The global concealer market was valued at USD 8.64 billion in 2024, projected to reach USD 11.57 billion by 2030 (Deep Market Insights). That level of demand reflects how central this product has become.
Concealer works differently depending on formula, shade, and placement. Getting those three things right is what separates a natural finish from a patchy, cakey one.
Concealer vs. Foundation: Core Differences
Concealer: Higher pigment concentration, thicker texture, spot application only.
Foundation: Lighter pigment, designed for full-face blending, thinner consistency.
A common mistake is using foundation to cover under-eye circles or active breakouts. It usually doesn’t work. The pigment is too thin and the coverage too light for targeted correction.
Concealer handles what foundation leaves uncovered. That’s the relationship between the two products.
—
Choosing the Right Shade
Wrong shade is the most common concealer mistake. Too light leaves a grey or chalky ring. Too dark adds shadow to the exact area you’re trying to lift.
The right approach depends on what you’re covering and where.
Matching Concealer to Skin Tone
For blemishes and general face coverage, match the concealer as closely as possible to your actual skin tone. The goal is seamless, not visible.
For the under-eye area, go one shade lighter than your skin tone. This creates a subtle brightening effect without the stark contrast of going two or three shades up.
Test shade on the jaw or inner forearm, not the back of your hand. The hand is usually a different tone from the face.
Color-Correcting Before Concealer
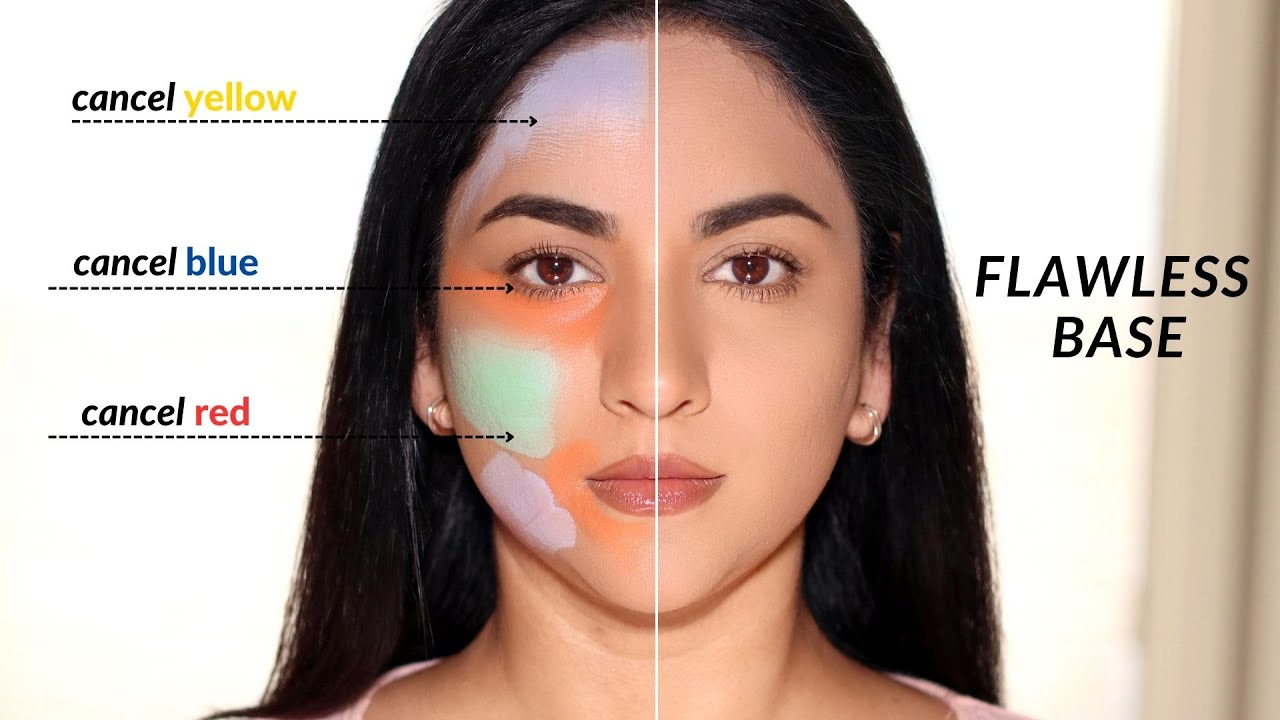
Color-correcting is a separate step that neutralizes discoloration before a skin-tone concealer goes on top. It uses the color wheel: opposite hues cancel each other out.
| Discoloration | Color Corrector to Use | Common Concern |
|---|---|---|
| Purple/blue dark circles | Peach or orange | Under-eye area |
| Redness, acne | Green | Active breakouts, rosacea |
| Sallowness (yellow tones) | Lavender | Dull, tired complexion |
| Deep dark circles on dark skin | Orange or red | Hyperpigmentation under eyes |
Apply color corrector in a thin layer first, let it set briefly, then apply your concealer on top. Skipping the set time causes both layers to mix and cancel each other out.
Understanding Undertones
Undertone affects how concealer reads on skin. Even a perfectly matched shade can look off if the undertone is wrong.
- Warm undertone: Yellow, peachy, or golden base. Look for concealers labeled warm or golden.
- Cool undertone: Pink, red, or bluish base. Concealers with pink or beige-pink tones work best.
- Neutral undertone: A mix of warm and cool. Most shades work, which is both a gift and a confusing shopping experience.
Fenty Beauty’s 50-shade concealer range set a new standard for shade inclusivity when it launched. Most major brands now offer 30 or more shades specifically because of that pressure.
—
Concealer Formulas and When to Use Each
Liquid concealers dominate the market with a 40% share of all concealer sales (Verified Market Reports, 2023). That’s not a coincidence. Liquid works for most skin types, most concerns, and most experience levels.
But liquid isn’t always the answer. Formula choice matters a lot depending on your skin and what you’re covering.
Liquid Concealer
The most versatile option on the market. Comes with a doe-foot applicator in most cases, blends easily, and works on all skin types when the right finish is chosen.
Best for: Under-eye dark circle coverage, dry skin, buildable coverage, daily wear.
One thing worth knowing: liquid concealer with a matte finish can emphasize dry patches. If you have dry skin, stick to hydrating or satin-finish liquid formulas.
Cream Concealer
Thicker than liquid, comes in pot or stick form, and delivers buildable full coverage. Popular with professional makeup artists for exactly that reason.
Best for: Mature skin, heavy discoloration, hyperpigmentation, tattoos, and scars. It layers cleanly without going patchy.
Apply in thin layers and build up. One thick application is hard to blend and looks heavy.
Stick Concealer
Dense, portable, and precise. The solid format makes it easy to place directly on a blemish without spreading product onto surrounding skin.
Best for: Spot coverage on blemishes and dark spots. Less ideal for under eyes since the thick texture is prone to creasing on thin skin.
Stick concealers are the fastest-growing concealer sub-segment (Verified Market Reports). Convenience and portability are driving that trend.
Powder Concealer
Lightest coverage of all formulas. Sets and conceals at the same time, making it a solid option for oily skin types that want to skip a separate setting step.
Not buildable, though. If you need medium or full coverage, powder alone won’t get there.
| Formula | Coverage Level | Best Skin Type | Best Use |
|---|---|---|---|
| Liquid | Light to full (buildable) | All types | Under eyes, daily wear |
| Cream | Medium to full | Dry, mature, combination | Heavy discoloration, scars |
| Stick | Full | Normal, combination | Spot blemish coverage |
| Powder | Light | Oily | Setting and sheer coverage |
—
Tools for Applying Concealer

The tool you use changes how concealer looks on skin. Same product, same shade, but applied with different tools will give completely different results.
Fingers
The warmth from fingertips melts product into skin. This makes fingers one of the best options for under-eye application, where thin skin needs gentle, seamless blending.
Downside: oils from hands can sometimes break down coverage faster. Wash hands first.
Beauty Sponge
A damp Beautyblender or similar sponge gives the most natural finish. The stippling motion pushes product into skin rather than dragging it across the surface.
Key point: Damp, not wet. A sponge that is too saturated will absorb most of the concealer before it reaches your face.
- Best for under eyes and general face coverage
- Prevents creasing when used with a patting motion
- Works well with both liquid and cream formulas
Flat Brush vs. Fan Brush
Flat concealer brush: Precise placement on blemishes and small areas. Gives more coverage than a sponge because it doesn’t absorb product.
Fan brush: Best for setting with powder concealer. Too diffused for accurate coverage on active spots.
A Cohley consumer survey (2024) found that 4 in 5 makeup wearers use concealer, blush, and foundation as their core three products. Tool quality directly affects how those products perform.
—
Application Order in a Makeup Routine

Where concealer goes in the routine depends on what you’re using it for. There is no single correct order. Two approaches work, and each has a different purpose.
After Foundation: The Standard Approach
Most people apply foundation first, let it settle, then follow with concealer on any areas that need more coverage.
This method uses less concealer overall. Foundation handles the base, and concealer fills the gaps. Less product means less risk of creasing and a more natural result.
This is the approach most professional artists use for everyday applying makeup situations.
Before Foundation: When It Makes Sense
Going concealer-first works specifically for color correcting. Peach and green correctors look better when blended before foundation, not after.
It also works for heavy discoloration that needs to be fully neutralized before anything else goes on top.
Baking technique: Apply concealer, press a thick layer of translucent powder on top with a sponge, let it sit for 5-10 minutes, then dust off the excess. Sets coverage and controls oil in the under-eye area for hours.
The right setting powder technique is what makes baking work. Without it, the concealer just creases by midday.
Setting Concealer
Setting is non-negotiable for under-eye concealer. Without it, any movement in the eye area causes the product to settle into fine lines within an hour or two.
- Translucent powder: Works for most skin tones, keeps things neutral
- Banana powder: Yellow-toned, brightens the under-eye area, works well on medium to dark skin
- Setting spray: Locks everything in place as a final step
Laura Mercier Translucent Loose Setting Powder is one of the most referenced products for this step, partly because it works across a wide range of skin tones without shifting the color of the concealer underneath.
—
How to Apply Concealer Under the Eyes

This is the area where most mistakes happen. Too much product, wrong placement, or the wrong blending technique and you end up with something that looks worse than no concealer at all.
Placement: Triangle vs. Dots
The inverted triangle method covers more area. Draw a triangle with the point at the inner corner of the eye, extending down toward the cheek. This brightens the whole under-eye zone, not just the darkest strip directly below the lash line.
The dot method works for minimal coverage days. Three small dots placed directly under the eye, blended outward.
Which to use: Triangle for significant darkness. Dots for a quick refresh or lighter coverage need.
Blending Technique for the Under-Eye Area
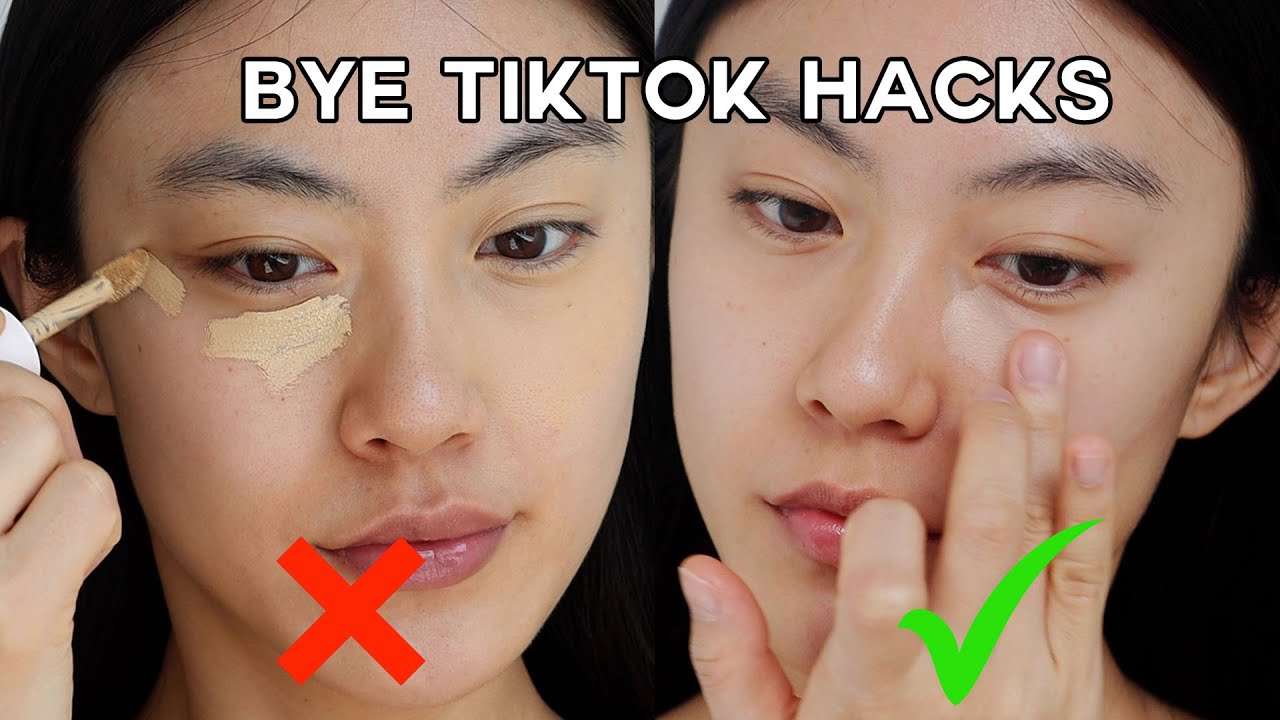
Pat, never rub. The skin under the eyes is thinner than anywhere else on the face. Rubbing stretches it, drags product unevenly, and pulls coverage off entirely.
Use a ring finger or damp sponge and press gently in a stippling motion from the inner corner outward. Take your time here. Rushing this step is the main reason concealer ends up looking patchy.
A common mistake is applying too much product and trying to blend out the excess. Start with less than you think you need. You can always add, not subtract.
Preventing Creasing Under Eyes
Creasing under the eyes is frustrating and almost always caused by one of three things.
- Too much product sitting in a thin layer that folds when the eye moves
- Skipping a primer or eye cream base that gives the concealer something to grip
- Not setting with powder before the concealer fully dries
An eye-specific primer, like those from Laura Mercier or NARS, applied before concealer gives the product grip and dramatically cuts down on creasing throughout the day.
For a more detailed breakdown of preventing creasing under the eyes, formula choice and prep steps both matter as much as the application technique itself.
How to Cover Blemishes and Acne
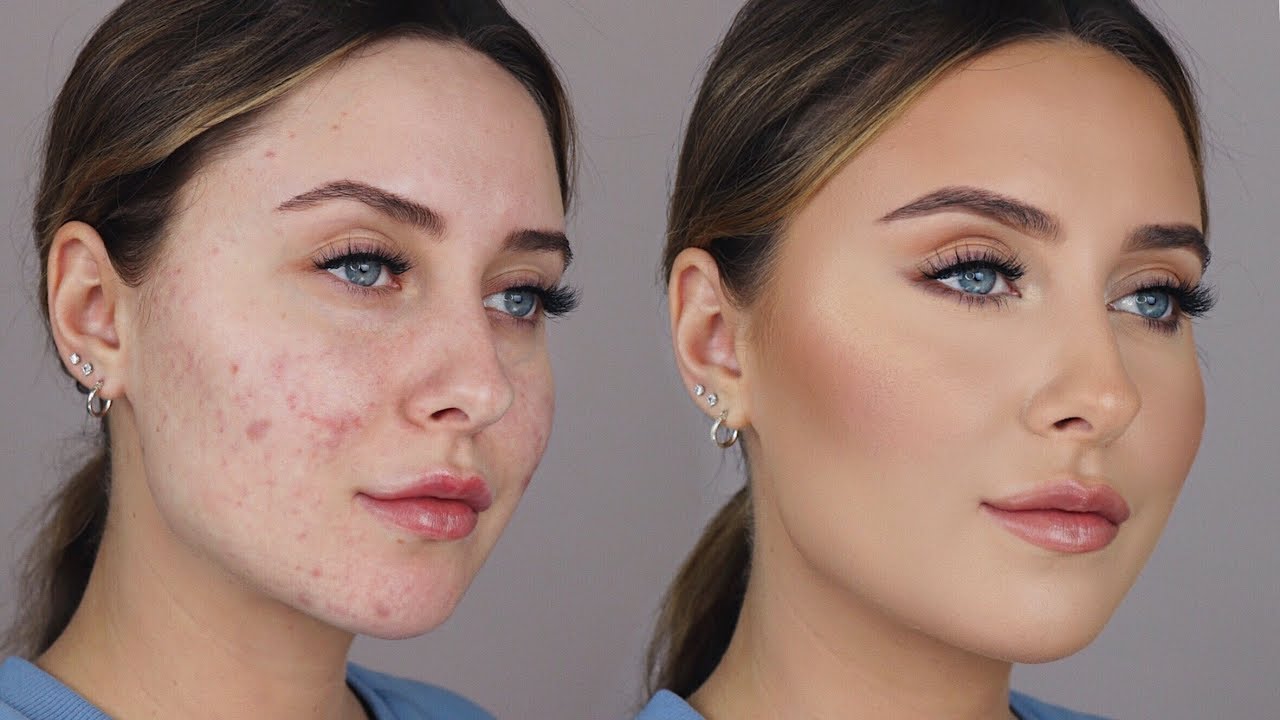
Covering acne is different from covering dark circles. The skin texture is uneven, the area is inflamed, and too much product makes it look worse, not better.
A 2024 survey found that 56% of concealer users apply it specifically to hide blemishes and acne, making it the third most common use after under-eye coverage and general skin discoloration (Beauty Buddy).
Choosing the Right Product for Blemishes
Formula matters here more than anywhere else. Non-comedogenic is non-negotiable for acne-prone skin. Anything with heavy oils or synthetic fragrance risks clogging pores and triggering more breakouts.
- Liquid or cream formula, medium-to-full coverage
- Non-comedogenic, oil-free
- Optional: formulas with salicylic acid (like Neutrogena SkinClearing) treat while they cover
Avoid heavy matte concealers on textured skin. They settle into the bump and make the surface look more uneven, not less.
Application Technique for Active Breakouts
Green color corrector first. One small dot directly on the red blemish, blended only at the edges. Let it set for 15 to 30 seconds before adding concealer on top.
Then, with a small flat brush or clean fingertip, press the skin-tone concealer directly over the blemish. Press, never rub. Rubbing spreads bacteria, removes coverage, and can irritate already inflamed skin.
Blend only the outer edges. Leave the center alone. Touching the center displaces the product from exactly where you need it.
Makeup artist Mikayla Nogueira popularized what she calls the Sticky Method: dab concealer onto all blemishes first using a brush, let it dry without blending, then apply foundation with a sponge over the top. The foundation blends the edges without disturbing the coverage underneath.
Covering Post-Acne Marks and Hyperpigmentation
Post-acne marks are flat discoloration left after a breakout heals. No texture, just pigment. These are actually easier to cover than active blemishes.
Red or purple marks: green corrector first, then concealer.
Dark brown spots on deeper skin tones: peach or orange corrector, then a full-coverage cream concealer layered in thin coats.
Set with a light dusting of translucent powder over the area to prevent transfer. Avoid heavy powdering directly on active textured spots since powder accentuates surface bumps.
—
Concealer for Contouring and Highlighting

Concealer doesn’t only cover. Used in the right shades and placement, it shapes the face by mimicking where light and shadow naturally fall.
This is one of those techniques that looks complicated but is actually more forgiving than contour powder. Cream and liquid concealers blend out mistakes more easily.
Contouring with a Darker Shade
Choose a concealer one to two shades darker than your natural skin tone. It must be matte. Shimmer creates the opposite of shadow.
Apply along the hollows of the cheeks, sides of the nose, temples, and jawline. Then blend thoroughly with a damp sponge so no visible line remains between the contour and the skin.
Professional makeup artist Mary Phillips, who works with clients including Hailey Bieber, recommends starting with just one feature at a time when learning. The cheeks are the easiest place to begin.
Highlighting with a Lighter Shade
One to two shades lighter than your skin tone draws light to the areas you want to bring forward.
| Area | Effect | Tip |
|---|---|---|
| Brow bone | Lifts the eye area | Small amount only |
| Cupid’s bow | Defines and plumps lip shape | Blend downward into lips |
| Center of forehead | Brightens and extends face length | Skip if forehead is wide |
| Inner eye corners | Opens and brightens eyes | Tiny amount, precise placement |
Keep the finish satin or matte for the lighter shade too. A glittery highlight looks different from a natural light-catching concealer.
Matching Texture Between Contour and Foundation
This is where people go wrong most often. Mixing textures causes pilling.
Cream concealer for contouring works over liquid or cream foundation. Powder concealer or contour powder goes over a set powder base. Never layer a cream product directly over a powder one.
The right cream contour technique accounts for product layering order as much as placement. Get the texture sequence wrong and the whole thing pills off within an hour.
—
Making Concealer Last All Day

Concealers generally last 6 to 8 hours, with longevity depending heavily on formula, setting technique, and skin prep (Makeup School Sydney). Most coverage breakdown happens in the under-eye area and the T-zone first.
The fix is not a better concealer. It’s almost always about what goes under and over it.
Skin Prep Before Application
A 2024 study in the Journal of Cosmetic Dermatology found that foundation altered skin moisture and sebum levels within 20 minutes of activity. Makeup breaks down because oil and sweat accumulate underneath it, not because the product itself is poor quality.
Prep sequence that works:
- Cleanse and pat dry completely. Damp skin creates an unstable base.
- Apply a lightweight moisturizer and wait 2 to 3 minutes
- Eye-specific primer under concealer if the under-eye area is your main concern
- Face primer across the T-zone and any areas prone to oiliness
Skipping moisturizer often seems like the right move for oily skin. It’s not. Dehydrated skin compensates by producing more oil, which breaks down makeup faster.
Setting Methods That Actually Hold
Two setting steps beat one. Setting powder locks in the concealer. Setting spray then locks in the powder and blends the layers together for a more natural finish.
Translucent powder: press (don’t sweep) onto concealed areas with a damp sponge or puff. Sweeping moves the product; pressing locks it in place.
Setting spray: hold 6 to 8 inches from the face, spray in an X and T pattern, and let it dry without touching. High-performance sprays like Charlotte Tilbury’s setting spray are designed to last through heat and humidity for extended wear.
For applying setting spray correctly, the distance and drying time both matter. Spraying too close leaves patches. Touching the face before it dries disturbs the film it’s building.
Touch-Up Techniques Mid-Day
Touching up without disturbing what’s underneath is a skill. Adding more powder over faded concealer creates buildup and cakiness fast.
Blotting papers first. Remove the excess oil before adding anything. Then a very light press of translucent powder only where coverage has faded.
If under-eye concealer has creased, use a clean ring finger to lightly pat the crease area. The warmth reactivates the product and smooths it out without full reapplication.
—
Common Concealer Mistakes

Most concealer problems come from a handful of consistent errors. Fixing them doesn’t require better products. It requires different technique.
Wrong Shade or Undertone
Going too light under the eyes is the most common mistake. Two or more shades lighter than skin tone creates a grey or chalky ring that’s more visible than the original dark circles.
One shade lighter. That’s the ceiling for under-eye brightening.
Wrong undertone is subtler but just as disruptive. A warm-toned concealer on cool skin looks orange. A cool-toned concealer on warm skin looks chalky or ashy. Test on the jaw before buying, not on the back of the hand.
Using Too Much Product
Too much concealer is the second most common error, and it compounds every other problem. Heavy product creases faster, looks less natural, and draws more attention to the area you’re trying to conceal.
Start with less than you think you need. A small amount patted on precisely covers more than a large amount smeared across the area. Building up in thin layers gives far better results than one thick application.
Skipping the Set Step
Concealer without powder creases. This is almost guaranteed in the under-eye area, where thin skin and constant movement work against any product trying to stay put.
Powder is not optional if you want under-eye coverage to last past the first hour. Even a light press with a translucent powder doubles the wear time.
For a full breakdown of how layering, product order, and skin prep all affect makeup layering, the sequence matters as much as the individual products.
Applying Concealer on Unprepared Skin
Dry, flaky skin under the eyes makes any concealer look worse, not better. The product clings to dry patches and emphasizes texture instead of smoothing over it.
A thin layer of eye cream or hydrating primer applied first and fully absorbed before concealer goes on solves this. Prepping skin before makeup is the single step that changes how every product performs, not just concealer.
Well, the thing is, most concealer frustrations trace back to this one step. Fix the skin prep and half the other problems disappear on their own.
FAQ on How To Use Concealer
Do you apply concealer before or after foundation?
Apply concealer after foundation in most cases. Foundation handles the base, so you need less concealer to finish the job. Go concealer-first only when color correcting heavy discoloration underneath.
How do you stop concealer from creasing under the eyes?
Use less product, set with translucent powder immediately after blending, and apply an eye primer first. Creasing under the eyes almost always comes from too much product or skipping the setting step entirely.
What concealer shade should you use for dark circles?
Go one shade lighter than your skin tone. Any lighter and you get a grey, chalky ring. For deep purple circles, apply a peach color corrector first to neutralize the tone before concealer goes on top.
How do you blend concealer without it looking patchy?
Pat, never rub. Use a damp beauty sponge or ring finger and work in a stippling motion. Blending concealer with a rubbing motion drags product unevenly and pulls coverage off the skin.
Which concealer formula is best for oily skin?
A matte-finish liquid concealer works best. Set it with a translucent or pressed powder to control oil buildup. Stick and cream formulas tend to slide on oily skin and break down faster through the day.
Can concealer be used to contour the face?
Yes. Use a matte concealer one to two shades darker than your skin tone to create shadow under cheekbones and along the jawline. A lighter shade on the brow bone and cupid’s bow adds highlight.
How do you cover acne with concealer without making it look worse?
Apply a green color corrector first to cancel redness. Then press a small amount of non-comedogenic concealer directly onto the blemish with a brush. Never rub over active breakouts. Set lightly with powder.
What is the correct order for applying concealer in a full makeup routine?
Primer, then foundation, then concealer, then setting powder, then setting spray. Color correctors go before foundation if the discoloration is heavy. Applying makeup in this sequence uses less product overall and gives better coverage.
How do you choose the right concealer undertone?
Match your undertone: warm skin needs yellow or golden-toned concealer, cool skin needs pink or beige-pink, and neutral undertones can work with most shades. Test on the jaw, not the back of the hand.
How long does concealer last on the skin?
Concealer typically lasts 6 to 8 hours. Setting with powder and finishing with a setting spray extends that wear time significantly. Oily skin and the under-eye area break down coverage fastest without proper prep and setting.
Conclusion
This conclusion is for an article presenting how to use concealer as more than just a coverage product. It covers blemish concealing, under-eye application, color correcting, contouring, and making your base last.
The right concealer formula paired with correct shade matching and blending technique makes a bigger difference than the price tag on the product.
Skin prep matters. Setting matters. And less product almost always beats more.
Whether you’re working with liquid concealer, a cream formula, or a stick, the principles stay the same: match your undertone, press don’t rub, and set with translucent powder.
Get those three things right and most concealer problems solve themselves.

- What Is Skin Tint and Why Everyone Is Obsessed - July 11, 2026
- What Is Foundation and How Do You Choose One? - July 6, 2026
- How to Make Blush Last Longer - July 3, 2026


