

Flaky, rough lips don’t respond to more balm. They respond to removing the dead skin first.
Learning how to exfoliate lips naturally is one of the simplest upgrades to any lip care routine. It takes under a minute, uses ingredients most people already have at home, and the difference in texture shows up immediately.
This guide covers everything you need:
- What lip exfoliation actually does to your skin
- Which natural ingredients work best (and which to avoid)
- DIY lip scrub recipes you can make in minutes
- The correct technique, frequency, and aftercare
- How long it takes to see smooth, soft lips consistently
No complicated products needed. Just the right approach.
What Is Lip Exfoliation

Lip exfoliation is the process of removing dead skin cells from the surface of your lips, either by physically scrubbing them away or by using mild acids that dissolve the bonds holding dead cells together.
Lip skin is about 5 times thinner than the rest of the body’s skin, according to dermatologists at Curology (2024). It also has almost no sebaceous glands, meaning it produces very little natural oil to protect itself. Dead skin builds up faster here than almost anywhere else on your face.
There are two main types of exfoliation for lips:
- Physical exfoliation: Uses granular particles like sugar or a soft toothbrush to manually scrub away dry, flaky skin.
- Chemical exfoliation: Uses mild acids (like AHAs) to loosen dead skin cells without friction. Less common for lips, but an option for sensitive skin.
Most people go with physical exfoliation at home. It’s straightforward, uses ingredients from the kitchen, and the results show up fast.
The lip care products market was valued at $2.47 billion in 2024 (Grand View Research), with lip scrubs emerging as the fastest-growing segment at a 7.51% CAGR. That’s not nothing. People are paying more attention to their lip skin, treating it like the rest of their face skincare routine rather than an afterthought.
A complete lip care routine almost always starts with exfoliation before any balm or treatment goes on, because products absorb better on clean, smooth skin.
Who Should Exfoliate Their Lips

Honestly, most people would benefit from it. Chapped, flaky, or dull-looking lips are signs that dead skin has built up faster than it’s shedding on its own.
Signs Your Lips Need Exfoliation
Your lips are telling you something when they look or feel a certain way.
- Visible peeling or flaking even after applying balm
- Rough or uneven texture when you run your tongue across them
- Lip color looking patchy or faded in areas
- Lip balm sitting on top instead of soaking in
That last one is key. If your balm or treatment never fully absorbs, there’s likely a layer of dead skin blocking it.
When to Skip It or Be Careful
Do not exfoliate when you have any of the following:
- Active cold sores or open wounds on the lips
- Severely cracked or bleeding lip skin
- Lip dermatitis or eczema flare-up
Scrubbing broken skin makes it worse. Always let the skin fully heal first.
People with sensitive skin can still exfoliate, just less frequently and with finer-grain scrubs. Oatmeal-based scrubs or a soft damp washcloth are gentler than sugar for people who tend to react easily.
According to the American Academy of Dermatology (AAD), people with chapped lips should look for products with healing ingredients like shea butter and ceramides, and avoid anything with menthol, eucalyptus, or salicylic acid, which can further irritate delicate lip skin.
How Often to Exfoliate Lips
Once or twice a week is the standard recommendation from dermatologists. Most people find once a week is plenty.
Frequency by Skin Sensitivity
| Skin Type | Recommended Frequency | Best Method |
|---|---|---|
| Normal | 1–2x per week | Sugar or honey scrub |
| Dry or dehydrated | 1x per week | Sugar + coconut oil scrub |
| Sensitive | Every 10–14 days | Oatmeal scrub or soft washcloth |
| Severely chapped | Pause until healed | Hydration only (balm, oil) |
Seasonal Adjustments
Winter lips need more support. Cold air, indoor heating, and low humidity all pull moisture from lip skin faster than usual.
Increasing to twice a week during winter months makes sense, but watch for over-exfoliation. Redness, stinging, or increased peeling right after scrubbing are signs you’ve gone too far.
Signs of Over-Exfoliation
Dermatological studies recommend limiting exfoliation to once or twice a week for delicate skin areas, since over-exfoliating disrupts the stratum corneum and actually increases dryness (Rejuvaskin, 2024).
Back off if you notice:
- Raw, red, or stinging skin after scrubbing
- Lips feeling more dry immediately after exfoliating
- Increased peeling in the days following a session
Natural Ingredients That Work as Lip Exfoliants

The best natural exfoliants for lips combine gentle abrasion with hydration. You want something that removes dry, flaky skin without creating friction damage on tissue that’s already thin and delicate.
Sugar
The most commonly used natural lip exfoliant. Sugar granules are soft enough to avoid micro-tears, water-soluble so they rinse clean, and slightly humectant when dissolved.
White sugar is finer and milder. Brown sugar is softer and slightly coarser, plus it contains molasses which adds a bit of extra moisture. Most dermatologists, including Dr. Angela Brimhall (Sage Dermatology), point to sugar-based formulas as the gold standard for home lip exfoliation.
Honey
Honey works as a binder in scrubs and brings real skin benefits on its own.
- Natural humectant: draws moisture into the skin
- Antibacterial properties that help with minor cracks or chapping
- Anti-inflammatory, which reduces irritation after scrubbing
Research published in IRJMETS confirms honey and sugar together form an effective, chemical-free exfoliating and moisturizing combination appropriate for regular use.
Coconut Oil
Acts as the carrier or base in most DIY scrubs. Contains fatty acids and antioxidants that soothe and nourish lip skin. Works well combined with brown sugar as a simple two-ingredient scrub.
Dr. Katie Mann, nurse practitioner and lip care expert, notes that sugar granules mixed with oil is the foundation of nearly all effective lip scrubs because the oil moisturizes at the same time as the sugar exfoliates.
Oatmeal
Best pick for sensitive or reactive lip skin. Ground oats are far finer than sugar and create almost no friction. Not as effective for heavy dead skin buildup, but a good option if sugar causes stinging.
Coffee Grounds
Coarser than sugar. Use sparingly and only occasionally. Coffee does contain antioxidants, and some people find the slight stimulation helpful for blood circulation in the lips. Not the right choice for anyone with already-irritated skin.
What to Avoid
Walnut shell powder, sea salt, and coarse salt are all too abrasive for lip skin. The AAD also flags menthol, eucalyptus, and citrus-based ingredients as common irritants to skip.
Natural Lip Scrub Recipes You Can Make at Home
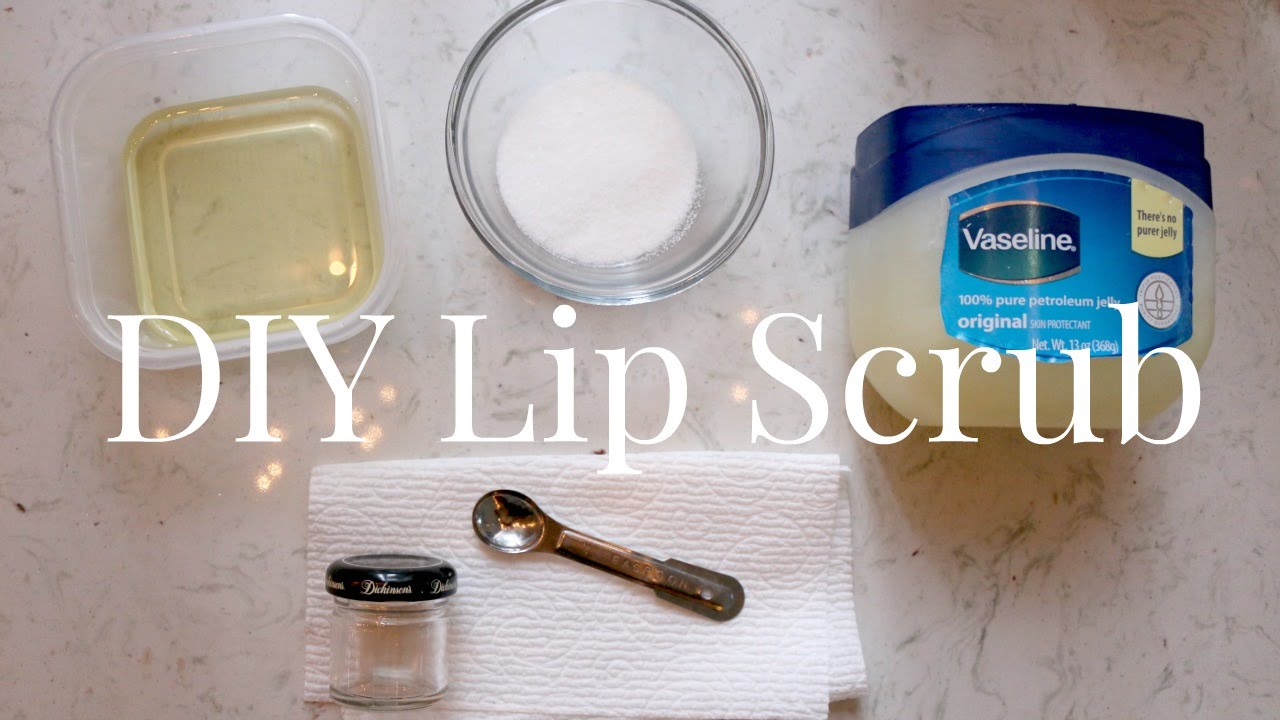
All four recipes below use kitchen ingredients. No special equipment needed. A small bowl and a spoon is enough.
Basic Sugar and Honey Scrub
This is the one most dermatologists point to when asked about DIY options. Aesthetic nurse practitioner Jackie Spagnuolo confirmed that combining sugar and honey creates an effective homemade lip scrub (Today, 2024).
Ingredients:
- 1 teaspoon white or brown sugar
- 1/2 teaspoon honey
Mix into a paste. Apply to lips with a fingertip using circular motions for 30-60 seconds. Rinse with warm water. Follow with lip balm immediately.
Shelf life: 1-2 weeks in a small sealed jar at room temperature.
Brown Sugar and Coconut Oil Scrub
The Honest Company and several dermatology sources specifically recommend brown sugar over white when pairing with oil, because it’s a softer exfoliant and the molasses content adds extra conditioning.
Ingredients:
- 1 tablespoon brown sugar
- 1 tablespoon coconut oil
- Optional: 1 teaspoon honey
Combine and stir until uniform. Apply and massage gently for 45-60 seconds. Rinse with warm water, then apply your usual lip care for dry lips routine to lock in moisture.
Gentle Oatmeal Scrub for Sensitive Lips
This one is a bit underrated. Finely ground oats have a naturally soothing effect on irritated skin, and the texture is mild enough for people who react to sugar-based scrubs.
Ingredients:
- 1 teaspoon finely ground oats (blend dry oats in a food processor)
- 1/2 teaspoon aloe vera gel
- 1/2 teaspoon honey
Mix well. Apply very gently, let sit for 1 minute, then rinse. This works better as a light exfoliating mask than an aggressive scrub.
Storage note: The aloe vera shortens shelf life. Make fresh each time or store in the refrigerator and use within 3 days.
Coffee and Coconut Oil Scrub
Use this one occasionally, not weekly. Coffee grounds are coarser, so it’s better suited for lips that aren’t sensitive and have heavier dead skin buildup.
Ingredients:
- 1 teaspoon finely ground coffee (not coarse grind)
- 1 teaspoon coconut oil
- 1/2 teaspoon honey
Mix and apply with light pressure. Rinse thoroughly. The coffee can stain lighter skin tones slightly if left on too long, so keep the contact time to 30 seconds max.
How to Exfoliate Lips Step by Step

The technique matters as much as what you use. Aggressive scrubbing on already-thin skin causes more damage than benefit.
Before You Start
Soften first. Press a warm damp cloth to your lips for 30 seconds before applying any scrub. This loosens dead skin and makes the whole process gentler and more effective.
Remove all lip product. Scrubbing over lipstick or balm reduces the contact between the exfoliant and your actual lip skin.
Application
Apply a small amount of scrub (about the size of a pea) to your fingertip.
Use light circular motions across the lips for 30 to 60 seconds. That’s it. You don’t need to press hard. The granules do the work, not the pressure.
Common mistakes that cause irritation:
- Scrubbing back and forth in a straight line instead of circular
- Using too much product and overloading the skin
- Pushing down hard thinking it’ll work faster
- Skipping the warm compress beforehand
Rinse and After-Care
Rinse with lukewarm water. Pat dry with a soft cloth, don’t rub.
Apply a nourishing lip balm or oil immediately while the skin is still slightly damp. This is when absorption is highest. According to a study published in the Journal of Clinical and Aesthetic Dermatology, moisturizing right after exfoliation significantly reduces transepidermal water loss and keeps skin soft longer.
If you plan on going outside, use an SPF lip product. Freshly exfoliated skin is more sensitive to UV exposure. This step matters more than most people realize, especially in summer.
After establishing a regular exfoliation habit, applying products like lipstick on dry lips becomes less of a problem since the base texture is smoother and more even.
Natural Lip Exfoliation Without a Scrub

Not everyone wants to mix up a paste every week. Fair. There are tool-based methods that work just as well for regular maintenance, especially if your lips are only mildly dry rather than heavily flaky.
| Method | Best For | Key Rule |
|---|---|---|
| Soft toothbrush | Normal to slightly dry lips | Wet bristles first, light pressure only |
| Damp washcloth | Sensitive or reactive skin | Microfiber preferred, circular motion |
| Lip brush | Makeup prep, fine texture work | Dry brush only, very brief |
Soft Toothbrush Method
One of the most accessible options and a long-standing favorite in basic skincare routines.
Wet the bristles with warm water. Brush in small circular motions for 30 to 45 seconds, covering the full lip surface. Rinse and apply balm immediately.
Use a toothbrush that’s designated only for your lips. Sharing with your dental brush introduces bacteria to an area that’s already prone to minor irritation.
Board-certified dermatologist Loretta Ciraldo warns that over-exfoliating with a brush can lead to redness, swelling, or sensitivity (via Mind Body Green). Once a week is the right starting point.
Warm Damp Washcloth
Soft washcloth fibers create mild friction that lifts loose dead skin without touching the skin barrier, according to Revival Labs (2026).
Steps:
- Wet a microfiber or soft cotton cloth with warm water
- Press gently to lips for 20 seconds to soften skin first
- Rub in small circles for 30-40 seconds
- Apply balm while lips are still slightly damp
This is the method dermatologist Kristina Collins leans toward for people who find scrubs too aggressive. Hydration first, then gentle friction.
When Tool Methods Work Better Than Scrubs
Scrub-free exfoliation is the right call when:
- Lips are mildly flaky but not severely chapped
- You react easily to new products or ingredients
- You want a quick daily or every-other-day light refresh
It’s worth noting that toothpaste is not an exfoliant for lips. It contains ingredients meant for enamel, not thin skin tissue, and several common toothpaste components (menthol, fluoride) can irritate lips badly.
What to Do After Exfoliating Your Lips

The exfoliation step on its own does very little if you skip what comes after. Freshly exfoliated lips are more absorbent, which means this is the window where moisturizing actually works.
Moisturize Immediately
Apply balm or oil while lips are still slightly damp from rinsing. That residual moisture gets locked in by the balm rather than evaporating.
Best natural ingredients for post-exfoliation moisture:
- Shea butter: rich in fatty acids, supports the moisture barrier, stays on longer than most oils
- Vitamin E oil: antioxidant protection, supports cell repair after exfoliation
- Castor oil: conditioning, creates a smooth seal on the lip surface
- Beeswax-based balms: form an occlusive layer that prevents water loss throughout the day
Consistent post-exfoliation moisturizing with quality ingredients typically shows noticeable improvement within 2 to 4 weeks, according to Luminous Skin Studios (2024).
Add SPF If You’re Going Outside
Freshly exfoliated lip skin is more UV-sensitive than usual. The thin protective layer that was just removed takes a few hours to start rebuilding.
Dermatologist Kristina Collins notes that lips lack melanin and are often completely forgotten when applying sunscreen, making them highly vulnerable to UV damage (Glam, 2023).
A lip balm with SPF 30 or higher handles both moisture and sun protection in one step. Look for formulas with zinc oxide or titanium dioxide as the active sun filters.
Overnight Treatments
Evening is the best time to exfoliate. Skin repairs itself more effectively at night (Skin Research and Technology), so the combination of fresh exfoliation followed by a thicker treatment balm gives maximum benefit.
Castor oil, shea butter, or a dedicated overnight lip mask all work well as the final step before sleep. The longer contact time means deeper absorption compared to a daytime application.
Once your lipstick lasts longer consistently, that’s usually a sign your lip skin texture has genuinely improved. Rough, flaky lips eat through product fast. Smooth, well-hydrated lips hold color far better.
How Long It Takes to See Results

Lip exfoliation works faster than most people expect.
The first session delivers immediate smoothness, according to Luminous Skin Studios (2024). Dead skin physically lifts away and lips feel noticeably softer within minutes of rinsing. The color also tends to look slightly brighter right after, because the dull dry layer is gone.
Short-Term vs. Long-Term Changes
| Timeframe | What Typically Happens |
|---|---|
| First session | Immediate smoothness, brighter color, better balm absorption |
| 1 week (2 sessions) | Noticeable reduction in flaking, more even texture |
| 2 to 4 weeks | Consistent improvement in texture, tone, and hydration retention |
| Ongoing routine | Soft, smooth lips that hold lip products better and chap less easily |
Factors That Affect How Fast You See Results
Results vary. A few things that slow progress:
- Licking your lips repeatedly (saliva breaks down the skin barrier and causes more dryness)
- Dehydration, which shows up on lips faster than most other areas
- Dry climate or heavy wind exposure between sessions
- Skipping the post-exfoliation balm step
The National Institutes of Health estimated that people use lip products for at least 8 hours daily, with a minimum of three applications per day. Heavy product layering without proper removal and exfoliation leads to residue buildup that keeps lips looking dull regardless of how much balm you apply.
When Results Don’t Improve
If lips remain persistently dry or cracked after 2 weeks of consistent exfoliation and moisturizing, the issue may not be surface dead skin at all.
Conditions like lip dermatitis, contact allergy to a product ingredient, or vitamin B deficiency can all mimic the appearance of chapped lips without responding to exfoliation. A dermatologist visit makes sense if nothing improves after two weeks of consistent care, or if you notice unusual color changes, swelling, or pain.
Applying lipstick on well-exfoliated, hydrated lips is a noticeably different experience. The product sits evenly, lasts longer, and the color reads truer. That result alone is worth building the habit.
FAQ on How To Exfoliate Lips Naturally
Can I exfoliate my lips every day?
No. Daily exfoliation damages the thin lip skin barrier and causes more dryness, not less.
Stick to 1-2 times per week. Sensitive skin types should start with once every 10 days and adjust based on how lips respond.
What is the best natural ingredient for a lip scrub?
Sugar is the top choice among dermatologists. It’s soft enough to avoid micro-tears, dissolves with water, and pairs well with honey or coconut oil for added moisture.
Brown sugar is slightly gentler than white sugar.
Can I use a toothbrush to exfoliate my lips?
Yes, with a soft-bristled brush only. Wet the bristles, use light circular motions for 30-45 seconds, and follow immediately with a lip balm.
Never use a toothbrush with medium or hard bristles on lip skin.
Should I exfoliate my lips before or after applying lip balm?
Always before. Exfoliating over balm reduces contact between the scrub and actual lip skin.
Apply your lip balm immediately after rinsing, while lips are still slightly damp, to lock in moisture.
Is it safe to exfoliate chapped or cracked lips?
No. Scrubbing broken skin worsens irritation and slows healing.
Focus on hydration only until the skin barrier recovers. Once lips are no longer cracked or bleeding, resume gentle exfoliation as part of your regular lip care routine.
How do I make a simple DIY lip scrub at home?
Mix 1 teaspoon of sugar with half a teaspoon of honey. Apply with a fingertip using gentle circular motions for 30-60 seconds, then rinse with warm water.
Coconut oil works as a substitute for honey.
Does exfoliating lips help lipstick apply better?
Yes. Dead skin creates an uneven surface that causes lip color to look patchy and fade faster.
Smooth, exfoliated lips hold product more evenly and the color reads truer from first application.
Can I exfoliate my lips if I have sensitive skin?
Yes, but choose a finer exfoliant. Ground oatmeal or a damp washcloth are gentler than sugar scrubs.
Reduce frequency to once every two weeks and always follow with a fragrance-free, natural lip moisturizer to protect the skin barrier.
What should I apply after exfoliating my lips?
Apply a nourishing balm or oil immediately after rinsing. Good options include shea butter, vitamin E oil, castor oil, or beeswax-based balm.
If going outside, use a balm with SPF 30 or higher. Freshly exfoliated skin is more UV-sensitive.
How long until I see results from exfoliating my lips?
Lips feel noticeably smoother after the first session. Consistent improvement in texture and hydration shows up within 2-4 weeks of regular exfoliation.
Results slow down if you skip post-exfoliation moisturizing or lick your lips frequently.
Conclusion
This conclusion is for an article on how to exfoliate lips naturally, and the core takeaway is simple: soft, smooth lips start with removing dead skin, not piling on more product.
A basic sugar and honey scrub, used once or twice a week, handles most dry lip texture issues.
Follow every session with a nourishing lip balm containing shea butter, vitamin E, or castor oil. That step is what locks in the results.
Consistency matters more than intensity. Gentle exfoliation over several weeks improves skin cell turnover, lip hydration, and overall lip texture far better than aggressive scrubbing ever will.
Pair the habit with daily lip moisturizer and SPF protection, and chapped, flaky lips stop being a recurring problem.

She started writing on the site after fielding the same questions from clients and friends often enough to just write the answers down: which red won't turn orange on a warm undertone, how to keep lipstick from feathering into fine lines, why a "12-hour" formula rarely survives dinner.
Every review on the site follows the same rule she uses with paying clients: wear it first, then decide if it's worth recommending.
- How to Choose Setting Powder for Your Skin Type - August 1, 2026
- How Long Does Eyeliner Last Before It Expires? - July 28, 2026
- What Is Contour and How Do You Apply It? - July 25, 2026


