

Most makeup routines fall apart not because of the foundation or concealer, but because of what comes after.
Knowing how to apply translucent powder correctly is the difference between a finish that holds for eight hours and one that creases, cakes, or turns ashy by noon.
This guide covers everything from loose powder application over foundation to the baking technique, skin-type adjustments, white cast fixes, and midday touch-up methods that actually work.
Whether you’re setting concealer, controlling shine on an oily T-zone, or trying to avoid flashback in photos, the technique matters more than the product in your hand.
What Is Translucent Powder

Translucent powder is a colorless, finely milled face powder that sets makeup without adding pigment or coverage. It sits on top of foundation and concealer to lock them in place, control shine, and create a finished look.
The word “translucent” is doing real work here. Unlike tinted or colored powders, it does not alter your foundation shade. It works on every skin tone because there is nothing in it to clash.
Most formulas use silica as the key active ingredient. Silica is a porous mineral that absorbs sebum, diffuses light, and creates a soft-focus finish on skin. Some formulas also include rice powder or cornstarch for additional oil absorption.
Two main formats exist:
- Loose translucent powder – finer milled, better for setting and all-over application
- Pressed translucent powder – more compact, better for touch-ups throughout the day
The global loose setting powder market was valued at USD 1.2 billion in 2023 and is projected to reach USD 2.3 billion by 2032, growing at a CAGR of 7.1% (Dataintelo). Translucent powder holds the largest product share in that market, driven by its versatility across skin tones.
Well-known formulas include the Laura Mercier Translucent Loose Setting Powder, the RCMA No-Color Powder used by professional makeup artists, and the e.l.f. Halo Glow Setting Powder at the budget end. Each uses a slightly different silica-to-filler ratio, which affects how the powder sits on different skin types.
What Translucent Powder Does to Skin

Translucent powder does four things: sets makeup, controls oil, blurs texture, and extends wear time. That is its full job description. It does not add coverage, change your skin tone, or treat skin conditions.
Silica particles in the formula absorb excess sebum throughout the day. According to AGC Chemicals research, high-grade cosmetic silica can hold between 50 and 200 percent of its mass in oil depending on formulation. That is a lot of shine control from a very light product.
The pore-blurring effect is optical, not physical. Fine silica particles scatter light when they sit on the skin, which reduces the appearance of pores and fine lines in person and in photos. This is why translucent powder is used on film and TV sets.
What it does not do:
- Add coverage over redness or blemishes
- Replace primer for long wear
- Moisturize or treat dry skin
- Work as a standalone base product
Skin type matters here. Oily skin benefits most from translucent powder because the silica has active sebum to absorb. Dry skin gets less benefit, and if you apply too much over dry areas, the powder settles into fine lines and makes them more visible. Mature skin needs a lighter hand for the same reason.
Laura Mercier specifically reformulated their translucent setting powder in June 2024 to improve oil-control performance and expand the shade range, responding to consumer demand for longer-wear options across a wider range of skin tones (Face Powder Market, WiseGuy Reports 2024).
Tools for Applying Translucent Powder

The tool you use changes the finish. Same powder, same skin, different tool – different result. Pick based on what you want the powder to do.
| Tool | Best For | Finish |
|---|---|---|
| Fluffy powder brush | All-over light application | Soft, natural matte |
| Powder puff | Pressing powder into oily skin | More matte, longer wear |
| Damp beauty sponge | Baking technique, heavy coverage areas | Smooth, transfer-proof |
| Fan brush | Dusting off excess after baking | Light, minimal deposit |
Fluffy brush is the go-to for most situations. It picks up a controlled amount of powder and deposits it lightly without pressing it in. Sweep in downward strokes to avoid disturbing the skin’s fine hairs.
Powder puff works better for oily skin. Pressing and rolling the puff into the skin pushes powder deeper and creates a longer-lasting matte finish. Some makeup artists use this technique in humid climates where swipe-on powder lifts off quickly.
Damp beauty sponge is for the baking technique specifically. Dampening the sponge slightly reduces the amount of product that absorbs into the sponge itself and packs it more deliberately onto the skin. Dry sponge absorbs too much product.
Kabuki Brush vs. Tapered Brush
A kabuki brush deposits more product and works well for full-face setting. A tapered or pointed powder brush gives more control for targeted areas like the T-zone or under-eye zone.
Most people only need one good fluffy brush. The Sigma Beauty F80 and Real Techniques Powder Brush are reliable options that do not shed or pack on too much product at once.
How to Apply Translucent Powder Over Foundation
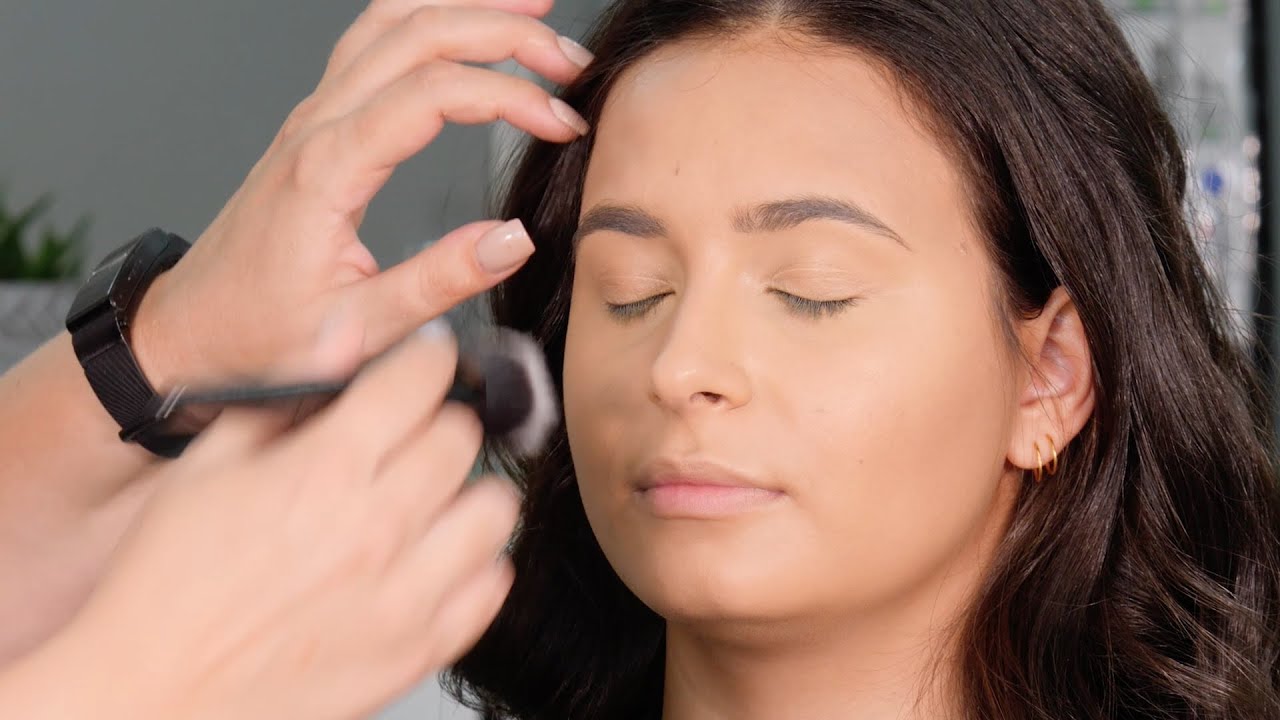
Timing is the first thing most people get wrong. Wait 60 to 90 seconds after applying foundation before reaching for powder. This gives the foundation time to oxidize and set slightly, so the powder does not drag, pill, or mix into the base in a patchy way.
A Beauty Buddy survey found that 33% of consumers prioritize makeup longevity as their top foundation concern, and setting powder is the most direct way to address that (Beauty Buddy Foundation Report). Getting the application right matters more than the brand of powder you buy.
Step-by-Step Powder Application Over Foundation
Step 1: Tap your brush against the jar or lid to remove excess. Too much product causes caking.
Step 2: Apply with a light pressing motion in the T-zone first. This is where oil breaks through fastest.
Step 3: Sweep outward from the center of the face. Use downward strokes on cheeks to smooth, not disrupt, the foundation underneath.
Step 4: Apply a second light layer only if needed in very oily areas. Do not layer everywhere.
The most common mistake: too much product applied in a sweeping back-and-forth motion, which moves foundation around and creates a patchy, cakey finish. Always press first, then sweep once to distribute.
How to Apply Translucent Powder Without Foundation
On bare, moisturized skin, powder does less. But it still controls shine and provides a slight skin-smoothing effect. Apply over a makeup primer for better adhesion and longer wear when skipping foundation entirely.
Use less product than you would over foundation. Skin without a base shows powder more easily, and heavy application on bare skin can look dry and flat. A light dusting is enough.
The Baking Technique with Translucent Powder

Baking came from drag and stage makeup, where performers needed makeup to survive hours under hot lights without creasing or fading. The technique migrated to everyday makeup around 2015 and has stayed popular since.
How baking works: A large amount of translucent powder sits on the skin for 5 to 10 minutes. Body heat “bakes” the concealer underneath, setting it more firmly and creating a crease-resistant, long-wear finish. Then the excess powder is swept away.
How to Bake Under Eyes
Apply a generous amount of concealer under the eye. Pack loose translucent powder on top using a damp beauty sponge.
Leave it for 5 to 10 minutes while doing the rest of your makeup. Then dust away the excess with a fluffy or fan brush using downward strokes.
The result is a brighter, smoother under-eye area with noticeably better crease resistance throughout the day. This is the one area where baking makes a real difference for most people.
When Baking Does Not Work
Baking on dry or mature skin makes fine lines and texture worse. It is also unnecessary on combination skin unless the specific area is very oily.
- Skip baking on cheekbones (dehydrates the area)
- Avoid baking over cream blush or highlighter (kills the finish)
- Do not bake over dry skin patches (settles and emphasizes texture)
Fenty Beauty’s Pro Filt’r Setting Powder is one of the few formulas that bakes well across a wide range of skin tones without leaving a white cast, partly because of its finely milled, low-silica formula that diffuses light more evenly.
How to Apply Translucent Powder on Different Skin Types
There is no universal application method. Skin type determines how much powder to use, where to put it, and which tool gets the best result.
| Skin Type | Amount | Focus Areas | Tool |
|---|---|---|---|
| Oily | Medium to heavy | Full face, T-zone priority | Powder puff or dense brush |
| Dry | Very light | T-zone only | Fluffy brush |
| Combination | Light to medium | T-zone, avoid dry cheeks | Fluffy brush |
| Mature | Minimal | T-zone only, skip under eyes | Fan or fluffy brush |
| Sensitive | Light | T-zone, avoid active breakouts | Fluffy brush |
Oily Skin
Translucent powder is most effective here. Pressing the powder in with a puff rather than sweeping it on creates a better seal over oily areas. Midday touch-ups are still necessary for very oily skin. Blot with paper first, then re-apply powder only to the shiniest areas.
The powder segment of the makeup market is expected to contribute 45.58% of global makeup market share in 2026, driven largely by demand from oily-skin consumers who rely on setting powder for daily oil control (Fortune Business Insights).
Dry and Mature Skin
Less is always more. Apply only to areas that actually get shiny, and skip the rest. Over-powdering on dry or mature skin settles into fine lines and makes texture more visible, not less.
If you need to prevent creasing under eyes, use the smallest possible amount of powder with a fan brush rather than a puff or dense brush. The goal is to set concealer without drying out the area.
Combination Skin
Target only the T-zone and any other areas that actually produce oil. Leave the cheeks alone unless they get shiny too. Most people with combination skin make the mistake of powdering everywhere out of habit, then wonder why their cheeks look dry and flat by midday.
Where Not to Apply Translucent Powder
Knowing where to skip powder matters as much as knowing where to use it. Most powder mistakes come from applying it everywhere out of habit rather than need.
Over Cream Blush and Cream Highlighter

Cream products go before powder, not after. Applying translucent powder on top of cream blush or a cream highlighter kills the finish entirely. The powder absorbs the luminosity, and the cream blush loses its skin-like flush.
Charlotte Tilbury’s guidance is direct on this point: apply and blend all cream products first, then set lightly with powder only where needed, and avoid powdering over areas where you want the cream finish to show through (Charlotte Tilbury official guides).
The rule: cream first, powder second. If you want both a cream blush and a powder blush, apply the cream to bare skin after foundation, then dust powder blush on top for longevity and dimension.
Under Eyes on Dry or Mature Skin
Under-eye powder is one of the most over-done steps in everyday makeup routines. On dry or mature skin, powder under the eyes settles into fine lines within hours and makes them far more visible, not less.
When to skip it: if you have visible fine lines under the eyes, dry skin, or are over 40. Mintel’s US Beauty Life Stages report notes that 40% of mature beauty consumers describe their makeup skills as basic, and under-eye powdering is one of the most common areas where technique breaks down for this group.
If you still need to set concealer under the eyes, use the absolute minimum amount with a fan brush. Press, do not sweep.
The Hairline and Eyebrow Area
Powder in the hairline turns ashy and leaves a visible line, especially on deeper skin tones. Most fluffy brushes pick up more product than needed for a full-face sweep, and the residue ends up in the hairline by default.
Stop your powder application before you reach the hairline. Same for the eyebrows: powder over filled-in brows disrupts the product underneath and creates a patchy, dull finish over areas that should look defined and clean.
Translucent Powder and White Cast
White cast is the most common complaint about translucent powder, especially among people with medium to deep skin tones. It shows up in person as an ashy film and in photos as a stark white reflection. Both are caused by specific ingredients in the formula.
The US transparent setting powder market was valued at USD 312.7 million in 2024 and is projected to reach USD 423.86 million by 2030 (Issuu market research, 2024). The growth in shade-inclusive and white-cast-free formulas is a direct response to broader demand from consumers with deeper skin tones who previously avoided the category entirely.
Why White Cast Happens
Two main culprits:
- High silica concentration – scatters light aggressively when used in heavy amounts
- Titanium dioxide – a whitening agent found in many powders and SPF-containing formulas; reflects flash photography badly
Titanium dioxide and zinc oxide are excellent at absorbing UV rays, but they scatter visible light the same way. Under a camera flash, that scatter reads as a white cast (Lab Muffin Beauty Science).
A powder labeled “translucent” is not automatically free of these ingredients. Some formulas include titanium dioxide as an opacity booster or built-in SPF, and that is enough to cause visible flashback even if the powder looks fine in daylight (The Makeup Refinery).
How to Choose a Powder Without White Cast
Check the INCI ingredient list before buying. If titanium dioxide or zinc oxide appear in the first five ingredients, the formula will likely cast on deeper skin tones and under flash.
| Formula Type | White Cast Risk | Best For |
|---|---|---|
| Silica-only (no TiO2) | Low | All skin tones, photography |
| Rice powder base | Low to medium | Medium to deep skin tones |
| Contains titanium dioxide | High under flash | Fair skin, non-flash settings |
| HD or micronized silica | Low (depends on amount used) | Photography, stage makeup |
The RCMA No-Color Powder and the Fenty Beauty Pro Filt’r Setting Powder are consistently recommended across deeper skin tones for low white cast. Both use finely milled silica formulas without significant titanium dioxide.
Also worth testing: the NYX Professional Makeup HD Finishing Powder and the Hourglass Veil Translucent Setting Powder. Always test with flash before an event or photoshoot. Apply the powder as you normally would, take a flash photo indoors, and compare the result before committing to a formula.
How Application Affects White Cast
Too much product causes white cast regardless of formula. Even low-cast silica powders look ashy if you pack on three layers. Less product, correctly pressed in, always performs better than more product swept on.
Pressing powder into the skin with a damp sponge or puff, then sweeping off the excess with a fluffy brush, gives you the setting benefit without leaving a surface layer of white particles sitting on top of skin.
How to Touch Up Translucent Powder During the Day

Midday touch-ups are where most people make the mistake of just adding more powder over what is already there. That approach causes caking. The correct method takes one extra step and makes the result look completely different.
Transparent powders hold 50% of the global makeup powders market by product type, driven by consumers who rely on them for daily oil control and touch-ups throughout the day (Verified Market Reports, 2023).
The Correct Midday Touch-Up Method
Step 1: Blot first. Use blotting paper or a clean tissue to press away excess oil before applying any product. This removes the oil without disturbing the makeup layer underneath.
Step 2: Press, do not sweep. Use a pressed translucent powder with a puff or compact brush. Pressing powder into skin over a blotted surface resets the matte finish without adding visible product buildup.
Layering powder over unblotted oily skin mixes the oil and powder into a patchy, cakey layer. Blotting first prevents this entirely (Thin Lizzy guides; L’Oreal Paris midday touch-up guidelines).
Products to Keep in Your Bag
Loose powder is not practical for touch-ups. It is too messy without a controlled dispenser.
- Pressed translucent powder – Coty Airspun or Charlotte Tilbury Airbrush Flawless Finish in a compact
- Blotting papers – always use these before any powder reapplication
- Setting spray – useful for refreshing the whole face without adding any product buildup
If your skin is very oily and you have already applied two rounds of powder, skip the third layer of powder and use blotting papers only. Adding more powder at that point does not absorb more oil. It just adds more product to an already heavy base.
A light mist of setting spray after your morning powder application can also reduce how much oil breaks through by midday, cutting down on the number of touch-ups needed overall. It is worth adding to the routine if you find yourself reaching for the compact by 11am regularly.
For a complete guide to making your makeup last all day, the approach goes beyond powder alone and covers primer, foundation layering, and the order of application from start to finish.
FAQ on How To Apply Translucent Powder
How do you apply translucent powder without it looking cakey?
Use less product than you think you need. Tap excess off your brush before touching your face.
Press the powder in with a fluffy brush rather than sweeping back and forth. One light layer over foundation is almost always enough.
Should you apply translucent powder before or after foundation?
After. Always after. Wait 60 to 90 seconds for your liquid foundation to settle, then apply powder.
Applying powder too soon drags the foundation and creates a patchy, uneven finish underneath.
Can translucent powder be used on all skin tones?
Yes, but formula matters. Choose a silica-based powder without titanium dioxide to avoid white cast on medium and deep skin tones.
Fenty Beauty Pro Filt’r and RCMA No-Color Powder both work across a wide range of skin tones.
How much translucent powder should you use?
Very little. A light dusting over the T-zone and under-eye area is enough for most skin types.
Oily skin can handle a bit more in targeted areas. Dry and mature skin should use the absolute minimum.
What is the best brush for applying loose translucent powder?
A large, fluffy powder brush works for all-over setting. A powder puff is better for pressing powder into oily areas for longer wear.
For the baking technique specifically, use a damp beauty sponge to pack product under the eyes.
Does translucent powder cause flashback in photos?
Some formulas do. The culprits are titanium dioxide and zinc oxide, which reflect camera flash and create a white cast.
Check the ingredient list. Silica-only formulas like RCMA No-Color Powder are much safer for flash photography.
Can you apply translucent powder without foundation?
Yes. Apply it over a moisturizer or setting powder base to control shine and blur texture without foundation underneath.
Use a lighter hand than you would over foundation. Bare skin shows powder more easily.
How do you apply translucent powder for the baking technique?
Apply concealer, then pack a generous amount of loose powder on top using a damp sponge. Leave it for 5 to 10 minutes.
Dust off the excess with a fluffy brush. Best used under eyes and on the T-zone for long-wear makeup.
How do you touch up translucent powder during the day?
Blot with paper first to remove oil, then press a small amount of pressed powder on top. Never add powder directly over unblotted shine.
Skipping the blotting step causes the oil and powder to mix, which leads to a cakey, patchy result.
Is translucent powder the same as setting powder?
Not exactly. Translucent powder is colorless and works across all skin tones. Setting powder is a broader category that includes tinted and pigmented formulas too.
All translucent powders set makeup, but not all setting powders are translucent.
Conclusion
This conclusion is for an article presenting how to apply translucent powder, and the core takeaway is simple: the right tool, the right amount, and the right skin-type approach make all the difference.
A loose powder application with a fluffy brush handles most everyday routines. A damp sponge and the baking technique take care of longer wear.
Avoid over-powdering dry areas, skip product over cream blush, and always blot before any midday touch-up with your pressed powder compact.
For deeper skin tones, stick to silica-based formulas without titanium dioxide to keep white cast and flash photography issues out of the picture entirely.
Powder is the last line of defense in a base makeup routine. Get it right, and everything underneath stays put.

She started writing on the site after fielding the same questions from clients and friends often enough to just write the answers down: which red won't turn orange on a warm undertone, how to keep lipstick from feathering into fine lines, why a "12-hour" formula rarely survives dinner.
Every review on the site follows the same rule she uses with paying clients: wear it first, then decide if it's worth recommending.
- What Is CC Cream and How Is It Different? - July 16, 2026
- What Is Skin Tint and Why Everyone Is Obsessed - July 11, 2026
- What Is Foundation and How Do You Choose One? - July 6, 2026


