Most people are doing cream contour wrong, and the result looks nothing like a natural shadow.
Knowing how to use cream contour correctly changes the entire outcome. Done right, it adds genuine depth and face sculpting that reads as real structure, not painted-on color.
This guide covers everything from shade selection and contour placement to blending technique and all-day setting methods. You will learn which tools work best, how to contour for your specific face shape, and why most cream contour fades by noon.
No diagrams to decode. No professional kit required. Just a clear, step-by-step cream contour tutorial that works.
What Is Cream Contour
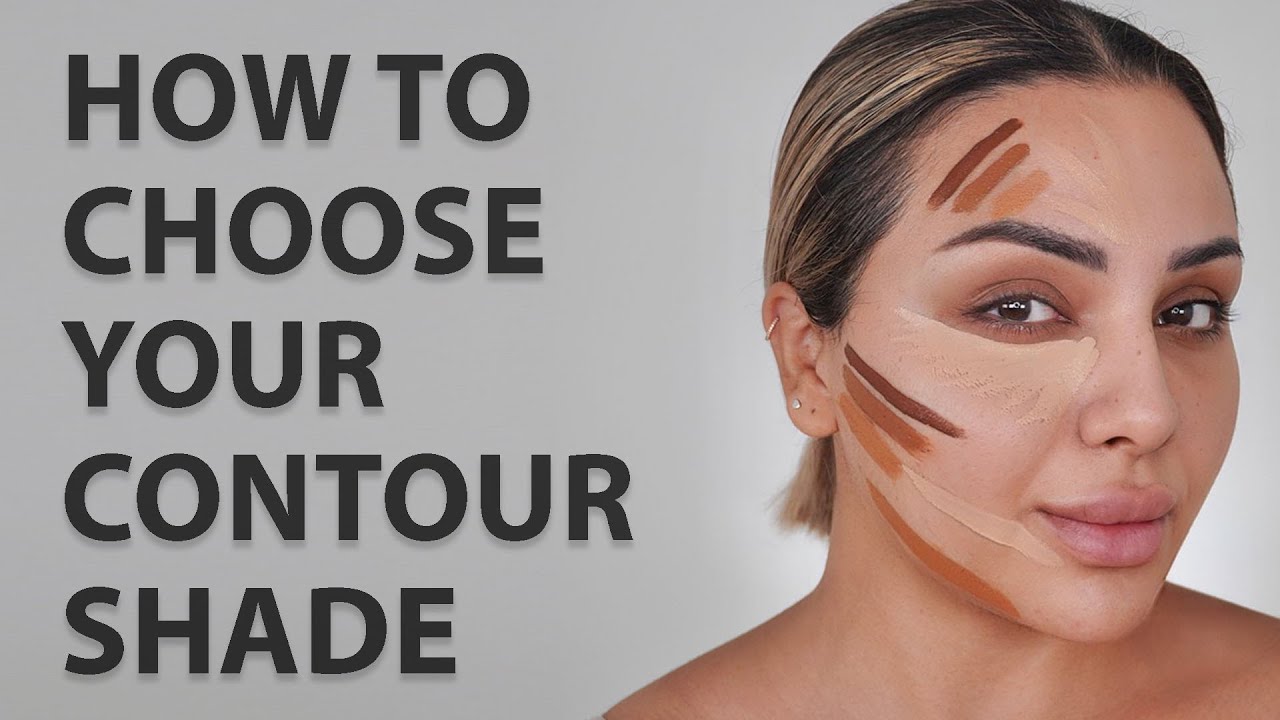
Cream contour is a pigmented, blendable makeup product used to add shadow and depth to specific areas of the face. It mimics the natural shadows your face already has, making features like cheekbones, jawlines, and the nose appear more defined.
The formula is soft and workable. It presses into skin rather than sitting on top of it, which is why the finish looks more like a real shadow than a painted line.
Cream contour comes in three main forms:
- Stick: The most popular format. Twist-up, portable, easy to apply directly to skin
- Pot: Higher pigment payoff, requires a brush or finger to pick up product
- Palette: Multiple shades in one compact, good for mixing custom depths
The shade itself matters more than the format. A good cream contour reads as a cool or neutral shadow on skin. Not warm, not orange. Cool-toned or slightly taupe, similar to what the hollow of your cheek actually looks like in a shadow.
Cream contour works best on dry, normal, and combination skin. It can work on oily skin too, but it needs to be set with powder quickly or it will move.
Cream contour sticks dominate the market, valued at $600 million in 2024 and projected to reach $1 billion by 2035, according to Wiseguy Reports. That growth reflects how widely the format has been adopted across skill levels.
If you are newer to contouring, stick formulas are the most forgiving starting point. The product is already on the applicator, placement is controlled, and blending is faster than working from a pot. Brands like Fenty Beauty Match Stix, Charlotte Tilbury Contour Wand, and NARS Cream Bronzer are all solid entry points depending on your budget.
Cream Contour vs. Powder Contour

These two formats do the same job but produce different results. Choosing the wrong one for your skin type or routine is one of the most common reasons contour looks off.
| Feature | Cream Contour | Powder Contour |
|---|---|---|
| Finish | Skin-like, natural, dewy | Matte, defined, flat |
| Best skin type | Dry, normal, combination | Oily, combination |
| Blending window | Short (blend immediately) | Longer, more forgiving |
| Layering | Under or over foundation | Always over foundation |
| Longevity | Needs setting powder to last | Stays in place longer |
Circana reports that cream formats have been outpacing powder in U.S. prestige makeup growth, signaling a clear shift in what consumers are reaching for. That does not mean powder is wrong. It means the use case is different.
Powder contour is better for oily skin and high-humidity situations. It also gives a sharper, more sculpted look, which some people prefer for photography or evening makeup. Cream gives a softer, more believable shadow for everyday wear.
When to use both
Many makeup artists, including celebrity artist Cara Lovello, layer cream first and then dust powder on top to set it. This approach gives you the natural finish of cream with the staying power of powder.
The layering order matters. Cream always goes before powder. Doing it the other way around breaks down the powder and creates a muddy, patchy mess.
If your foundation is liquid or cream-based, apply cream contour directly after foundation, then set everything with translucent powder. If you are working with a powder foundation, skip the cream contour and go straight to powder contour instead.
Tools for Applying Cream Contour

The tool you use changes the result more than most people realize. Same product, different tools, totally different finishes.
Brushes
Best for precision and defined placement. A flat contour brush or small tapered brush lets you deposit product exactly where you want it before blending. Brushes give more control over how much product goes down and work especially well for nose contouring and jawline work where accuracy matters.
The tradeoff is that brushes can leave streaks if the product is not blended out quickly. A dense, angled brush works for initial placement. A fluffy blending brush works for softening edges after.
Beauty Sponges
Damp sponges press cream product into skin rather than dragging it across the surface. The result is seamless, soft, and hard to over-apply.
BeautyBlender data confirms their sponge works particularly well with cream formulas, blending product with a bouncing motion that avoids streaks. The pointed tip is useful for smaller areas like the nose or temples.
One thing to keep in mind: sponges absorb product. You will use more cream contour per application compared to a brush, so start with less than you think you need.
Fingers
Fingers work in a pinch, especially for stick formulas. Body heat warms up the product and helps it melt into skin quickly. That sounds convenient, and it is, but fingers are hard to control on smaller areas and the finish tends to be less precise.
Use fingers for large areas like the forehead or sides of the face. Avoid using them for detailed work like nose contouring.
| Tool | Best For | Finish |
|---|---|---|
| Flat contour brush | Precise placement, nose, jawline | Defined |
| Fluffy blending brush | Softening edges after placement | Diffused |
| Damp beauty sponge | Blending into skin, dewy looks | Seamless, natural |
| Fingers | Quick application on large areas | Soft, warm-blended |
How to Pick the Right Shade

Wrong shade is the number one reason cream contour looks bad. Too warm and it reads as bronzer. Too dark and it reads as dirt. The goal is a shade that mimics actual shadow on your skin.
The shadow rule: Look at the natural hollow of your cheek in natural light. That grayish-brown color is exactly what your contour shade should approximate. It should never have orange or red tones.
By undertone
Cool undertones: Look for contour shades with slightly gray or taupe bases. Products like NARS Cream Bronzer in shades like Mont Blanc or Laguna (used as contour rather than bronze) work well.
Warm undertones: A slightly warmer taupe works, but it still needs to read as shadow, not as a sun-kissed flush. Avoid anything with red or golden shimmer.
Neutral undertones: You have the most flexibility. Both slightly cool and slightly warm taupes read well on neutral skin.
By skin depth
- Fair skin: Light taupe or soft grayish-brown. Even a small amount of product shows up strongly, so build slowly
- Medium skin: Medium brown with cool or neutral base
- Tan skin: Deeper cool brown, still no orange tones
- Deep skin: Rich espresso or deep cool brown. Fenty Beauty Match Stix has some of the best deep shade options on the market
A good test before buying: swatch the product on your inner wrist in natural light. If it looks gray and shadow-like, it is the right direction. If it looks warm or brown-orange, keep looking.
Where to Apply Cream Contour by Face Shape
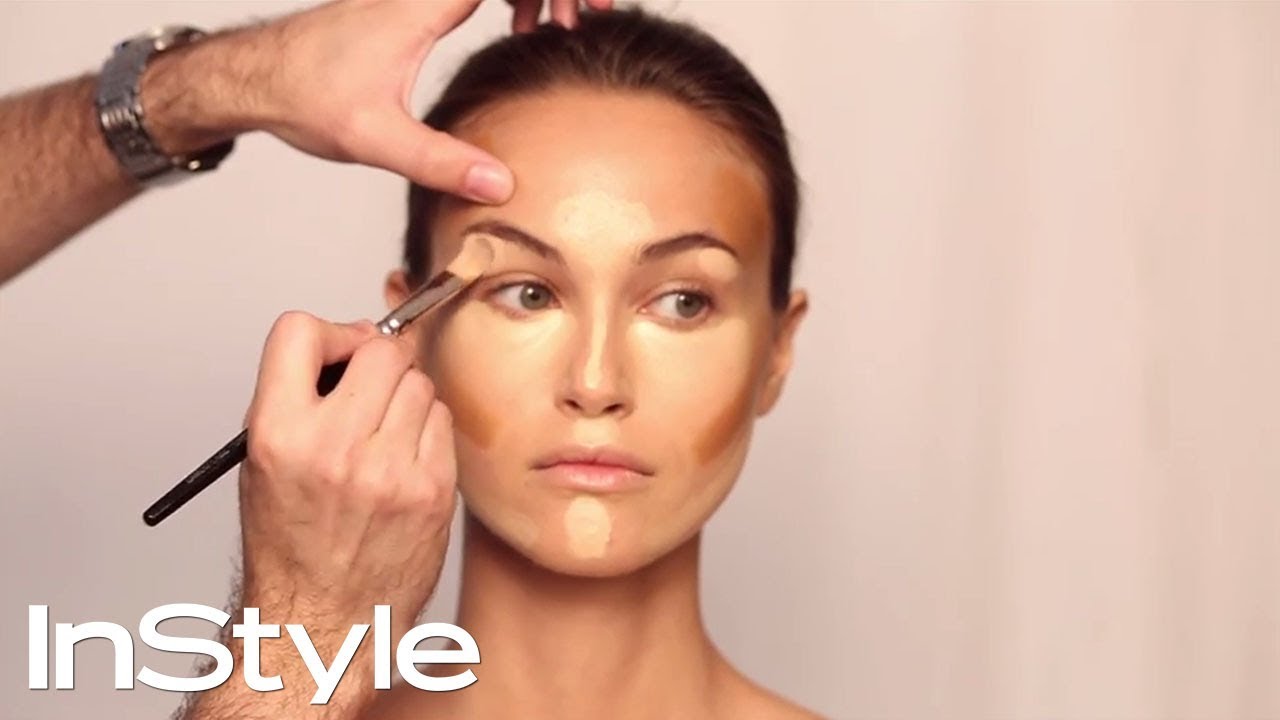
Placement is everything. The same contour shade in the wrong spot can make your face look wider, heavier, or asymmetrical. Each face shape has specific zones that respond well to contouring and areas that should be left alone.
Before applying anything, find your natural hollows in good lighting. The shadow zones are already there. You are just deepening them slightly.
Cheekbone Placement
This is where most contour lives, regardless of face shape.
The standard placement starts just below the cheekbone, running from the ear toward the corner of the mouth. Stop about two finger-widths from the corner of your mouth. Taking it too far forward makes the face look sunken rather than defined.
For round faces, apply the contour a touch higher and blend upward toward the temple. This creates lift rather than just depth, which slims the face more effectively than going straight across.
For square faces, the emphasis shifts. Soften the corners of the jaw rather than heavily sculpting the cheekbones. Harsh cheekbone contouring on a square face can make the face look angular in an unflattering way.
Jawline and Forehead Placement
Jawline contouring works best on oval and heart-shaped faces. Apply a thin stripe along the underside of the jawline and blend downward onto the neck. This separates the jaw from the neck and creates definition without needing a dramatic change in shade.
Forehead contouring is often skipped but makes a real difference on round or oblong faces. Apply contour along the hairline, blending upward into the hair and downward toward the temples. The goal is to visually reduce the forehead size rather than add hard lines.
| Face Shape | Primary Contour Zones | What to Avoid |
|---|---|---|
| Round | Sides of face, temples, hairline | Heavy product directly under cheekbones |
| Oval | Cheekbones, light jawline work | Over-contouring (oval needs minimal work) |
| Square | Jaw corners, temples, forehead sides | Harsh cheekbone lines |
| Heart | Forehead hairline, light jaw | Cheekbone contouring (already prominent) |
| Oblong | Hairline top, sides of forehead | Jawline contouring (lengthens face further) |
Nose Contour
Nose contouring with cream is tricky. The area is small, the skin is oily, and it is very easy to go too heavy.
Apply two thin lines of product along the sides of the nose bridge using a small flat brush or the pointed tip of a beauty sponge. Blend inward, not outward. The lines should be no wider than the natural shaded area already present on your nose.
Skip nose contouring for everyday makeup. It reads well in photos but tends to look obvious in person unless the blending is very precise. Most makeup artists reserve nose contour for events and professional shoots.
Step-by-Step Application Technique
Getting the technique right matters more than the product you use. A cheap cream contour blended well will always beat an expensive one applied carelessly.
Skin prep and base
Start with moisturizer and let it absorb fully before touching any makeup. Cream products blend into hydrated skin far better than into dry patches.
Apply primer if your skin needs it, then foundation. Cream contour goes directly over liquid or cream foundation while the base is still slightly tacky. That slight tackiness helps the contour product grip and blend rather than sliding around.
If you are working with a liquid or cream foundation base, you have a good window to apply and blend cream contour before everything sets.
Product placement

Less product than you think. A single light swipe from a contour stick is almost always enough for a starting point. You can add more, but you cannot easily take away.
Apply product directly to the face in the placement zones covered in the section above. Do not blend yet. Get all your placement down first, then blend everything at once. This avoids the problem of blending one area perfectly and then disturbing it when you place product nearby.
Blending
Blend with a damp sponge using bouncing motions, or with a brush using small circular strokes. Always blend upward and outward, never downward, which can drag the shadow into the wrong zones.
The goal is soft edges with no visible line where the contour begins or ends. If you can clearly see where the product starts, keep blending.
Check your work in natural light. Artificial lighting, especially warm bathroom lighting, hides a lot of mistakes. What looks blended under yellow light can still look very obvious in daylight.
Setting
After blending, set cream contour with a light dusting of translucent or light-tinted setting powder. Use a fluffy brush and press the powder gently into the contour zone rather than sweeping it across.
Sweeping powder across a cream product can drag and lighten the pigment, undoing your blending work. Pressing locks it in place without disrupting the finish.
If you want to add more definition after setting, this is the point where you can dust a powder contour lightly over the top. The cream underneath acts as a base and the powder on top adds depth and longevity.
Layering makeup products in the right order is what separates a contour that lasts all day from one that fades by noon.
Common Mistakes With Cream Contour

Most contour problems come down to a handful of fixable errors. Knowing what they are saves a lot of time spent trying to blend out a muddy mess.
Wrong shade and wrong formula
Using bronzer instead of contour is the single most common mistake makeup artists flag. Bronzer adds warmth. Contour creates shadow. Those are two completely different things and they look very different on skin.
Makeup artist Janet Debris, speaking to Bustle, put it clearly: a contour needs a cool undertone to mimic natural shadow, not a warm one that just adds color.
Two other shade errors to avoid:
- Going too dark, especially on fair skin where even a light taupe reads as heavy
- Choosing a shade that pulls orange or red, which makes the contour look dirty rather than sculpted
Applying too much product at once
Celebrity makeup artist Mary Phillips, known for her work with Hailey Bieber and Kendall Jenner, says the biggest mistake is loading on product immediately. Thin layers, built gradually, give the most natural skin-like result.
With cream formulas, a little goes very far. One pass with a contour stick is almost always enough to start. The product is buildable, so you can always add more after assessing the first layer.
Blending too late
Cream contour has a short working window. Once it starts to set into skin, blending becomes difficult and streaky. This is especially true in warm weather or on oily skin.
Blend immediately after placement. Do not apply product to every zone first and then go back to blend later. Work one area at a time if you are slower with blending.
Skipping the setting step
An unset cream contour will fade, crease, and migrate within a few hours. L’Oreal Paris makeup team confirms that translucent setting powder over cream products is the step that locks color in place and prevents midday slippage.
Skipping this step is also the main reason contour disappears on oily skin. No setting powder means the skin’s natural oils break down the cream formula quickly.
Placing contour too low on the face
Contour placed too far forward or too low on the cheek creates a hollow, sunken appearance rather than definition.
The two-finger rule: Place two fingers horizontally at the corner of your mouth. Your contour should stop where your fingers end. Anything lower or more central reads as shadow in the wrong place.
Best Cream Contour Products

The cream contour stick market is valued at $1.95 billion in 2024 and projected to reach $3.5 billion by 2035, according to Wiseguy Reports. There are a lot of options at every price point.
These are the products that consistently perform well across skin types, undertones, and skill levels.
High-end picks
Charlotte Tilbury Hollywood Contour Wand ($42) is an editors’ choice across multiple beauty publications. The cushion-tip applicator delivers precise product placement, and the formula has a radiance to it that avoids looking flat or painted on. Works especially well on dry and mature skin.
Makeup by Mario SoftSculpt Shaping Stick is the go-to recommendation for beginners from multiple professional makeup artists. Shade range covers fair through deep, the cool-toned formula reads as genuine shadow rather than bronzer, and it has a built-in angled brush on one end. Hard to over-apply.
NARS Cream Bronzer doubles effectively as a contour when used in the right shade. Cool-toned options like Mont Blanc work well for fair to medium skin.
Mid-range and drugstore picks
Fenty Beauty Match Stix Matte Contour Skinstick ($32) gets consistent praise for its shade range, especially on deeper skin tones. It dries down to a soft matte that holds without powder, though setting is still recommended. Multiple makeup artists specifically cite it for inclusive shade coverage.
| Product | Price | Best For | Finish |
|---|---|---|---|
| Charlotte Tilbury Contour Wand | $42 | Dry skin, mature skin | Radiant matte |
| Makeup by Mario SoftSculpt Stick | $30 | Beginners, all skin types | Soft matte |
| Fenty Match Stix Contour | $32 | Deep skin tones, oily skin | Matte |
| NYX Wonder Stick | $14 | Beginners, budget | Satin |
| Maybelline Master Sculpt Contour Stick | $10 | Everyday use, drugstore | Matte |
NYX Wonder Stick is worth mentioning specifically for beginners. Multiple makeup artists note the formula is forgiving, glides smoothly, and does not require heavy blending. For a $14 product, the quality-to-price ratio is genuinely good. You can also try the NYX contour palette if you prefer a multi-shade setup for mixing depth.
For oily skin specifically
Oil-control primer before foundation is the biggest variable for cream contour longevity on oily skin. The contour product matters less than the base underneath it.
Fenty Match Stix and Makeup by Mario SoftSculpt both hold reasonably well on oily skin due to their matte, powder-like dry-down. Both still need to be set with powder for full-day wear.
How to Make Cream Contour Last All Day

Cream contour is the most prone to fading of all face products. Getting longevity out of it requires a specific approach at every stage, not just a final spritz of setting spray.
The cream-then-powder method
This is the technique professional makeup artists use on set and for bridal work. Apply cream contour first, then dust a matching or slightly deeper powder contour over the top before setting the whole face.
Why it works: the cream layer grips the skin and provides pigment depth. The powder layer seals the cream and adds definition. The combination lasts significantly longer than cream alone.
Celebrity makeup artist Sir John, who works with Beyonce, recommends reinforcing every cream cheek product with a powder version of it for all-day events. The method applies directly to cream contour.
Setting powder application technique
How you apply setting powder matters as much as whether you use it.
- Press, do not sweep. Sweeping powder across cream contour drags and lightens the pigment
- Use a fluffy brush and tap off excess before touching skin
- Target the contour zone specifically rather than dusting the whole face uniformly
- Baking (leaving powder on for 5-10 minutes) works well for high-wear occasions like weddings or all-day events
Setting spray as the final lock
A setting spray after all powder work creates a barrier that prevents transfer, color shift, and creasing. Makeup.com recommends holding the bottle 8-10 inches from the face and misting in X and T patterns for even coverage.
Urban Decay All-Nighter is a consistently cited professional favorite. For oily skin, look for oil-control setting sprays rather than dewy or hydrating formulas, which can break down cream products faster.
Touch-ups and midday fixes
Carry a compact powder in the same depth as your contour for touch-ups. A small fluffy brush and the powder is enough to refresh faded areas without disturbing the base underneath.
Avoid rubbing or sweeping when touching up. Press the powder gently into areas where the contour has faded. Rubbing moves the base product and creates patchiness.
If your foundation tends to oxidize or shift throughout the day, addressing that problem first will also help your contour stay true. Stopping foundation from oxidizing keeps your entire base stable, which is what cream contour needs to sit correctly for hours.
For full-day events, pair cream contour with a long-wear primer, set with matching powder, use setting spray midway through makeup application (not just at the end), and touch up with powder only. That four-step approach is what keeps contour visible and natural-looking from morning to night.
If you want to understand how all these products layer together as part of a complete face routine, learning how to apply bronzer alongside your contour is the next practical step. Bronzer goes on after contour is set, on the high points of the face where sun would naturally hit.
FAQ on How To Use Cream Contour
Do you apply cream contour before or after foundation?
Apply it after foundation while the base is still slightly tacky. That grip helps the cream contour blend seamlessly. Some artists apply it under foundation for an ultra-natural finish, but over foundation is the standard approach for most routines.
What is the best tool for blending cream contour?
A damp beauty sponge gives the most seamless, skin-like result. A flat contour brush works better for precise placement on smaller areas like the nose and jawline. Many artists use both in combination.
How do you stop cream contour from looking muddy?
Use a shade with a cool or neutral undertone, never warm or orange. Blend immediately after placement before the product sets. Too much product in one pass is the most common cause of a muddy finish.
Can you use cream contour on oily skin?
Yes, but preparation matters. Start with an oil-control primer, apply cream contour in thin layers, and set immediately with translucent powder. Without setting powder, cream contour breaks down on oily skin within a few hours.
How do you pick the right cream contour shade?
Choose a shade that mimics a natural shadow on your skin. It should read as cool or neutral taupe, never warm brown or orange. Test it on your jawline in natural light. If it looks gray and shadow-like, it is correct.
Where exactly do you apply cream contour?
Focus on the hollows of the cheeks, temples, hairline, and along the jawline. For cheekbone definition, start near the ear and stop two finger-widths from the corner of the mouth. Placement shifts slightly depending on your face shape.
How do you make cream contour last all day?
Layer a matching powder contour over the cream, then set everything with translucent powder using pressing motions, not sweeping. Finish with setting spray. This cream-then-powder method is the standard technique for long-wear results.
Is cream contour better than powder contour?
For dry and normal skin, cream gives a more natural, skin-like finish. Powder suits oily skin better and lasts longer without setting. Many people layer both. Circana data confirms cream formats have been outpacing powder in prestige makeup sales.
Can beginners use cream contour?
Absolutely. Stick formulas are the easiest starting point because product placement is controlled and blending is faster. Makeup by Mario SoftSculpt and NYX Wonder Stick are both widely recommended for beginners due to their forgiving, buildable formulas.
How do you contour different face shapes with cream?
Placement varies by shape. Round faces need product along the sides and temples. Square faces benefit from softening the jaw corners. Heart-shaped faces focus on the hairline. Oval faces need minimal work. Always blend toward the hairline, never downward.
Conclusion
This conclusion is for an article presenting how to use cream contour as a practical skill, not an intimidating technique reserved for professionals.
Shade selection, placement, and blending technique are the three variables that determine whether your contour looks natural or obvious.
Get those right and the rest follows. Wrong undertone, too much product, or skipping setting powder will undo even the most careful application.
The tools matter too. A damp sponge, a flat contour brush, and translucent powder cover most situations across all face shapes and skin types.
Products like Fenty Beauty Match Stix and Makeup by Mario SoftSculpt make buildable coverage accessible at every skill level.
Practice in natural light. Start light. Build slowly. That is genuinely all it takes.

She started writing on the site after fielding the same questions from clients and friends often enough to just write the answers down: which red won't turn orange on a warm undertone, how to keep lipstick from feathering into fine lines, why a "12-hour" formula rarely survives dinner.
Every review on the site follows the same rule she uses with paying clients: wear it first, then decide if it's worth recommending.
- How to Make Eyeliner Last Longer Without Smudging - August 31, 2026
- How to Make Eyeshadow Last Longer All Day - August 29, 2026
- How to Find Your Undertone in 5 Easy Steps - August 27, 2026