

Summarize this article with:
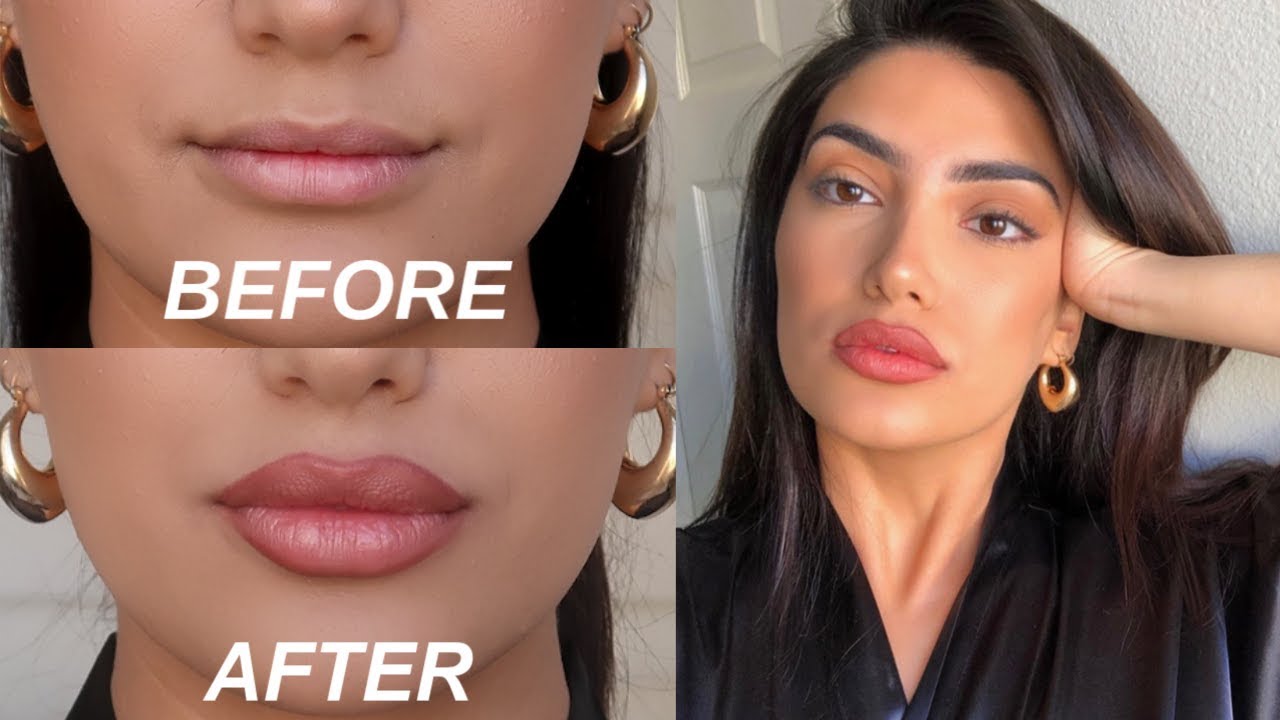
Your lipstick bleeds. Your lip shape looks uneven. The color fades before lunch.
Learning how to apply lip liner fixes all three problems in under five minutes.
This cosmetic pencil does more than outline your mouth. It creates a barrier against feathering, corrects asymmetry, and makes any lip color last hours longer.
Most people skip liner because they think it looks obvious. Wrong technique causes that harsh ring. The right method stays invisible.
This guide walks you through six steps: prepping your lips, outlining the Cupid’s bow, shaping both lips, connecting corners, filling for grip, and setting everything in place.
Grab your lip pencil. Let’s fix your lip game.
What Is Lip Liner and Why Use It?

Lip liner is a cosmetic pencil used to define and shape your lips before applying lipstick or gloss.
You need this product when creating precise lip edges, preventing lipstick from bleeding into fine lines, or making thin lips appear fuller.
This guide covers 6 steps requiring 3-5 minutes and basic makeup skills.
Works with wood pencils, retractable lip liners, and mechanical lip pencils.
What You Need Before Starting
Required Tools
- Lip liner pencil (wood, retractable, or twist-up style)
- Lip balm for hydration
- Mirror with natural lighting
- Tissue for blotting excess moisture
Optional But Helpful
- Lip primer for extended wear
- Concealer for cleaning up mistakes
- Small lip brush for blending edges
- Lip exfoliator for smoother application
Before You Begin
Match your liner shade to your lipstick or go one shade darker for definition. Choosing the right lip liner prevents that obvious ring around your mouth.
If using a wood pencil, sharpen your lip liner to a fine point for precision.
Step One: How Do You Prepare Your Lips for Liner?

Smooth, hydrated lips hold liner better and create cleaner lines.
Dry, flaky skin causes the pencil to skip and drag, ruining your outline.
Exfoliate Gently
Use a lip scrub or damp washcloth in small circular motions. Exfoliating your lips naturally removes dead skin without irritation.
Takes 30 seconds. Don’t overdo it.
Apply Lip Balm
Dab a thin layer across both lips. Wait 2-3 minutes for absorption.
Skip this if you have oily lips or plan to use a matte formula.
Blot Before Lining
Press a tissue against your lips to remove excess balm.
Liner won’t stick to greasy surfaces. You want hydrated, not slippery.
Following a proper lip care routine makes every application smoother.
Step Two: Where Do You Start Drawing Lip Liner?

The Cupid’s bow is your starting point. This V-shaped area on your upper lip creates symmetry for everything that follows.
Create the X Mark
Draw a small X at the center peak of your upper lip, right where the two curves meet.
This anchors your entire outline and prevents lopsided results.
Pencil Position Matters
Hold your lip pencil at a 45-degree angle. Light, short strokes work better than heavy pressure.
The vermilion border (your natural lip edge) guides placement.
Work Outward from Center
From the X, draw toward each corner of your upper lip.
Follow your natural lip shape or go slightly outside for a fuller appearance.
Stop at the corners. Don’t connect to the bottom lip yet.
Step Three: How Do You Outline the Bottom Lip?
Bottom lips are usually fuller than top lips, requiring a different approach.
Find Your Center Point
Place your pencil at the center of your lower lip, directly below the Cupid’s bow X.
This creates vertical alignment between both lips.
Draw Toward Each Corner
Work from center to the left corner, then center to the right corner.
Keep the line along your natural lip edge definition for a realistic finish.
Check Your Symmetry
Step back from the mirror. Both sides should mirror each other.
Fix uneven lines now before filling in. Small corrections are easier at this stage.
If you struggle with dry lips, the pencil may drag. Reapply balm and blot again.
Step Four: How Do You Connect the Lines at Lip Corners?
Lip corners are where most bleeding happens. Seal them properly and your color stays put all day.
Meet at the Edges
Bring your upper and lower lines together at each corner. The connection point should form a clean angle, not a rounded blob.
Reduce Pressure Here
Lighten your hand as you approach each corner. Heavy lines at edges look unnatural and create buildup.
Check for Gaps
Run your finger along the outer edge. Any gaps between liner and skin invite feathering later.
Close them now with light, short strokes.
Step Five: How Do You Fill In Lips with Liner?
Filling creates a base layer that helps lipstick grip and last longer. Skip this step if you want a lighter look.
Use Light Feathering Strokes
Work from the outer edges toward the center using diagonal strokes.
Cover the entire lip surface with an even layer of color.
Control Your Intensity
One layer gives sheer coverage; two layers create a matte lip finish that can stand alone.
Build slowly. Removing excess is harder than adding more.
Why Filling Matters
Lipstick adheres better to liner than bare lips. Your color lasts 2-3 hours longer with this technique.
Learning how to make lip liner last saves constant reapplication.
Step Six: How Do You Set and Finish Your Lip Liner?
Setting prevents smudging and transfers. Your lined lips need protection before adding lipstick.
Blend the Edges
Use your fingertip or a lip brush to soften harsh lines along the inner lip area.
The outline should stay crisp; the interior gets blended.
Add Your Lip Color
Apply your lipstick starting from the center, pressing outward toward your lined edges.
Different lipstick types require different techniques. Mattes need precision; creamy formulas are more forgiving.
Final Setting
Blot with tissue, then apply a second thin layer of color.
For transfer-proof results, dust translucent powder over a tissue held against your lips.
How to Check Your Lip Liner Application
Symmetry Test
Look straight into the mirror. Both sides of your Cupid’s bow should peak at the same height.
Check that corners sit at equal positions.
Edge Sharpness
Your vermilion border outline should be clean, not fuzzy or feathered.
Use concealer on a small brush to sharpen any wobbly areas.
Movement Test
Smile, pucker, and open your mouth wide. The liner should move naturally without cracking or bunching.
If it cracks, your lips needed more prep moisture.
Common Problems and Fixes
Uneven Lines on One Side
Problem: One half looks different from the other.
Fix: Use concealer to erase the uneven side completely. Redraw while looking straight ahead, not at an angle.
Liner Looks Too Dark or Harsh
Problem: Obvious ring around your mouth.
Fix: Blend inward with a lip brush or clean fingertip. Layer lip gloss on top to soften the look.
Product Not Showing on Lips
Problem: Liner disappears or skips across skin.
Fix: Blot away excess balm; sharpen pencil to fresh point. Creamy formulas like cream lipstick pencils work better on dry lips.
Color Bleeding Into Fine Lines
Problem: Lipstick feathers outside your outline.
Fix: Apply clear lip liner around the outer edge as a barrier. Stopping lipstick from feathering requires sealing the perimeter.
Related Techniques
Overlined Lips for Fuller Appearance
Draw slightly outside your natural lip line (1-2mm maximum). Focus on the center of both lips, not corners.
Best for thin lips that need extra dimension.
Ombre Lip Look
Use a darker liner on edges, lighter color in the center. Blend where they meet for a gradient effect.
Learn how to create ombre lips for a dimensional finish.
Nude Liner as Universal Base
A nude lip liner works under any lipstick shade. Fill entire lips to neutralize natural color before applying bold shades.
Reverse Lining with Concealer
Apply concealer around your lips after lining, not before. Creates ultra-sharp edges and prevents any bleeding.
Works especially well before applying red lipstick or other bold colors.
FAQ on How To Apply Lip Liner
Should I Apply Lip Liner Before or After Lipstick?
Always apply lip liner before lipstick. The liner creates a defined border and base layer that helps your lip color adhere better and last longer throughout the day.
Do You Put Lip Liner All Over Your Lips?
Yes, filling your entire lips with liner creates a long-wearing base. This technique prevents lipstick from fading unevenly and adds 2-3 hours of extra wear time to any formula.
Should Lip Liner Be Lighter or Darker Than Lipstick?
Match your liner to your lipstick shade or go one shade darker for subtle definition. Avoid going more than two shades darker, which creates an obvious outline around your mouth.
How Do I Stop My Lip Liner From Looking Obvious?
Blend the inner edges with a lip brush or fingertip after outlining. Keep the outer border crisp while softening interior lines. Blending your lip products properly eliminates harsh rings.
Can I Wear Lip Liner Without Lipstick?
Absolutely. Fill your lips completely with liner for a matte lip finish that lasts all day. Top with clear gloss for shine, or wear alone for a natural stained look.
What Is the Best Lip Liner for Beginners?
Retractable lip pencils work best for beginners since they stay sharp without manual sharpening. Creamy formulas glide easier than firm wax-based pencils and forgive small mistakes during application.
How Do I Make My Lips Look Bigger with Liner?
Draw slightly outside your natural vermilion border, about 1-2mm. Focus overlining on the center of both lips, not corners. This technique works especially well for creating fuller lips appearance.
Why Does My Lip Liner Keep Smudging?
Excess lip balm or oily skin causes smudging. Blot lips before lining and set with translucent powder afterward. Long lasting lip liner formulas contain more wax and resist moisture better.
Should I Use Clear Lip Liner or Colored?
Clear liner works as a universal barrier against feathering with any lip color. Colored liner adds definition and extends wear. Use both together for maximum lipstick longevity on special occasions.
How Often Should I Sharpen My Lip Liner?
Sharpen before each use for precise lines. A dull point creates thick, uneven edges that look messy. Keep your pencil in the refrigerator for 10 minutes before sharpening to prevent breakage.
Conclusion
Knowing how to apply lip liner transforms your entire lip makeup routine. Six steps, five minutes, and your color stays exactly where you put it.
Start at the Cupid’s bow. Work toward each corner. Fill for grip. Blend the edges.
The technique matters more than the product. A drugstore pencil applied correctly outperforms expensive formulas used carelessly.
Practice on bare lips first. Get comfortable with pressure and angles before adding lipstick on top.
Your precise lip application skills will improve with each use. Symmetry gets easier. Lines get cleaner. The whole process speeds up.
Once you master liner, explore applying matte lipstick or liquid lipstick formulas for longer wear.
Your lip game just leveled up.

- What Is Skin Tint and Why Everyone Is Obsessed - July 11, 2026
- What Is Foundation and How Do You Choose One? - July 6, 2026
- How to Make Blush Last Longer - July 3, 2026


