

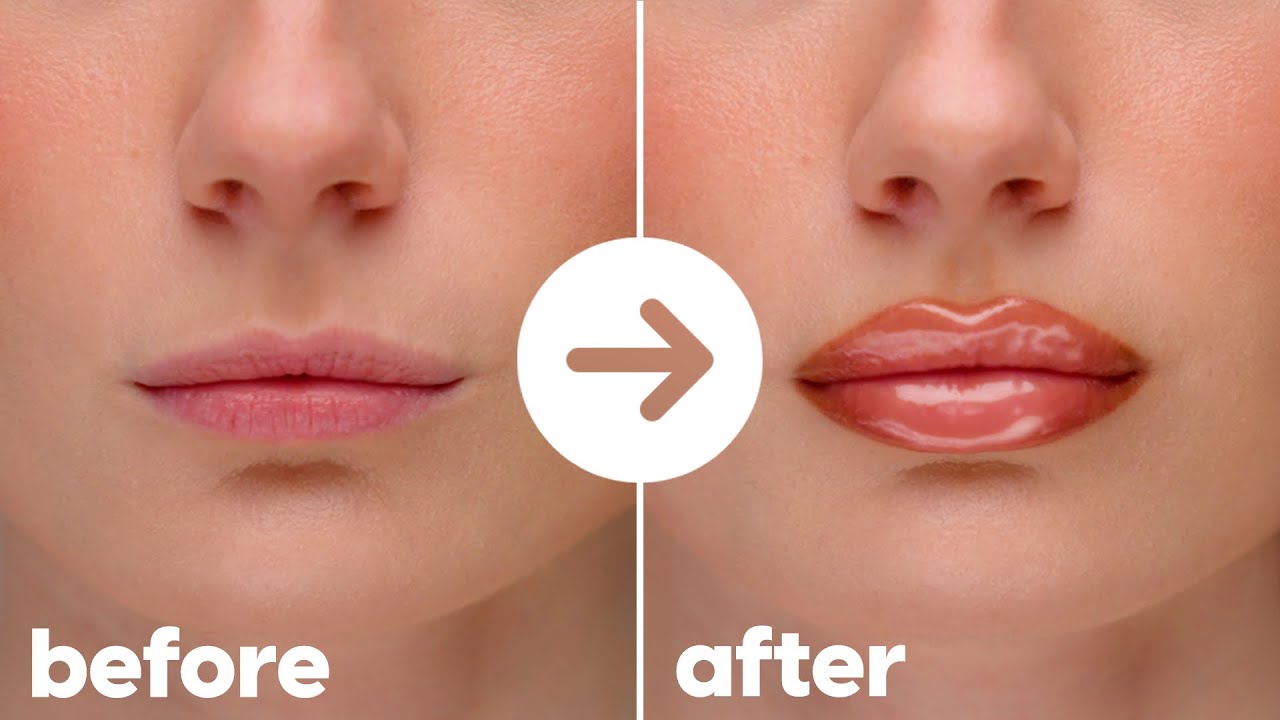
Thin lips and bold lipstick can absolutely work together. You just need the right technique.
Learning how to apply lipstick on thin lips transforms your entire lip makeup game. Strategic liner placement, smart color layering, and proper blending create the illusion of fuller, more defined lips without fillers or expensive treatments.
This guide walks you through six steps: prepping your lips, overlining with precision, building color from the center, blending toward edges, adding highlight for dimension, and setting everything for long wear.
Total time needed is 5-7 minutes. Skill level is beginner-friendly.
Grab your lip liner and lipstick. Let’s get started.
How to Apply Lipstick on Thin Lips

Learning how to apply lipstick on thin lips creates the appearance of fuller, more defined lips using strategic placement and layering techniques.
This technique works when you want to add dimension without fillers or invasive procedures.
The process takes 5-7 minutes and requires basic makeup skills. You’ll work through 6 steps covering prep, lining, application, and finishing.
What You Need Before Starting
Tools and Products
- Lip liner in a shade matching your lipstick or one shade darker
- Lipstick (creamy or satin formulas work best for thin lips)
- Lip primer or concealer
- Lip brush for precise application
- Mirror with good lighting
- Tissue for blotting
Time and Skill Level
Time estimate: 5-7 minutes from start to finish.
Skill level is beginner-friendly. If you can draw a basic line, you can do this.
Step 1: How Do You Prepare Your Lips Before Applying Lipstick?
Smooth, hydrated lips hold color better and create a more even canvas for overlining techniques.
Dry, flaky skin makes thin lips look even smaller and causes lipstick to settle into cracks.
Exfoliate First
Gently scrub lips with a damp washcloth or sugar scrub using small circular motions for 30 seconds.
If your lips tend toward dryness, exfoliating lips naturally the night before gives better results.
Apply Lip Balm
Use a thin layer of lip balm and wait 2-3 minutes for absorption.
Wipe off any excess before moving forward. Too much moisture prevents liner from gripping.
Prime the Lip Area
Dab concealer or lip primer over your entire lip and slightly beyond the natural lip line.
This creates a neutral base and helps the overlined edge blend into surrounding skin. Pat gently with your fingertip to set.
Step 2: Where Do You Apply Lip Liner to Create Fuller-Looking Lips?
The liner placement determines how much fuller your lips appear. Going too far looks obvious; staying too close defeats the purpose.
Start at the Cupid’s Bow
Begin at the peaks of your upper lip. Draw just outside your natural vermillion border by about 1-2mm.
Connect the peaks with a soft curved line, following your natural shape but slightly exaggerated.
Outline the Bottom Lip
Start at the center of your bottom lip and work outward toward each corner.
Keep the same 1-2mm distance from your natural edge. The bottom lip handles slightly more overlining than the top without looking fake.
Connect the Corners
Bring both lines together at the lip corners. Don’t extend past where your lips naturally meet.
For a complete guide on technique, see our tutorial on applying lip liner step by step.
Fill in Lightly
Use your liner to lightly fill the entire lip. This gives lipstick something to grip and extends wear time.
Focus especially on the overlined portions. The right lip liner shade makes blending much easier.
Step 3: How Do You Apply Lipstick to the Center of Thin Lips?

Center-first application builds dimension. Starting at the edges flattens the look and wastes product.
Choose Your Application Method
Direct tube application works for everyday looks.
A lip brush gives more control for precise placement within your new lip shape. For thin lips, the brush method usually works better.
Apply to the Center
Press lipstick onto the center of your bottom lip first. Use a patting motion rather than swiping.
Repeat on the upper lip, focusing on the area just below the cupid’s bow peaks.
Build the Coverage
Add a second layer to the center only. This creates natural dimension where light hits the fullest part of lips.
The center should have more color density than the edges. Cream lipstick formulas build well without caking.
Step 4: How Do You Blend Lipstick Toward the Lip Edges?
Gradient blending creates depth and makes overlined edges disappear into your natural lip shape.
Use Light Pressure
Work color from center toward corners using a lip brush or your fingertip. Less product at the edges; more at the center.
The goal is a subtle fade, not a hard line. Master the technique of blending lipstick for a professional finish.
Blend the Overlined Areas
Pay extra attention where liner extends past your natural lip. Use tiny circular motions to soften visible edges.
The lip color should transition smoothly into the primed skin around your mouth.
Clean Up the Corners
Lip corners collect excess product. Dab gently with a clean fingertip or cotton swab dipped in concealer.
Sharp, clean corners make thin lips look intentional rather than messy.
Step 5: How Do You Add Highlight to Make Lips Appear Fuller?

Light reflection tricks the eye into seeing more volume. Strategic highlight placement adds the finishing touch to your fuller lip appearance.
Choose Your Highlight Product
Options include:
- Clear or shimmery lip gloss for high shine
- Cream highlighter for subtle glow
- Light-reflecting concealer for matte looks
Apply to the Center
Dab a tiny amount onto the center of your bottom lip. Add a touch to the cupid’s bow peaks on the upper lip.
Avoid the edges entirely. Highlight there emphasizes the overlined border instead of hiding it.
Blend Gently
Tap with your ring finger to diffuse. The shine should look natural, not like a stripe across your mouth.
For extra dimension, learn the technique of applying lip gloss over your base color.
Step 6: How Do You Set Lipstick for Longer Wear on Thin Lips?
Setting prevents feathering and migration. Both problems are more visible on overlined lips, so this step matters.
Blot First
Press a single-ply tissue against your lips. Don’t rub. This removes excess oils without disturbing color placement.
Apply Powder (Optional)
Hold a tissue over your lips and dust translucent powder through it. The tissue acts as a filter for lighter coverage.
For detailed instructions, see our guide on setting lipstick with powder.
Add a Second Layer
Apply one more thin coat of lipstick over the powder. This locks everything in place and restores color intensity.
The powder-lipstick sandwich method helps with making lipstick last longer throughout the day.
How to Verify the Application Looks Correct
Check your work before leaving the mirror. Small adjustments now prevent bigger fixes later.
What to Look For
- Lip liner visibility: Should be invisible after blending
- Symmetry: Check from straight on and both profile angles
- Overline naturalness: Step back 3 feet from the mirror; edges should disappear
- Color density: Even coverage across both lips with slightly more intensity at center
Lighting Check
Natural daylight reveals the truth. Bathroom lighting can hide unblended edges that show up outdoors.
Take a photo with flash if possible. Camera flash exposes harsh lines your eyes might miss.
Common Problems and Fixes
Lip Liner Still Visible
Problem: You can see a distinct ring where liner meets lipstick.
Fix: Apply more lipstick to the visible line using a brush. Blend outward with small strokes until the edge disappears.
Lipstick Bleeds Outside the Lines
Problem: Color migrates past the overlined border, creating fuzzy edges.
Fix: Use a cotton swab with micellar water to clean up. Apply concealer around the lip line as a barrier. Learn more about stopping lipstick from feathering.
Color Fades Unevenly
Problem: Center fades faster than edges, reversing the fullness effect.
Fix: Touch up center only using the original lipstick. Avoid reapplying to edges, which maintains the gradient.
Overlining Looks Obvious
Problem: The overdrawn line is clearly visible, especially in photos.
Fix: You went too far. Remove everything and start over with a maximum 1mm overline. Less is more with thin lips.
Related Techniques
Once you’ve mastered basic application, explore these connected skills:
- Lipstick ideas for thin lips covers shade selection and formula recommendations
- Ombre lips add extra dimension using two-tone color placement
- Lip care routine keeps lips smooth between applications
- Making lip liner last extends the base of your fuller lip look
FAQ on How To Apply Lipstick On Thin Lips
What lipstick finish works best for thin lips?
Satin and cream finishes work best for thin lips. They reflect light and add dimension without emphasizing fine lines. Matte formulas can flatten the appearance, though applying matte lipstick correctly with highlight at the center helps counteract this effect.
How far should I overline thin lips?
Stay within 1-2mm of your natural lip line. Going further looks obvious, especially in photos. The overlining technique works best when subtle. Focus on the cupid’s bow and center of the bottom lip for maximum fullness effect.
Should I use lip liner before lipstick on thin lips?
Yes, always. Lip liner creates the foundation for your fuller lip shape and prevents color from bleeding. Fill in your entire lip with liner before applying lipstick. This extends wear time and gives lipstick something to grip.
What lipstick colors make thin lips look fuller?
Nude shades close to your natural lip color create soft fullness. Light pinks and mauves work well too. Wearing dark lipstick can minimize thin lips, so save deep shades for when you want a bolder, more defined look.
Why does my lipstick make my thin lips look smaller?
Dark or matte formulas without proper technique shrink lip appearance. Skipping the center highlight removes dimension. Not overlining keeps your natural small shape. Fix this by adding gloss to the center and using a lip liner slightly outside your natural border.
Can I wear bold colors on thin lips?
Absolutely. Bold colors work with the right technique. Applying red lipstick on thin lips requires careful overlining and center highlighting. The key is creating dimension first, then adding your statement color on top of that foundation.
How do I stop lipstick from feathering on thin lips?
Use lip primer around your mouth as a barrier. Line lips completely before applying color. Set with translucent powder using the tissue method. Long lasting lip liner formulas also help prevent bleeding throughout the day.
Should I use lip gloss or lipstick for thin lips?
Both work, but layering them together gives the best results. Apply lipstick as your base color, then add lip gloss to the center only. This combination creates dimension that neither product achieves alone on thin lips.
How do I make my thin lip makeup last all day?
Layer properly: liner, lipstick, blot, powder, lipstick again. This sandwich method locks color in place. Avoid touching or licking your lips. Carry your liner for touch-ups since the overlined shape fades first on thin lips.
What mistakes should I avoid when applying lipstick on thin lips?
Skip these common errors: overlining too far past your natural lip, using only dark matte shades, forgetting the center highlight, applying heavy gloss everywhere instead of just the center, and skipping lip prep before application.
Conclusion
Mastering how to apply lipstick on thin lips comes down to six simple steps. Prep, line, apply to center, blend outward, highlight, and set.
The technique creates a natural lip fullness illusion without injections or expensive treatments. Strategic placement does the heavy lifting.
Your vermillion border becomes a suggestion, not a boundary. The cupid’s bow gets definition. Light catches the center and adds dimension where it matters most.
Practice the overlining technique until it feels automatic. Start subtle at 1mm and adjust from there.
Small lips hold bold colors beautifully when you build the right foundation first. Now you have the method. Go make it yours.

She started writing on the site after fielding the same questions from clients and friends often enough to just write the answers down: which red won't turn orange on a warm undertone, how to keep lipstick from feathering into fine lines, why a "12-hour" formula rarely survives dinner.
Every review on the site follows the same rule she uses with paying clients: wear it first, then decide if it's worth recommending.
- How to Choose Setting Powder for Your Skin Type - August 1, 2026
- How Long Does Eyeliner Last Before It Expires? - July 28, 2026
- What Is Contour and How Do You Apply It? - July 25, 2026


