

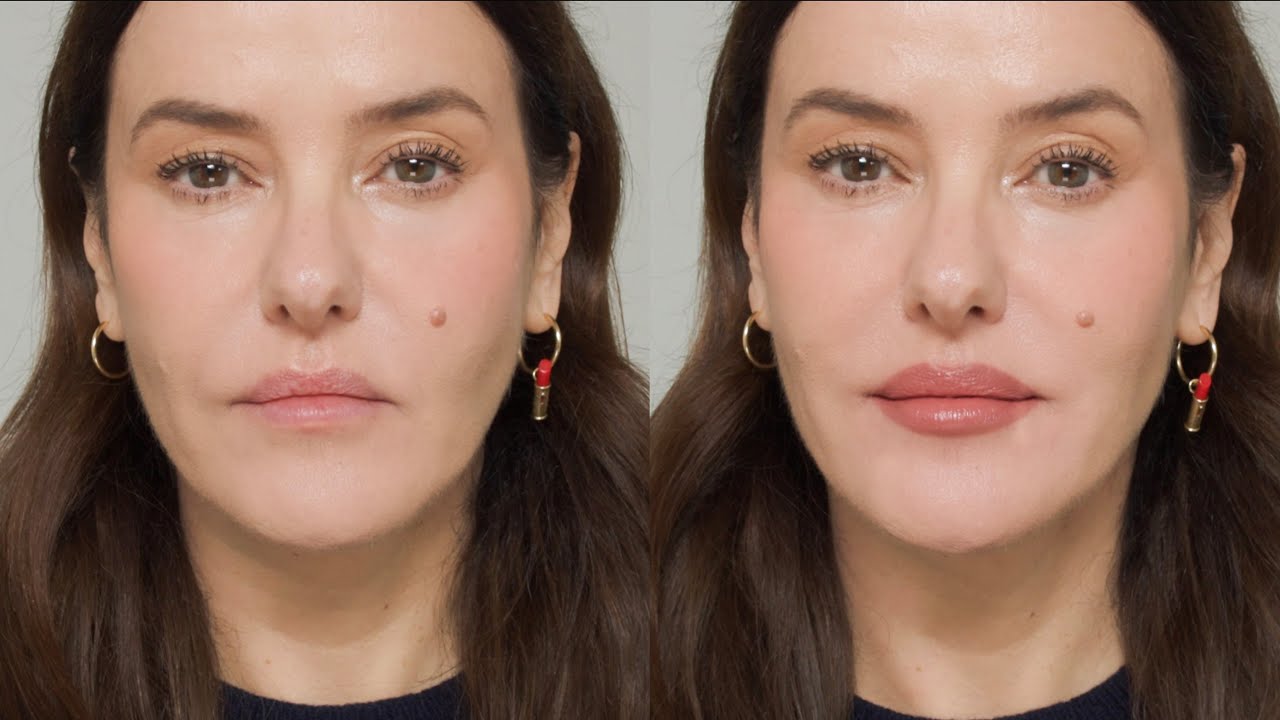
Your lipstick fades halfway through lunch. Sound familiar?
Learning how to set lipstick with powder changes everything. This technique locks in color, absorbs excess oils, and creates a smudge-proof finish that lasts through coffee, meals, and long events.
Makeup artists have used this method for decades on photo shoots and film sets. Now you can do it at home in under 10 minutes.
This guide covers lip preparation, the tissue powder technique, layering methods, and troubleshooting common problems.
By the end, your long-lasting lipstick routine will handle anything from work meetings to dinner dates without a single touch-up.
Introduction
Setting lipstick with powder is a technique that creates long-lasting, smudge-proof lip color by applying translucent powder over your lipstick to absorb excess oils and lock pigment in place.
Users need this when they want their lip color to last through meals, drinks, long work days, or special events without constant touch-ups.
This guide covers 6 steps requiring 5 to 10 minutes and basic familiarity with lipstick application.
Prerequisites
Gather these items before starting:
- Translucent loose powder or finely milled setting powder
- Lip liner matching your lipstick shade
- Lipstick (matte or cream formula works best)
- Fluffy powder brush or kabuki brush
- Single-ply facial tissue
- Lip scrub or sugar exfoliator
- Lip balm or primer
- Small mirror with good lighting
Time estimate: 5 to 10 minutes total.
Skill level: Beginner friendly.
Step 1: How Do You Prepare Your Lips Before Applying Lipstick?
Smooth, hydrated lips accept color better and prevent flaking throughout the day. Start by exfoliating your lips naturally with a lip scrub, then apply a thin layer of lip balm and wait 2 minutes before blotting away the excess with a tissue.
Exfoliation Method
Apply lip scrub in circular motions for 30 seconds. Rinse with lukewarm water and pat dry.
This removes dead skin cells that cause lipstick to apply unevenly.
Hydration Step
Pat a thin layer of lip balm across your entire lip surface. Wait 2 minutes for absorption.
Blot with a tissue to create a slightly tacky base, not a slippery one.
Why This Matters
Proper lip care routine before color application prevents flaking and extends wear time. Skipping prep leads to patchy, cracked color within hours.
Step 2: How Do You Apply Lip Liner as a Base?
Lip liner creates a color foundation that grips lipstick and prevents bleeding into fine lines around your mouth. Outline your lips starting at the cupid’s bow, draw outward to corners, then fill in the entire lip surface with liner using short strokes.
Outline Technique
Start at the center peak of your upper lip. Draw outward toward each corner in one smooth motion.
Repeat on the lower lip, starting at center and moving outward.
Fill-In Method
Color your entire lip surface with lip liner using short, feathery strokes. This creates a base layer that holds lipstick in place.
Ensure no harsh lines remain at the lip edges.
Why Liner First
Liner is drier than lipstick and adheres directly to lips. Even if your creamy lipstick wears off, the liner base keeps color visible. Learn more about applying lip liner for detailed techniques.
Step 3: How Do You Apply the First Layer of Lipstick?
Thin layers build better than thick application for long-lasting lipstick. Use a lip brush for precision or apply directly from the tube, covering lips with a thin, even coat starting at the center, then press a single tissue against lips to remove excess product.
Application Tool Options
Lip brush: Maximum precision and control over color placement.
Direct from tube: Faster application, works well for everyday looks.
Coverage Amount
Apply one thin, even coat. Start at the center of lips and blend outward.
Resist the urge to pack on heavy color. Less is more at this stage.
First Blot
Press a single tissue against closed lips once. This removes excess oils and product without stripping color.
Matte lipstick formulas work best with this technique since they already have less slip.
Step 4: How Do You Set Lipstick with Powder Using a Tissue?

The tissue barrier technique filters translucent powder onto your lips for subtle setting without altering color intensity. Separate a 2-ply tissue into a single layer, hold it flat against closed lips, then dust powder over the tissue using light tapping motions with a fluffy brush.
Tissue Preparation
Pull apart a standard facial tissue to get one thin ply. The single layer acts as a filter between powder and lip color.
Positioning
Hold the single-ply tissue flat against your closed lips. Keep it taut but not stretched.
Powder Application
Dip your fluffy brush into loose setting powder. Tap off excess on the back of your hand.
Gently dust powder over the tissue in light tapping motions. Cover the entire lip area.
Removal
Lift the tissue straight up without dragging. Dragging smears the color underneath.
This method works best for cream lipstick and satin lipstick formulas.
Alternative Method: How Do You Apply Powder Directly to Lips?

Direct powder application creates a stronger matte finish but may slightly dull the color. Skip the tissue when you want maximum staying power and a completely shine-free look.
Brush Loading
Tap brush into translucent powder. Knock off excess by pressing bristles against the back of your hand.
Application Pressure
Lightly press powder onto lips using a patting motion. Never drag or swipe across the lip surface.
Coverage Focus
Concentrate on the center of lips where transfer happens most. The outer edges need less powder.
Direct application suits those who prefer a velvet, completely matte lip texture. Learn more about applying translucent powder for face and lips.
Step 5: How Do You Apply the Second Layer of Lipstick?
Layering after powder creates deeper color that bonds with the set base for all-day wear. Apply a second thin coat of lipstick over the powdered layer, concentrating on the center of lips for dimension while checking edges for buildup.
Application Method
Apply another thin coat over the set layer. Use the same technique as your first application.
Focus Areas
Concentrate color on the center of lips for natural dimension. Blend outward with lighter pressure.
Edge Check
Ensure no product buildup at lip lines or corners. Clean edges with a small brush if needed.
This layering technique is key to making lipstick last longer through meals and events.
Step 6: How Do You Complete the Final Setting?
The final setting step maximizes wear time for events lasting several hours. Optional: add one more light powder dusting, clean up edges with concealer, and do a final tissue press to confirm zero transfer.
Optional Powder Touch
Light dusting over the second lipstick layer. Even less powder than the first application.
Edge Cleanup
Use a small brush with concealer around the lip line. This sharpens edges and prevents feathering.
Follow with powder over the concealer to set it. Your lip color is now locked in place.
Final Blot
Single tissue press to ensure no transfer. If color comes off heavily, repeat the powder step.
For additional protection, this technique helps with making lipstick transfer proof.
Verification
Test your work before leaving the mirror:
- Press tissue against lips firmly for 3 seconds
- Check tissue for significant color transfer
- Minimal to no transfer indicates successful setting
- Rub lips together once and check mirror for even coverage
- Test transfer on back of hand
If heavy color transfers, add another powder layer and retest.
Troubleshooting
Powder Changes Lipstick Color to Chalky or Ashy Appearance
Solution: Use less powder on brush, tap off excess before application, switch to a finer milled translucent formula.
Lipstick Still Transfers After Setting
Solution: Allow each layer to dry 1 minute before the next step; use a matte formula instead of cream.
Lips Feel Dry or Tight After Powder Application
Solution: Apply thinner powder layers, use hydrating lip primer before liner, choose powder without silica. Check out tips for keeping lips moisturized with matte lipstick.
Color Looks Patchy or Uneven
Solution: Fill entire lip surface with liner before lipstick, apply color in thin even strokes, avoid over-blotting between layers.
Recommended Products by Powder Type
Translucent Loose Powder
Best for: All lipstick shades without altering color.
Finish: Natural to matte depending on application amount.
Finely Milled Setting Powder
Best for: Cream and satin formulas that need oil absorption.
Finish: Soft matte with minimal texture. Learn more about applying setting powder techniques.
Pressed Powder Compact
Best for: Touch-ups throughout the day when you’re away from home.
Finish: Buildable coverage for reapplication on the go.
Related Techniques
Explore more lip color methods:
- Choosing lip liner for your lipstick shade
- How to stop lipstick from feathering into fine lines
- Picking lipstick color for your skin tone
- Applying lipstick on dry lips without flaking
- Removing liquid lipstick at the end of the day
FAQ on How To Set Lipstick With Powder
What Type of Powder Works Best for Setting Lipstick?
Translucent loose powder works best because it absorbs oils without changing your lip color. Finely milled formulas create a smoother finish.
Avoid tinted powders unless you want to alter the shade. Pressed powder works for touch-ups but loose powder sets more effectively.
Does Setting Lipstick with Powder Change the Color?
Using the tissue technique prevents color change. Direct application may slightly dull or mattify the shade.
The tissue filters powder so only a small amount reaches your lips. This locks color without affecting intensity or undertone.
Can I Use This Technique with Any Lipstick Formula?
This method works best with matte and cream formulas. Satin finishes also respond well.
Glossy lipstick and lip gloss don’t hold powder effectively since their slippery texture prevents adhesion.
How Long Does Lipstick Last When Set with Powder?
Properly set lipstick lasts 6 to 8 hours without significant fading. Heavy meals may require minor touch-ups.
The layering technique with powder between coats extends wear time compared to single application without setting.
Why Use a Tissue When Applying Powder to Lips?
The tissue acts as a filter. It allows just enough powder through to set the color without creating a chalky or cakey appearance.
Direct application deposits more powder, which can look heavy and feel dry on lips.
Will Powder Make My Lips Feel Dry?
Light powder application shouldn’t cause dryness. Using too much powder or skipping lip prep creates that tight, uncomfortable feeling.
Always hydrate lips before application. Follow a proper lip care for dry lips routine if dryness persists.
Does This Technique Work with Liquid Lipstick?
Liquid lipstick already dries matte and transfer-proof. Powder setting is unnecessary for most liquid formulas.
If your liquid lipstick transfers slightly, a light powder dusting helps. But most liquid lipstick users skip this step entirely.
How Much Powder Should I Use?
Less is more. Tap your brush into powder, then knock off excess on your hand before applying.
You need barely visible powder on the brush. Heavy application causes color change and uncomfortable texture on lips.
Can I Set Lip Stain with Powder?
Lip stain absorbs into lips and doesn’t sit on the surface like traditional lipstick. Powder setting isn’t effective for stains.
Stains already offer long-lasting color. Adding powder may create patchiness without improving wear time.
Can I Reapply Lipstick Over the Powder Layer?
Yes. The powder creates a base that accepts additional color. Many makeup artists apply lipstick, powder, then lipstick again for maximum staying power.
This layering method builds intensity while locking each layer in place for all-day wear.
Conclusion
Mastering how to set lipstick with powder transforms your lip color from temporary to transfer-proof. The technique takes minutes but delivers all-day results.
Start with proper lip preparation. Build thin layers with a good lip liner base. Use the tissue method for subtle setting or apply powder directly for a full matte finish.
Your translucent powder and fluffy brush become essential tools in your makeup routine.
The layering technique works for work meetings, dinner dates, and special events. No more constant mirror checks or touch-up routines every hour.
Try this lipstick setting trick once. You won’t go back to watching your lip color fade before noon.

She started writing on the site after fielding the same questions from clients and friends often enough to just write the answers down: which red won't turn orange on a warm undertone, how to keep lipstick from feathering into fine lines, why a "12-hour" formula rarely survives dinner.
Every review on the site follows the same rule she uses with paying clients: wear it first, then decide if it's worth recommending.
- How to Choose Setting Powder for Your Skin Type - August 1, 2026
- How Long Does Eyeliner Last Before It Expires? - July 28, 2026
- What Is Contour and How Do You Apply It? - July 25, 2026


