

Summarize this article with:
Most eye makeup tutorials were not made for you.
If you have hooded eyes, you already know the frustration. Carefully blended shadow. A liner wing that looked perfect with eyes closed. Then you look straight ahead and half of it has disappeared behind the fold.
Learning how to do makeup for hooded eyes is less about buying different products and more about understanding shadow placement, lid space, and which techniques actually work with this eye shape.
This guide covers everything: identifying your hooded lids, adapting eyeshadow and eyeliner placement, choosing the right mascara, shaping brows that lift the eye, and building looks from a quick everyday routine to a full cut crease.
What Are Hooded Eyes

Hooded eyes occur when a fold of skin from the brow bone droops down and partially or fully covers the mobile eyelid. The crease is still there, technically, but it disappears under that extra skin when your eyes are open.
According to Welia Health, hooded eyes appear in roughly 11.5% of the population. They show up across all ethnicities and age groups, though they become more common with age as collagen and elastin break down.
How to Check If You Have Hooded Eyes
Stand in front of a mirror. Look straight ahead, not up or down.
If your eyelid crease disappears behind a fold of skin when your eyes are open, you have hooded eyes. If the crease stays visible, you don’t.
That’s the whole test. A lot of people overthink it.
Hooded Eyes vs. Similar Eye Shapes
| Eye Shape | Key Feature | Crease Visible? |
|---|---|---|
| Hooded | Skin fold covers part of the lid | No (hidden when eyes open) |
| Monolid | No crease at all | No crease exists |
| Deep-set | Eyes set further back in socket | Yes, but shadowed |
| Downturned | Outer corners drop downward | Yes |
Hooded and monolid are the ones people most often confuse. The difference matters because the techniques for each are quite different.
Why Hooded Eyes Develop
Genetics is the most common cause. If a parent has hooded lids, chances are good you will too.
Aging is the other major factor. Skin loses collagen over time, the brow drops slightly, and the excess skin begins to fold over the lid. This is why hooded eyes are much more common in people over 40, even if they weren’t present earlier in life.
Weight changes can also play a role, since fat redistribution around the eye socket changes how the lid sits.
How Hooded Eyes Change Standard Makeup Rules

Most eye makeup tutorials are filmed on almond-shaped eyes with a clearly visible lid. That setup does not transfer to hooded eyes. At all.
The eye shadow market was valued at USD 18.2 billion globally in 2024, with eyeshadow growing at one of the fastest rates in the segment (Grand View Research). Still, the majority of application content online assumes a lid space that hooded eyes simply don’t have in the same way.
The Lid Space Problem
When you look straight ahead, a hooded lid shows very little of the mobile eyelid. Whatever shadow you put directly on the lid? Most of it hides behind the fold.
This is why people with hooded eyes often find their carefully blended crease look completely invisible in real life. The shadow was placed in the right spot for a different eye shape, not theirs.
The fix is to move everything up. The placement needs to sit above where the fold rests, not inside the natural crease.
How Liner Behaves Differently
The transfer problem: liner applied to the upper lid often stamps onto the hood above it when the eyes are open. This creates smudging that has nothing to do with formula or application skill.
The disappearing problem: thick liner on the upper lid gets hidden behind the fold. The thicker the line, the less visible it becomes.
These two issues explain why hooded eye tutorials almost always recommend tightlining and floating liner instead of traditional lid placement.
Why Standard Blending Direction Fails
Most tutorials say to blend eyeshadow upward and outward from the crease. On hooded eyes, “the crease” you see in the mirror is already covered. Blending into it means blending into hidden space.
The correct approach is to blend higher than the visible crease line, using the open-eye method to check placement as you go. More on that in the shadow section below.
Eye Shadow Placement for Hooded Eyes

Placement is the whole game with hooded eyes. The best shadow in the world looks like nothing if it’s sitting in the wrong spot.
Sensient Beauty research from 2023 noted a direct consumer demand for eyeshadow formulated to enhance hooded lids without smudging or transferring, confirming that the challenge is widely recognized even at the formulation level.
Finding Your True Placement Zone
Open your eyes and look straight into a mirror. Place a finger lightly where the skin folds over your lid. Everything above that finger is your actual usable canvas for shadow.
Most people are surprised how high up this is. That’s normal. It feels wrong at first because it looks weird with eyes closed, but eyes-open placement is what matters.
Apply your transition shade starting from just above the fold, blending upward toward the brow bone. Keep the brow bone itself light.
The Open-Eye Method
Check placement with your eyes open throughout, not just at the end. This is the single most useful habit shift for hooded eye shadow application.
Step away from the mirror every few minutes and look straight ahead. If you can see the shadow sitting above the fold, the placement is correct. If it’s disappearing, blend higher.
Sounds obvious. Most people still skip it.
Cut Crease on Hooded Eyes
A cut crease on hooded eyes is placed above the natural crease, not in it. The goal is to create a visible line that stays exposed when the eyes are open.
Products that hold a clean edge:
- Concealer applied with a flat brush to “cut” the line
- Cream eyeshadow bases, which grip powder shadows
- Stamp tools designed for crease placement
Map the line first with a light pencil while looking straight ahead. That way you know exactly where the fold lands before applying any product.
Halo Eye on Hooded Eyes
The standard halo eye places shimmer in the center of the lid. On hooded eyes, that center shimmer hides behind the fold when the eyes are open.
The adjustment: position the shimmer slightly higher than you usually would, just above the fold. Blend the transition shade both inside and outside the shimmer so the halo effect reads correctly from the front.
Matte shades work better on the brow bone than shimmer when the hood is pronounced. Shimmer on the brow bone catches light in a way that draws attention to the excess skin rather than the eye itself.
Eyeliner Techniques That Work on Hooded Eyes
Eyeliner held a 33.61% share of the global eye makeup market in 2024, making it the single largest product segment (Mordor Intelligence). Given how tricky liner application is for hooded eyes, a lot of that product is being used incorrectly for this eye shape.
Tightlining: The Most Underused Technique
Tightlining means placing liner directly into the upper waterline, between the lashes. It defines the lash line without adding any product to the lid that could transfer.
For hooded eyes, this often delivers more definition than a full liner application. The color appears right at the lash line where it stays visible regardless of how much hood is present.
Pencil or kohl formulas work best here. Liquid liner on the waterline dries out the eye and rarely performs well in that area.
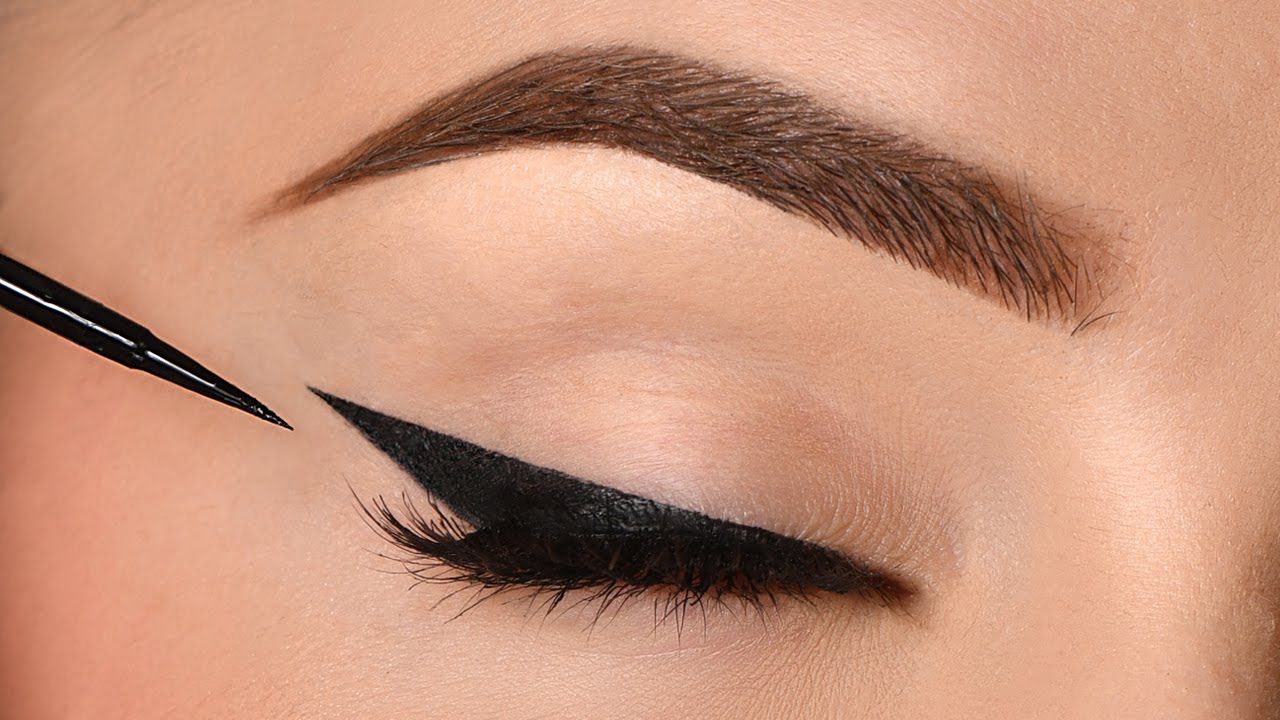
How to Draw a Wing on Hooded Eyes
Drawing a wing with eyes closed is the fastest way to get liner that looks great in the mirror and then vanishes the second you open your eyes.
The correct method:
- Keep eyes open and look straight ahead
- Dot the direction of the flick before drawing any line
- Extend the wing from the outer corner upward, following the lower lash line as a guide
- Connect the wing back to the lash line last
The wing needs to angle up more steeply than it would on other eye shapes. A flat wing disappears behind the fold. Want to do your winged eyeliner correctly? The open-eye mapping method changes everything for hooded lids specifically.
Floating Liner: High Placement, Big Impact
Floating liner skips the lash line entirely. It’s drawn above the crease, on the visible brow bone area, so it stays fully exposed when the eyes are open.
This works especially well as a colorful accent or graphic look. Because it sits above the fold, it never transfers and stays crisp all day.
Waterproof formulas are still recommended. The crease area can get warm and cause even above-crease liner to soften over time.
Mascara and Lash Tips for Hooded Eyes

Mascara is the top-selling segment of the global eye makeup category, generating over USD 1 billion in U.S. sales in 2023 alone (Statista). For hooded eyes, the formula choice matters more than most people realize, and it has everything to do with the transfer problem.
The Transfer Issue and How to Fix It
When lashes touch the hood above them, wet mascara stamps onto the skin. By midday, there’s often a dark smudge sitting directly on the brow bone area.
Tubing mascaras are the best solution here. Instead of coating lashes with pigmented wax, tubing formulas wrap individual lashes in tiny polymer tubes. They don’t smudge onto skin, and they come off cleanly with warm water.
Brands like Too Faced, Clinique, and Kevyn Aucoin have well-regarded tubing formulas. Worth trying before assuming the problem is your application.
Curling for Hooded Eyes
Curled lashes physically lift away from the hood, which reduces transfer and keeps lashes visible when eyes are open. Straightlashes on hooded eyes are one of the main reasons the eye area looks flat or heavy.
Technique that actually holds:
- Warm the curler with a hair dryer for 3-5 seconds, test heat on wrist first
- Curl at the base, hold for 10 seconds
- Move to midlash, hold again
- Apply mascara immediately while lashes are warm
A heated lash curler (Japonesque and Panasonic both make good ones) holds curl longer than a standard tool on most people.
Lower Lash Line Mascara
This one is tricky. Some mascara on the lower lashes adds definition. Too much, and it drags the eye downward, which emphasizes the heaviness of the hood rather than lifting it.
One light coat on the outer lower lashes only tends to work best. Skip the inner lower lash line entirely unless you’re going for a specific dramatic look where you’re deliberately balancing the eye with other techniques.
Eyebrow Shape and Its Effect on Hooded Eyes

Brow shape directly affects how hooded the eye appears. This is one of the most overlooked levers available, and it costs nothing to adjust compared to buying new products.
A 2024 McKinsey beauty survey found that 42% of respondents enjoy trying new beauty products, but brow techniques that work structurally with eye shape are often more effective than any new product purchase.
Why Arch Height Matters
A higher arch creates visible distance between the brow and the lash line. That space makes the eye appear more open and reduces how heavy the hood looks.
A flat brow, on the other hand, pushes the brow closer to the eyelid visually. Combined with a pronounced hood, it makes the eye area look compressed.
This doesn’t mean everyone needs a dramatically arched brow. Even a subtle lift in the arch peak makes a difference on hooded lids.
Brow Products That Help
| Product | What It Does | Best For |
|---|---|---|
| Soap brows | Brushes hairs upward and sets them | Creating a lifted, fluffy arch with natural brows |
| Tinted brow gel | Adds color and holds direction | Sparse brows needing both shape and color |
| Brow pencil | Defines arch shape with precision | Filling gaps and extending the arch higher |
| Clear setting gel | Locks brushed-up hairs in place | Finishing step over any other brow product |
Soap brows, in particular, create a natural upward direction that works well with hooded eyes. The hairs point up and slightly toward the arch, which draws the eye upward rather than down toward the lid.
Brow Tail Length and Drooping Outer Corners
A brow tail that drops too low at the outer end pulls the eye downward. On hooded eyes that already tend toward a heavier outer corner, this makes the droop more pronounced.
Keep the tail ending at or slightly above the outer corner of the eye. Extending the tail upward by even a few millimeters when filling in the brow can noticeably lift the outer eye area.
Benefit Cosmetics has been vocal about brow shaping for eye shape correction, with their Precisely My Brow pencil being a go-to for building arch definition on hooded eyes specifically.
Primer and Setting Products for Hooded Eyes

The global eyeshadow primer market was valued at USD 3.58 billion in 2023 and is projected to reach USD 6.2 billion by 2032, growing at a CAGR of 6.31% (Wise Guy Reports). That growth tracks directly with rising demand for smudge-proof, long-wear eye makeup, which is exactly what hooded eyes require.
Without a solid product base, even correctly placed shadow transfers, creases, and fades within a few hours. Primer is the step that makes everything else hold.
Eye Primer: Where and How
Coverage zone: apply primer across the entire mobile lid and above the crease line, all the way up to where your transition shade will land.
Most people apply primer only to the visible lid. On hooded eyes, that leaves the area above the crease unprimed, and shadow applied there (which is where it needs to go) has nothing to grip onto.
Urban Decay Eyeshadow Primer Potion and NYX HD Eye Base are consistently cited as top performers for hooded lids specifically, both for grip and for preventing the creasing that the skin fold causes.
Setting Shadow to Lock Placement
After primer, shadow, and blending, a dusting of translucent powder presses the product down and seals it. This matters for hooded eyes because the fold creates friction against the skin above it throughout the day.
Two-step setting approach:
- Dust translucent powder lightly over the entire eye area with a fluffy brush
- Press (don’t sweep) directly over the shadow to lock pigment without disturbing placement
Applying setting spray as a final step adds another layer of hold. One or two spritzes from about 12 inches away, eyes closed. Let it dry fully before opening.
Managing Oily Lids
Oily lids are one of the main reasons shadow creases and transfers on hooded eyes. The fold traps warmth, which accelerates oil production in that area.
Primer: use a mattifying formula specifically, not hydrating.
Powder: a light layer of translucent setting powder between primer and shadow is worth adding if lids oil up by midday.
Blotting papers: the thin kind used for face oil work on lids too. A light press on the lid area at the halfway point of the day without disturbing shadow placement.
Urban Decay relaunched its original Naked Palette in July 2024 with an updated formula described as creamier and easier to blend for longer-lasting wear, which directly addresses the shadow-holding challenge for hooded lids (IMARC Group).
Common Mistakes on Hooded Eyes
Most hooded eye makeup problems are not product problems. They’re placement and technique problems. The same issues come up repeatedly, and they’re all fixable once you know what to look for.
Charlotte Tilbury has noted that people with hooded eyes often apply shadow only to the visible lid, then relax their brows and find the look completely disappears. That single mistake accounts for a significant portion of hooded-eye frustration.
Placing Shadow Only on the Visible Lid
Shadow applied only to the small visible strip of the mobile lid is mostly hidden when eyes are open. The placement needs to extend above the fold.
This is the most common hooded eye mistake, and fixing it alone changes the entire result without changing any products.
Blending Downward
What happens: blending toward the lash line pushes product into the crease area, where it gathers and creases.
What to do instead: blend upward and outward, away from the crease. The diffusion should always move away from the fold, not toward it.
Think of the blending direction as lifting, not filling. Once you switch direction, the eye area reads as more open.
Over-Darkening the Lower Lash Line
Heavy product on the lower lash line (inner corner to outer corner, thick application) pulls the eye downward. On a hooded eye that already carries weight at the outer lid, this compounds the heaviness.
A light touch of shadow on the outer third of the lower lash line is enough for definition. Inner corner lower lash liner should stay light or be skipped unless you’re deliberately going for a dramatic look that’s balanced with other lifting techniques.
Copying Almond-Eye Tutorials Directly
This one sounds obvious, but it still causes problems. Most viral eye looks on social media are demonstrated on almond or round eyes with a large visible lid space.
The crease placement, blending map, and liner position in those tutorials are built for a different eye shape. Directly replicating them on hooded eyes usually produces something that looks off, not because the technique is wrong, but because the reference eye is wrong.
Adapt placement rather than copy it. Use any tutorial as a structural reference, then shift shadow placement higher and liner position outward to suit the actual lid space available.
Using Shimmer on the Brow Bone
Shimmer highlights whatever it sits on. On hooded eyes, shimmer on the brow bone draws attention to the excess skin rather than lifting the eye.
Keep the brow bone matte. Save shimmer for the center of the mobile lid (above the fold) and the inner corner, where it genuinely opens and brightens the eye.
Makeup Looks Adapted for Hooded Eyes

All the techniques in the sections above combine into actual looks here. These are not generic eye looks with minor adjustments. Each one is built specifically around hooded lid placement from the start.
The eye makeup segment is growing at a CAGR of 6.5% through 2030 (Fortune Business Insights), driven partly by demand for inclusive, eye-shape-specific content and products. More brands are now developing how-to content that addresses hooded, monolid, and mature eye shapes directly, not as afterthoughts.
Everyday Natural Look
Goal: defined but low-maintenance. Takes under 10 minutes.
- Eye primer across lid and above crease
- Light matte transition shade blended above the fold, upward toward the brow
- Tightline upper waterline with a dark pencil
- Groomed brows brushed upward with clear gel or soap
- Tubing mascara with lashes curled first
No liner on the lid, no shimmer. Just lash-line definition and lifted brows. Works on all skin tones and requires no precision blending.
Defined Day Look
This is the version where the eye is clearly made up but still appropriate for work or daytime events.
Shadow: medium-toned matte shade blended above the crease using the open-eye method, slightly deeper at the outer corner.
Liner: floating liner drawn above the fold with a fine-tip pen, or a thin wing drawn with eyes open using the outer-corner mapping method.
Lashes: curled and coated with lengthening mascara. A few individual lash clusters on the outer corner for lift, if desired.
Smoky Eye for Hooded Eyes
A smoky eye on hooded eyes is entirely doable. It just needs high placement and outward blending, not the traditional downward-heavy application most tutorials show.
| Step | Product Zone | Key Rule |
|---|---|---|
| Transition | Above fold, toward brow | Stay matte, blend upward |
| Dark shade | Above fold, outer two-thirds | Never below the fold line |
| Lower lash | Outer third only | Light hand, no inner corner |
| Highlight | Inner corner and center lid | Shimmer here only, not brow bone |
Keep the lower lash line smoke light. Heavy product on the full lower lash line pulls the eye downward and competes with the upper placement.
Cut Crease Glam
This is the high-effort version. Time-consuming to execute but delivers the most dramatic result on hooded eyes because it creates a visible line that stays exposed all day.
Sequence:
- Apply primer across the entire lid and above the crease
- Map the cut line with a light pencil while looking straight ahead
- Apply dark shadow above the mapped line, blending upward
- Use concealer on a flat brush to cut a clean edge along the line
- Pack a light or shimmer shade below the line on the mobile lid
- Set everything with translucent powder
- Add liner at the tightline and a wing drawn with eyes open
Charlotte Tilbury’s eyeshadow application advice for hooded eyes consistently points to this type of structured above-crease placement as the most effective way to create definition that reads when eyes are open.
Quick 5-Minute Look
Some days the full process is not happening. This still works.
One shadow, one liner, one mascara: a single matte mid-tone shade swept above the fold with a fluffy brush, tightliner on the upper waterline, curled lashes with tubing mascara. Done.
Skip the blending steps, skip the setting spray, skip the lower lash liner. The three-product version using correct placement still looks more put-together than a full application placed in the wrong spot. You can find more complete eye makeup approaches worth exploring once the basics feel solid, including everything from eye makeup looks built for different occasions to looks designed specifically for hooded eyes.
FAQ on How To Do Makeup For Hooded Eyes
Where should I apply eyeshadow on hooded eyes?
Apply shadow above the natural crease, not inside it. The fold covers whatever sits on the mobile lid when eyes are open. Use the open-eye method to check placement as you blend upward and outward toward the brow bone.
Why does my eyeliner disappear on hooded eyes?
The skin fold stamps over liner applied directly on the lid. Tightlining the upper waterline keeps definition visible without transfer. For a wing, draw it with eyes open, angling the flick upward from the outer corner.
What is the best eyeliner technique for hooded eyes?
Tightlining and floating liner work best. Floating liner sits above the crease so it stays exposed when eyes are open. Waterproof formulas reduce transfer onto the hood throughout the day.
How do I stop eyeshadow from creasing on hooded eyes?
Apply eye primer across the full lid and above the crease before any shadow. Set with translucent powder after blending. A setting spray as a final step locks everything and reduces transfer caused by the skin fold rubbing against itself.
Can I do a smoky eye with hooded eyes?
Yes. Place dark shadow above the fold, not below it. Blend outward toward the outer corner and upward toward the brow. Keep the lower lash line light. Heavy lower liner drags the eye downward and competes with the upper placement.
What mascara works best for hooded eyes?
Tubing mascaras are the top choice. They wrap individual lashes in polymer tubes instead of coating them with wax, which prevents smudging onto the hood above the lashes. Curl lashes thoroughly before applying to lift them away from the skin fold.
How do eyebrows affect hooded eyes?
Significantly. A higher arch creates visible space between brow and lash line, making the eye look more open. Flat brows compress the eye area. Brushing brow hairs upward with soap brows or tinted gel adds lift without any other changes.
What is a cut crease and does it work on hooded eyes?
A cut crease creates a defined line between two shadow shades. On hooded eyes, it must be placed above the natural crease so the line stays visible when eyes are open. Concealer on a flat brush cuts the cleanest edge.
How do I make hooded eyes look bigger?
Curl lashes, tightline the upper waterline, place a light or shimmer shade on the center of the mobile lid above the fold, and keep the brow bone matte. A higher brow arch adds the most visible lift without any liner required.
Is hooded eye makeup different for mature skin?
Yes, with some adjustments. Avoid shimmer on loose skin as it settles into fine lines. Stick to matte transition shades and lightweight primers that don’t emphasize texture. A cream shadow base under powder shadow helps prevent patchiness on crepey lids.
Conclusion
This conclusion is for an article presenting how to do makeup for hooded eyes, and the core takeaway is simple: placement beats product every time.
Move shadow above the fold. Draw liner with your eyes open. Curl lashes before mascara. Shape brows upward. None of these require expensive tools or advanced skill.
Eye primer, correct blending direction, and the open-eye method fix most of what goes wrong on hooded lids. The techniques covered here work whether you’re building an everyday look or a full smoky eye with a defined cut crease.
Hooded eyes are not a limitation. They just need a different approach. Once the lid space and shadow placement make sense, the rest follows.

- What Is Skin Tint and Why Everyone Is Obsessed - July 11, 2026
- What Is Foundation and How Do You Choose One? - July 6, 2026
- How to Make Blush Last Longer - July 3, 2026


