

Most eye makeup tutorials are not built for you.
If you have small eyes, the standard advice, heavy lid shadow, thick liner all around, often makes things worse. The techniques that open up other eye shapes will close yours off entirely.
Knowing how to do eye makeup for small eyes means working with your eye shape, not against it. The right eyeshadow placement, liner approach, and lash technique can make a real difference in how open and defined your eyes look.
This guide covers everything, from color selection and blending techniques to brow shape and the tools that actually work on limited lid space.
What Are Small Eyes in Makeup Terms

Small eyes, in makeup, refers to eyes where the visible lid space is limited relative to the overall face. The orbital bone sits close to the lash line, leaving little room between the lashes and the brow.
This matters because standard eye makeup placement assumes a generous lid. When that space is reduced, the same techniques that open up other eye shapes can actually close yours off further.
How Makeup Artists Define Small Eyes
Key characteristics:
- Visible lid surface is narrow when eyes are open
- Orbital bone sits low, reducing usable lid real estate
- Eyes appear smaller relative to the face’s proportions
- The eye-to-face ratio draws the gaze inward rather than opening it outward
The global eye makeup market reached $18.2 billion in 2024 (IMARC Group), driven partly by consumers looking for products that correct or adjust perceived eye size. That is a massive industry built, at least in part, on this exact problem.
Small Eye Subtypes That Need Different Approaches
Hooded small eyes: The brow bone skin folds over the crease. Usable lid space disappears when eyes are open.
Deep-set small eyes: The eye sits further back in the socket, creating shadow around the orbital area that makes eyes recede.
Close-set small eyes: Eyes sit closer together than one eyeball-width apart. This adds a visual effect of the eyes looking smaller and more compressed.
Many people actually have a combination. Deep-set and hooded together is pretty common. Knowing your specific subtype changes which techniques you reach for first.
Why Standard Makeup Rules Fail Small Eyes
Most eye makeup tutorials are built around a visible crease and a decent amount of lid space. Neither of those things apply here.
Applying a full dark shadow across the lid, using thick liner all the way around, or loading up the lower waterline with black all compress the eye further. These are not mistakes beginners make. They are techniques that genuinely work on other shapes but backfire on small eyes.
| Technique | Works on Large Lids | Effect on Small Eyes |
|---|---|---|
| Full dark shadow on lid | Adds depth and drama | Shrinks the eye further |
| Thick black waterline | Defines and intensifies | Closes off the eye |
| Heavy outer V shadow | Creates dimension | Drags eye downward |
| Liner on upper and lower lash lines equally | Frames the eye | Creates a circle effect that reduces size |
Colors That Make Small Eyes Look Bigger

Color is where most people get it wrong first. The instinct is to reach for neutrals and stay safe. That is not always wrong, but the specific neutrals matter a lot.
Light reflects outward. Dark absorbs. That is the whole logic behind color selection for small eyes.
Shades That Open the Eye
According to GCI Magazine’s survey of over 2,600 U.S. consumers, 81% preferred volumizing and lengthening mascara, both of which visually expand the eye. The same logic applies to shadow: select shades that expand, not compress.
Best options for the lid:
- Champagne and soft gold (reflect light off the lid surface)
- Warm peach and peachy-pink (brighten without adding heaviness)
- Sheer ivory or cream (maximizes the sense of open space)
- Soft rose-brown as a transition shade (adds definition without closing the eye)
Shades to Use With Caution
Deep matte shades are not off-limits. They just need to stay off the actual lid and live in the crease or outer corner only.
Shimmer on the full lid is fine. Shimmer in the inner corner is great. Chunky glitter all over? It reads as heaviness on a small lid and tends to emphasize the compressed space rather than work against it.
Browns deserve a specific mention. Warm medium browns in matte are actually ideal for crease work on small eyes. They add definition that reads as depth without the eye-closing effect of dark charcoal or black.
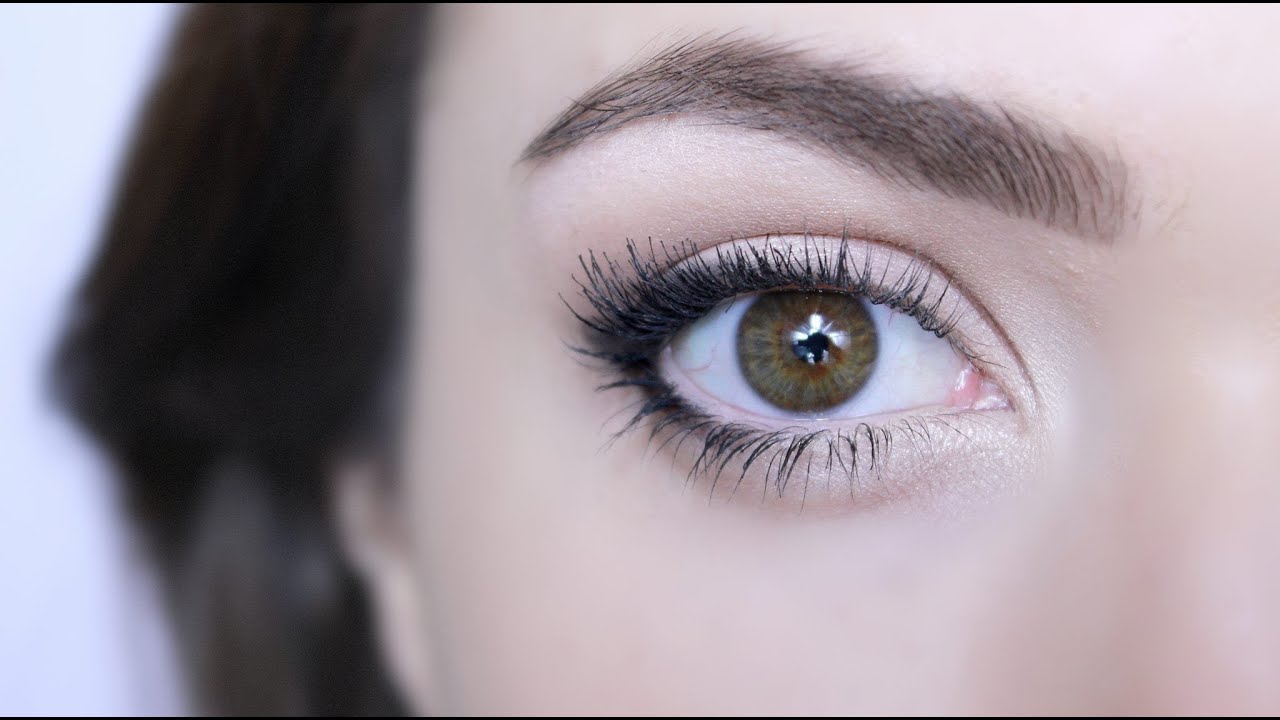
Inner Corner Highlight: Non-Negotiable
This is the single highest-impact color placement for small eyes. A champagne, pearl, or bright white shimmer pressed into the inner corner catches light and visually shifts the eyes apart and open.
Charlotte Tilbury’s Hollywood Flawless Filter is a product many artists use as an inner corner highlight on clients with small or deep-set eyes specifically for this reason. It gives a liquid-light effect without chunky shimmer particles that can settle into fine lines.
| Shade Type | Best Placement | Avoid |
|---|---|---|
| Champagne shimmer | Lid, inner corner | Outer corner (pulls eye down) |
| Warm matte brown | Crease and transition | Full lid coverage |
| Peach or rose | Lid base, under-brow | Lower waterline |
| Dark matte | Outer V, outer crease | All-over lid application |
Eyeshadow Techniques for Small Eyes

Eyeshadow placement on small eyes is really about creating the illusion of space that is not there. You are blending higher than feels natural and lighter than feels dramatic.
Eye shadow is forecast to grow at a 4.83% CAGR through 2030 (Mordor Intelligence), partly because more consumers are learning shape-specific blending. The technique gap between a general tutorial and a small-eye-specific one is real.
The Halo Eye Technique
This is one of the most flattering looks for small eyes and honestly underused. The idea: light shade in the center of the lid, darker shade on the inner and outer corners, and a bright highlight in the inner corner.
The center shimmer catches light exactly where it makes the eye appear fullest. The darker corners add depth without framing the eye as small.
Products for this: A dual-pan palette with a matte brown and a shimmer champagne does this well. Urban Decay’s Naked palettes have been the go-to for this kind of blend for years, and they still hold up.
Blending for Hooded Small Eyes
The crease is hidden when your eyes are open. That means you have to work above where the crease actually sits.
- Apply transition shade about 5-7mm above your natural crease line
- Blend upward toward the brow bone with a fluffy brush
- Check placement with eyes open, not closed
This feels wrong when you first start doing it. The shadow looks too high with eyes closed. Open your eyes, and it sits right in the socket line and creates the illusion of a deeper crease.
Blending for Deep-Set Small Eyes
Deep-set eyes already have natural shadow from the orbital bone. Avoid heavy outer corner shadow or you amplify the recessed look rather than work against it.
Light shades on the inner two-thirds of the lid and medium transition shades blended high and outward are the move. Keep the inner corner extremely bright. The goal is to pull the eye forward visually, not push it further back.
Cut Crease Placement for Small Eyes
A cut crease on small eyes needs adjusting. The standard cut crease cuts right at the natural crease, which leaves almost no visible lid on small eyes once the eyes are open.
Lift the cut crease line slightly above the natural crease. Use concealer or a skin-tone shadow to carve out the lid space below the cut. This creates a visible lid color block even when eyes are fully open.
Eyeliner Rules for Small Eyes
Eyeliner held 33.61% of the global eye makeup market share in 2024 (Mordor Intelligence). It is the most-used eye product by volume. And for small eyes, it is also the most misused.
The wrong liner application can erase all the work done with shadow in about 30 seconds.
Upper Lash Line: Thin and Lifted
Keep the upper lash line liner thin at the inner corner. It can thicken slightly toward the outer third. The line should lift at the outer corner, not follow the natural lash line straight across.
A slight flick upward at the outer corner, even just 2-3mm, adds an eye-lifting technique effect that lengthens the look of the eye horizontally. This is not a dramatic cat eye. It is a barely-there flick that changes the whole direction of the eye.
Felt-tip liner pens give the cleanest result here. Gel and liquid both work. Pencil tends to smudge on minimal lid space and can look messy fast.
The Waterline Problem
Black on the lower waterline is the fastest way to make small eyes look smaller. It visually cuts off the white of the eye and reduces the perceived size of the eye opening.
Swap it for:
- Nude or flesh-toned waterline pencil (expands the appearance of the eye)
- White or pearl waterline liner (maximum brightening effect)
- No waterline liner at all (sometimes the cleanest option)
Tight-Lining vs. Full Liner
Tight-lining (applying liner between the upper lashes right at the root) adds definition and makes lashes look fuller without reducing lid space. This is usually the better call for small eyes over a visible upper lid line.
It takes practice. The payoff is real. Done right, it makes the eye look defined without eating into any of that limited lid space.
If you want both, do a tight-line first, then add a thin liner on top. The tight-line fills in gaps, the top liner adds shape. Together they give density without bulk. You can read more about how to tightline eyes properly to get the technique right the first time.
Skip the Lower Lash Line Liner (Usually)
Lower lash liner on small eyes shrinks them. Full stop. If you want lower lash definition, use a soft brown shadow diffused under the lower lashes with a pencil brush. It reads as depth without the hard line that contracts the eye.
Mascara Application for Small Eyes

Mascara is the most purchased eye product in the U.S., with 94% of women buying it in the past year (The Benchmarking Company). For small eyes specifically, mascara is arguably more important than any shadow technique.
Curled, lifted, separated lashes add perceived height and openness to the eye in a way nothing else quite replicates.
Curl Before Everything
An eyelash curler is not optional for small eyes. Straight or downward-pointing lashes visually close the eye. Curled lashes lift the entire eye opening and create space between the lash line and the brow.
Clamp at the root first, hold for 10 seconds, then move to the middle of the lash and hold again. The two-point method gives a more natural curve than a single clamp at the base.
Shu Uemura makes a curler that professional artists consistently go back to. The arc matches most eye shapes better than standard drugstore options. Worth the price if lash curl is something you fight with regularly.
Choosing the Right Mascara Formula
Lengthening: Adds perceived eye height. Best first coat for small eyes.
Volumizing: Adds density but can cause clumping, which visually compresses the lash line. Use on a second coat only.
Curling: Good if your lashes drop even after curling manually. NYX and L’Oreal both have solid curling formulas at accessible price points.
Avoid waterproof as your only formula. Waterproof mascara is harder to remove thoroughly, and residue buildup around small eyes causes shadowing that makes them look more recessed over time.
Application Technique
Wiggle the wand at the root before pulling outward. This deposits the most product at the base, which is where you need it to create lift.
Focus extra coats on the outer corner lashes. This fans the lash line outward and elongates the eye horizontally without requiring liner.
Separate with a clean spoolie after the second coat. Clumped lashes reduce the eye opening visually. Separation is what makes the eye look larger, not raw volume. For the full technique on applying mascara step by step, the basics still matter even when you are adapting them.
Brow Shape and Its Effect on Small Eyes
The brow is the frame. Change the frame and the eye reads differently, sometimes dramatically so.
Most people do not adjust their brow approach when working with small eyes. That is a missed opportunity. The distance between the brow and the lash line is one of the biggest visual factors in how large an eye appears.
Arch Placement and the Lift Effect
A defined arch creates the impression of vertical space between the brow and the lid. This matters for small eyes because it gives the eye room to breathe visually.
Place the highest point of the arch above the outer edge of the iris. Not too far out toward the tail. This position lifts the eye at the correct angle and does not create a perpetually surprised expression.
Anastasia Beverly Hills has built much of their reputation around precise arch placement tools and pencils. The Brow Wiz pencil gives single-hair-stroke precision that is genuinely useful for adjusting arch position without looking drawn-on.
Brow Density: Fill vs. Darken
| Approach | What It Does | Effect on Small Eyes |
|---|---|---|
| Light fill with pencil | Defines shape, mimics hair strokes | Lifts and frames without overpowering |
| Heavy powder fill | Creates solid, dense brow | Can overpower small eyes, draws attention away |
| Brow gel only | Sets hairs in place, minimal color | Good for full brows that just need shaping |
| Pomade/ombre effect | Stronger front-to-tail gradient | Works if kept light at the front |
Tail Length and Horizontal Eye Elongation
Extending the brow tail slightly past the outer corner of the eye pulls the eye outward visually. This is one of the simplest tricks for making small eyes look longer and wider without touching any shadow or liner.
Extend the tail no more than a few millimeters past where it naturally ends. Angle it slightly downward. Too long and too straight looks drawn-on immediately.
Keep the brow-to-eye distance in check as well. Over-darkened or overly thick brows that sit close to a small eye can actually make the eye appear more recessed. A lighter hand at the front of the brow, gradually building toward the arch and tail, balances this well.
Concealer and Base Prep Specific to Small Eyes

Prep work is where most people skip steps. On small eyes, that skipping shows up fast.
A creased lid, patchy concealer under the eye, or missing primer can undo every shadow and liner technique in this guide within two hours.
Brightening the Under-Eye Area
61% of concealer users report prioritizing under-eye brightening as their primary reason for using the product (360 Research Reports, 2024). For small eyes, that is not vanity. Dark circles create shadow around the orbital area and make eyes appear more recessed than they actually are.
Use a concealer one shade lighter than your skin tone under the eye and blend it upward into the inner corner. This pulls the eye forward visually and reduces the shadow effect.
NARS Radiant Creamy Concealer is a product that artists reach for specifically on deep-set and small eyes because the formula reflects light rather than sitting flat. That light reflection is what does the work here.
Setting the Lid Before Shadow
Eye primer is not optional on small eyes. Limited lid space means any creasing compresses the eye further and makes eyeshadow placement look muddy.
49% of consumers in a 2024 Cohley survey reported using an eye primer or base as part of their regular routine. That number should be higher for anyone with minimal lid space or oily lids.
Apply a skin-tone shadow or the Urban Decay Eyeshadow Primer Potion before any color. This locks the base, prevents transfer onto the brow bone, and extends wear by several hours. On small eyes, smudged or transferred shadow reads as puffiness around the eye.
Concealer on the Inner Corner Highlight Zone
Before applying shimmer to the inner corner, tap a small amount of concealer onto that area first. It gives the shimmer something to grip and increases its brightness significantly.
This is a two-second step that makes a visible difference. The inner corner highlight is one of the most effective eye-widening techniques available. Not prepping that zone wastes the effort.
Skin-Tone Shadow as a Lid Base
Key prep order:
- Eye primer over the entire lid
- Skin-tone matte shadow packed over primer (evens out any veining or discoloration on the lid)
- Concealer on inner corner and under-eye
- Set under-eye with a fine translucent powder to prevent creasing
The skin-tone shadow step is the one most people skip. It creates a uniform base that makes every color applied on top appear more true to its pan. On small eyes with uneven lid texture, this step is what makes eyeshadow placement look intentional rather than patchy.
To learn more about using concealer correctly for under-eye and lid prep, the technique details matter more than the product choice.
Tools That Make a Difference on Small Eyes

The makeup brushes market was valued at $7 billion in 2024 (Grand View Research), and it is growing at 8.3% annually. Consumers are spending more on tools. Most of that spending goes toward brushes that are too large to be useful on small lids.
Precision is everything on minimal lid space. The wrong brush size makes careful placement impossible.
Brushes for Lid Work
A large fluffy blending brush belongs in the crease and transition zone, not on the lid itself. On small eyes, a fluffy brush dragged across the lid deposits shadow everywhere and removes any precision placement instantly.
What actually works:
- Small flat shader brush – packs shadow onto the lid with control
- Tapered blending brush – blends in the crease without flooding the lid
- Pencil brush – inner corner highlight, detailed outer V, lower lash definition
- Fan brush – sweeping away fallout without disturbing placed shadow
Sigma Beauty’s E25 and E05 brushes are two tools that consistently show up in professional kits specifically for small eye work. The E25 is a small blending brush that fits the crease of a small eye without overlapping onto the lid. The E05 is a flat shader that gives precise lid placement.
Eyelash Curler Shape Matters
Not all lash curlers are built the same. Standard straight-bar curlers have a wider arc than most small eyes require, which means the clamp either misses the inner lashes or pinches the outer corner skin.
A tighter-arc curler, like the Shu Uemura Eyelash Curler, fits the natural eye shape of smaller eyes better. It also curls more evenly from root to tip without the flat kink that straight-bar curlers sometimes leave at the root.
| Tool | Best Use on Small Eyes | Avoid When |
|---|---|---|
| Small flat shader brush | Lid color placement | Blending (too dense) |
| Tapered crease brush | Transition and crease blending | Inner corner (too wide) |
| Pencil brush | Inner corner, lower lash detail | Broad blending |
| Tight-arc lash curler | Full lash curl on small eye shape | N/A (replace wide-arc curler) |
Felt-Tip Liner Pen Over Other Liner Formats
On small eyes with limited lid space, precision at the lash line is harder to maintain. Pencil liners drag. Gel liners require a separate brush. Liquid liners in a brush-tip format are often too wet and bleed.
A felt-tip liner pen gives the most control on a tight lid line. The firm tip deposits a consistent, thin line without dragging or skipping. Stila Stay All Day and NYX Epic Ink Liner are two widely used options that perform well on small eyes specifically because of tip rigidity.
The right liner format matters more than the brand. Thin, controlled, and non-bleeding is what small eyes need. Everything else is preference. For tips on applying eyeliner with precision, the technique adjustments for minimal lid space are worth reading through before switching formats.
Full Makeup Looks for Small Eyes

Technique without context only gets you so far. Seeing how these methods combine into complete looks is where it clicks.
CivicScience data from 2025 shows 49% of makeup wearers prefer a minimal, light-makeup approach. The remaining half splits between classic and experimental. All three of those categories have versions that work specifically for small eyes.
Everyday Natural Look
Bare skin, mascara, and brightened inner corner. That is actually it for a genuine everyday look on small eyes.
- Eye primer over the lid
- Champagne shimmer across the entire lid
- Pearl or nude inner corner highlight
- Tight-lining only on upper lash line
- Curled lashes with one coat of lengthening mascara
No brow bone highlight needed. The shimmer lid reflects enough light on its own. This look takes under five minutes and reads as polished without being overdone.
Defined Daytime Look
This is the most useful look in the range. Enough definition to photograph well and hold up through a full day, without requiring expert-level blending.
Build it in layers:
Base: skin-tone shadow, eye primer.
Lid: soft warm champagne or peachy-gold shimmer packed from lash line to just above the crease.
Crease: warm medium brown blended above the natural crease line, blended outward and upward.
Liner: thin upper lash line only, slight upward flick at outer corner. Nude waterline.
Lashes: curled, two coats of lengthening mascara, spoolie-separated.
Smoky Eye Adjusted for Small Eyes
The standard smoky eye places dark color all over the lid and lower lash line. On small eyes, that closes the eye down entirely. The adjustment is significant but the result still reads as smoky.
Standard smoky vs. small eye smoky:
| Step | Standard Smoky | Small Eye Adjustment |
|---|---|---|
| Lid color | Dark all over lid | Dark on outer half only, shimmer on inner half |
| Lower lash line | Black liner full waterline | Nude waterline, soft brown under lower lashes |
| Inner corner | Dark shadow throughout | Bright shimmer or highlight |
| Blend direction | Outward and downward | Outward and upward only |
NYX Professional Makeup’s Smokey Eye palette works well for this version. The gradient from medium to deep shades allows precise half-lid placement without needing to cut color with a separate concealer.
Cut Crease Glam Look
90% of women wear eye makeup three or more times per week (The Benchmarking Company). For occasions where the look needs to hold up under photography or event lighting, a cut crease with false lashes is the strongest option for small eyes.
The technique: lift the cut crease line above the natural crease (as covered in the eyeshadow section), carve the lid with a flesh-tone concealer, pack a shimmer or foil shadow onto the carved lid, apply bold liner on the upper lash line with an upward flick, and finish with individual lash clusters at the outer corner only.
Individual clusters at the outer corner elongate without adding weight at the inner corner, which would visually shrink the eye. For full guidance on applying false eyelashes in clusters versus strips, the placement method differs enough to be worth checking before your first attempt.
Full strip lashes on small eyes usually require trimming from both ends, not just the outer end. The inner edge of most strip lashes hits too close to the inner corner on a small eye, which irritates the eye and compresses the look. Trim conservatively and check placement before applying glue.
FAQ on How To Do Eye Makeup For Small Eyes
What eyeliner style makes small eyes look bigger?
A thin line on the upper lash line with a slight upward flick at the outer corner works best. Skip the lower waterline or swap black for a nude waterline pencil. This keeps the eye open rather than framed closed.
What eyeshadow colors work best for small eyes?
Light, warm shades like champagne, peach, and soft gold on the lid reflect light and add perceived size. Use medium matte browns only in the crease. Avoid heavy dark shades across the full lid, as they compress lid space fast.
Should I use mascara on my lower lashes if I have small eyes?
Light mascara on lower lashes is fine, but keep it minimal. Heavy lower lash mascara drags the eye downward. Focus most of the product on upper lashes, curled from the root, for the best eye-widening technique result.
Does tight-lining help small eyes?
Tight-lining adds definition between the upper lashes without reducing visible lid space. It makes lashes look denser at the root and frames the eye subtly. It is a better option than a heavy upper lid liner line for most small eye shapes.
How do I do a smoky eye if I have small eyes?
Apply dark shadow on the outer half of the lid only. Keep the inner corner bright with a shimmer highlight. Use a nude waterline instead of black. Blend shadow upward and outward, not downward, to avoid closing the eye off.
What brush should I use for small eyes?
A small flat shader brush for lid color and a tapered pencil brush for inner corner detail. Avoid large fluffy brushes directly on the lid. They deposit shadow across the entire area and make precise eyeshadow placement impossible on limited lid space.
Does eyeshadow primer really matter for small eyes?
Yes. Creasing on a small lid compresses the eye visually and makes shadow placement look muddy. A good eye primer keeps color in place and prevents transfer onto the brow bone, which reads as puffiness on small eyes.
How should I shape my brows to make small eyes look larger?
A defined arch placed above the outer iris edge creates vertical space between the brow and lash line. Extend the brow tail slightly past the outer corner to elongate the eye. Keep the front of the brow light to avoid overpowering small eyes.
Can I do a cut crease with small eyes?
Yes, but lift the cut line above your natural crease. Standard placement leaves almost no visible lid once eyes are open. Carve the lid below the lifted cut with a skin-tone concealer, then pack a shimmer shadow onto the exposed lid space.
What is the best mascara for small eyes?
A lengthening formula applied after curling the lashes manually. Lengthening adds height to the eye opening. Separate lashes with a clean spoolie after the second coat. Clumped lashes reduce the eye opening and work against every eye-widening technique you have applied.
Conclusion
This conclusion is for an article presenting the core techniques behind eye makeup for small eyes, and the takeaway is straightforward: the right approach changes everything.
Color placement, eyeshadow blending, liner choice, and brow shape all work together. No single technique fixes everything on its own.
Focus on the inner corner highlight first. It is the fastest, highest-impact adjustment for any small eye shape, whether hooded, deep-set, or close-set.
From there, build your routine around lifted lash lines, a nude waterline, and transition shades blended above the natural crease.
The tools matter too. Precision brushes and a well-fitted lash curler are not optional extras on minimal lid space.
Start with one technique. Add the next. Small adjustments, applied consistently, produce real results.

She started writing on the site after fielding the same questions from clients and friends often enough to just write the answers down: which red won't turn orange on a warm undertone, how to keep lipstick from feathering into fine lines, why a "12-hour" formula rarely survives dinner.
Every review on the site follows the same rule she uses with paying clients: wear it first, then decide if it's worth recommending.
- How to Choose Setting Powder for Your Skin Type - August 1, 2026
- How Long Does Eyeliner Last Before It Expires? - July 28, 2026
- What Is Contour and How Do You Apply It? - July 25, 2026


