

Summarize this article with:
Winged eyeliner looks simple until you are standing in front of a mirror with a felt-tip liner in your hand and one eye that looks nothing like the other.
Learning how to do winged eyeliner is one of those techniques that takes maybe five attempts to get right, but the payoff is worth it. A clean flick lifts the eye, sharpens any look, and takes under two minutes once you know what you are doing.
This guide covers everything from choosing the right liner for your skill level to adjusting the cat eye technique for your specific eye shape, fixing common mistakes, and making the wing last all day.
What Is Winged Eyeliner

Winged eyeliner is a liner technique that extends beyond the outer corner of the eye and angles upward, creating a lifted flick. It is commonly called a cat eye or flicked liner look, and it has been a staple in makeup since the 1950s.
The wing has three parts: the tail (the flick itself), the lash line (the line along your upper lid), and the triangle fill (the solid shape connecting both). Get all three right and the look lands. Miss one and it falls apart.
It works by creating an optical illusion. The angled flick lifts the outer corner of the eye, making it appear more almond-shaped and defined. That is why the liner angle matters as much as the liner thickness.
Eye makeup in general is pretty forgiving, but winged liner is one of those techniques where small errors are very visible. That is what makes it tricky for beginners.
According to market data, nearly 70% of cosmetic users include eyeliner in their daily routine, underlining just how much demand there is for getting this technique right (Reanin Research, 2024).
—
Tools That Work Best for Winged Eyeliner

The liner you pick will determine how clean your wing looks. This is not the place to cut corners on product choice.
Most people struggle with winged liner not because of technique, but because they are using the wrong tool for their skill level or skin type.
| Liner Type | Best For | Control Level | Dry Time |
|---|---|---|---|
| Felt-tip pen | Beginners, sharp lines | High | Fast (10–20 sec) |
| Gel pot + brush | Intermediate, intense color | Medium-high | Moderate |
| Liquid brush | Advanced, flexible strokes | Low-medium | Slow |
| Pencil | Soft looks, smudged styles | High | N/A (smudgeable) |
Felt-Tip Liner Pens
Best choice for most people. Felt-tip liners like the Stila Stay All Day Waterproof Liner and NYX Epic Ink Liner give you a consistent ink flow with a tip that does not flex unpredictably mid-stroke.
The tip is firm enough to control but fine enough to draw a precise line close to the lash roots. Smudge resistance is high and dry time is fast, which matters when you are working on both eyes and do not want to wait around.
Gel Liner
Gel formulas like Bobbi Brown Long-Wear Gel Eyeliner deliver deep, opaque color. The texture is creamier than liquid, so it grips the skin without dragging.
The downside: gel requires an angled brush, which adds a skill variable. If your brush application is inconsistent, your line will be too. That said, gel is excellent for building thickness gradually without the ink-bleed risk you get with some liquids.
Pencil Liner
Pencil works well for sketching the wing shape before committing with liquid. Maybelline recommends this method: sketch with pencil first, then trace over with a felt-tip liquid for precision and staying power.
As a standalone wing liner, pencil is tricky. Lines tend to smudge, and sharp angles are harder to hold. Good for a softer, smokier flick. Not great for a clean cat eye.
—
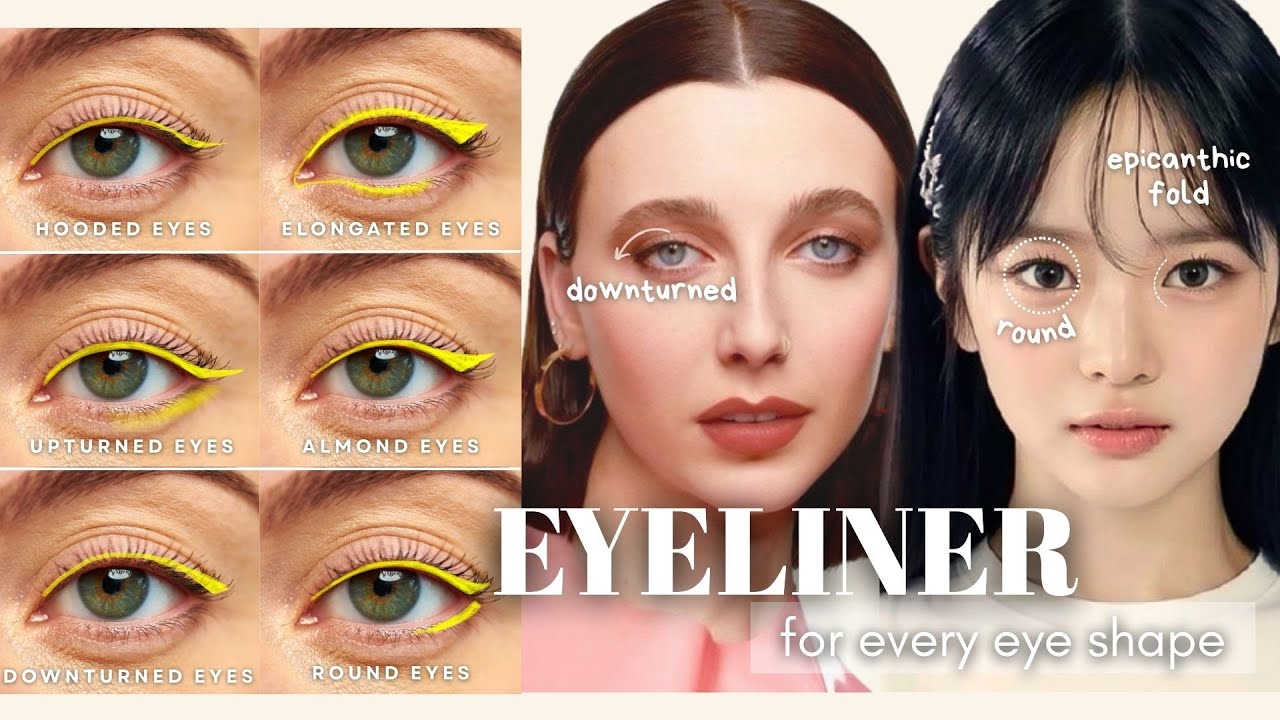
Eye Shapes and How They Change the Wing
There is no single “correct” wing. The angle, length, and placement all shift depending on eye shape. Using the wrong approach for your eye shape is one of the most common reasons people feel like they “can’t do” winged liner.
Hooded Eyes

This is the trickiest eye shape for winged liner. When eyes are open, the skin fold covers most of the mobile lid, so a standard wing drawn on the lid disappears completely.
The fix: draw the wing with your eyes open and looking straight into the mirror. Never stretch the skin. Makeup artist Russell (via Who What Wear) explains that pulling the skin while applying changes the shape entirely, so when you release, the liner looks wrong.
- Extend the wing outward rather than sharply upward
- Keep liner close to the lash roots, not across the lid
- Draw slightly beyond where you think is “too far,” because the fold will reduce visible length when eyes are relaxed
Monolid Eyes
Monolid eyes have no visible crease, which actually makes liner application more predictable. The lid surface is smooth and flat.
What works: a thicker line and a more dramatic upward angle. Because there is no fold to contend with, the full liner is visible when the eye is open. Graphic and bold styles look especially strong on monolid eyes.
Downturned Eyes
The outer corners of downturned eyes angle slightly downward. A standard wing following the natural lash line will reinforce that direction and pull the eye down further.
The correction is simple: angle the tail more aggressively upward than feels natural. Use the tail of your brow as a reference point. Draw the flick toward it, not parallel to your lower lash line.
Deep-Set and Almond Eyes
Almond eyes can pull off almost any wing style. Follow the natural shape and extend slightly past the outer corner. Most classic cat eye tutorials are written with almond eyes in mind.
Deep-set eyes sit further back in the socket. Thin, precise liner works better here than thick lines, which can make deep-set eyes appear more recessed.
—
Step-by-Step: The Basic Wing
Two methods work consistently well for most people. One starts with the flick. The other uses dots as a guide. Both are worth knowing.
The Flick-First Method
This is the method most makeup artists use. Starting with the tail first means you set your angle and length before committing to the full line, which prevents the most common error: finishing a full lash-line and then realizing the tail placement is off.
Step 1: Look straight ahead. Use the angle of your lower lash line as a guide and imagine extending that line outward past the outer corner. That is your tail direction.
Step 2: Draw the flick. One short upward stroke from the outer corner of the eye, following that angle. Keep it thin for now.
Step 3: Draw a second line from the tip of the tail back down to the lash line, creating a triangle outline.
Step 4: Fill in the triangle.
Step 5: Line along the upper lash line from inner corner to where it meets the filled triangle. Build thickness as you move toward the outer corner.
Do both tails before filling in either side. This way you can compare angles and length while corrections are still easy.
The Dot-and-Connect Method
Better for beginners or anyone with an unsteady hand. Place three to four small dots along the intended liner path before drawing any lines. The dots become your roadmap.
Connect them with short strokes rather than one long pull. This reduces the chance of a single wobbly stroke ruining an otherwise clean line.
Works best with felt-tip liners. The firm tip can tap and connect dots cleanly. Brush-tip liquid liners are harder to control with this method because the tip flexes on contact.
—
Getting Both Eyes Even

Symmetry is the part that frustrates people most. Faces are not perfectly symmetrical, which means even a technically correct wing can look uneven if you are comparing one eye to the other too closely.
According to Cosmetics Europe, retail sales for decorative cosmetics rose 8.2% in 2024, with eye products among the fastest-growing categories. More people are wearing liner daily, and symmetry complaints remain the top recurring issue in beauty tutorials and forums.
The most effective fix: do both tails first, step back from the mirror, and assess from a normal viewing distance before filling in either eye.
- Use a small card or piece of tape held at the outer corner to replicate the tail angle on both sides
- Check in a mirror from arm’s length, not up close
- Lighting matters more than most people realize. Overhead lighting creates asymmetric shadows that make even lines look uneven
- A Q-tip dipped in micellar water cleans up small discrepancies without disrupting the rest of your eye makeup
Accept that your two wings will never be identical. The goal is “sisters, not twins.” When the eyes are open and you are not scrutinizing up close, small differences are invisible.
—
Common Mistakes and How to Fix Them
Most winged liner problems come down to four things: product choice, application pressure, angle miscalculation, or skipping prep steps.
| Mistake | Why It Happens | Fix |
|---|---|---|
| Wobbly lines | Unsupported hand, rushing | Rest elbow on surface, use short strokes |
| Tail points down | Wrong angle reference | Use lower lash line extension as guide |
| Liner smudges under eye | No primer, oily lids | Eye primer + translucent powder before liner |
| Uneven thickness | One long stroke with too much pressure | Build up in thin layers from inner to outer |
| Wings look different | Checking too close, skin asymmetry | Compare from arm’s length, do tails first |
Wobbly Lines
Slow down and anchor your hand. Place your elbow on a flat surface before you start. This alone eliminates most wobble.
Short overlapping strokes build a cleaner line than one long drag. Think of it like sketching, not painting. If a stroke goes off course, stop immediately rather than trying to correct mid-stroke.
Smudging Before It Dries
Different formulas have very different dry times. Felt-tip liners dry in roughly 10 to 20 seconds. Gel with a brush can take longer, especially if applied thickly.
Keep your eyes relaxed and open after each stroke. Blinking onto wet liner is how most smudging happens. If smudging under the eye is a recurring problem, set the under-eye area with a light translucent powder before you start lining.
Liner Bleeding Into the Crease
This mostly affects people with oily lids. An eyeshadow primer applied and allowed to dry before liner creates a barrier that significantly reduces creasing and transfer throughout the day.
Maybelline’s Tattoo Studio Gel Pencil Liner launched in 2023 specifically targeting smudge-proof, long-lasting performance for this exact issue. Setting gel or pot liner with a matching matte eyeshadow on top also helps lock the formula in place.
Winged Liner Variations Worth Knowing

Winged eyeliner is not one thing. The classic black flick is just the starting point. Once you have the basic cat eye technique down, there are several directions to take it depending on mood, occasion, or skill level.
Google Trends data shows “winged eyeliner” reached peak search interest in November 2025, while “graphic eyeliner” saw its highest point in October 2025. Classic styles dominate, but bolder variations are gaining ground (Accio Market Intelligence, 2025).
The Subtle Flick
Best for everyday wear. A short, thin tail that extends just a few millimeters past the outer corner. The line along the lash line stays close to the roots, barely thickening as it moves outward.
This works with any liner type and takes the least time to fix if something goes off. Good starting point before attempting anything more dramatic.
The Graphic Wing
Bold, geometric, and extended past the outer corner. Think the Pat McGrath-directed Versace F/W 2023 looks, where models wore striking sweeps of jet-black liner with lines elongated well past the lash line into angular shapes.
- Uses thicker lash line base, usually 2-3mm at the thickest point
- Tail angles sharply upward, not just out
- Works best with a felt-tip liner that has a stiff, precise tip
Keep the rest of the face minimal. This style competes with nothing else.
The Floating Wing
No lash line contact at all. The liner sits above the crease as a separate, disconnected shape. Increasingly popular in editorial and editorial-inspired looks.
Harder to execute than it looks. Placement has to be intentional. Too high and it reads as eyeshadow. Too close to the lid and it merges with the lash line.
The Double Wing
DC Fashion Week trend coverage noted double-winged liner made a comeback in 2024, with makeup artists adding a secondary flick either above or below the classic wing for added dimension.
Upper wing: standard flick at lash line, angled upward.
Lower wing: a separate short flick along the lower lash line at the outer corner, connecting or slightly separated from the upper.
Both lines should mirror each other in angle. Different lengths, different thicknesses. That contrast is the point.
Colored Liner Wings
Brown liner has replaced black as the more wearable everyday alternative for many people. Beyond that, blues, greens, and neons showed up across TikTok and runway looks through 2024, with Glam reporting colored liners “taking center stage” as a major trend shift away from classic black and brown.
- Brown: softer, more natural, especially flattering on lighter skin tones
- Navy or dark green: close to black in impact but warmer or cooler depending on skin undertone
- Bright color: keep the wing shape precise, reduce all other eye makeup to zero
—
Making Winged Eyeliner Last

A well-executed wing that fades by noon is still a failed wing. Liner longevity comes down to prep, formula choice, and one setting step most people skip.
| Step | Product | Why It Matters |
|---|---|---|
| Prep | Eye primer | Creates barrier against oil, prevents transfer |
| Pre-liner powder | Translucent powder | Removes excess oil before liner goes on |
| Setting | Matching matte shadow | Locks liner in place, extends wear significantly |
| Formula | Waterproof liner | Resists humidity, sweat, and accidental rubbing |
Eye Primer First
Skipping primer is the number one reason liner breaks down before end of day. The eyelid is one of the oiliest areas on the face, and oil dissolves liner formulas from underneath.
MAC Pro Longwear Paint Pot doubles as both primer and eyeshadow base. Urban Decay Eyeshadow Primer Potion is another reliable option. Apply, let it set for 30 seconds, then line.
The Setting Powder Trick
Apply a small amount of translucent powder along the lash line before you draw any liner. L’Oreal Paris recommends this specific step to remove oils from the surface so liner sits on a clean, dry base rather than on top of skin oils.
After the liner is dry, dust a matching matte eyeshadow on top with a small brush. Press, do not sweep. This sets the formula and adds depth. PVB Beauty pro tips confirm this combination locks liner in place even in humid conditions.
Waterproof vs. Regular Formulas
Waterproof liner matters on oily lids, humid days, or any event longer than 6 hours. For a quick 3-hour brunch, a regular felt-tip liner with primer is fine.
The trade-off: waterproof formulas need an oil-based remover to come off cleanly. Rubbing a dry cotton pad at waterproof liner causes friction, not removal. Worth knowing before you start.
Touch-Ups Without Smearing
Blot, do not rub. If the wing has shifted slightly, a pointed Q-tip with a tiny amount of micellar water can reshape the outer edge without disturbing the rest of the eye makeup.
A concealer applied with a small flat brush along the bottom edge of the wing sharpens the line and covers any fading underneath. This is the same trick used backstage at most fashion shows to keep liner crisp through long shooting days.
—
Removing Winged Eyeliner Without Damaging Skin

The skin around the eyes is the thinnest on the face. Pulling, rubbing, and repeated friction in this area contributes to fine lines and irritation over time. Removal technique matters as much as application technique.
Oil-Based Removers for Waterproof Formulas
Waterproof eyeliner uses polymers that regular micellar water cannot fully break down. An oil-based remover dissolves those polymers on contact.
DHC Deep Cleansing Oil and similar oil cleansers work well here. Saturate a cotton pad, press and hold over the closed eye for 10 to 15 seconds, then wipe outward with one stroke. The hold time is what most people skip, and it is the most important part.
Micellar Water for Regular Liner
Micellar water is gentle and effective for non-waterproof formulas. Garnier Micellar Water and Bioderma Sensibio H2O are widely used and ophthalmologist-tested.
The same hold-and-wipe method applies. Press and hold for several seconds before wiping. This allows the micelles to lift the liner rather than smearing it across the lid. Skincare specialist Christina Korouchtsidi confirms that micellar water handles light and daily-wear liner well, while waterproof formulas need something stronger.
What to Avoid
Rubbing removes makeup but also stretches the skin and disrupts the lash follicles. Over time, repeated friction at the outer corners contributes to lash thinning and premature lines.
- Never use rough cotton or textured pads on the eye area
- Avoid harsh, alcohol-heavy removers unless formulated specifically for eyes
- Do not try to remove liner with regular face wash alone (it will not fully dissolve liner polymers)
If you wear full eye makeup daily, a dedicated eye makeup remover designed for your formula type is worth having separately from your regular cleanser. Leaving liner residue around the lash line overnight can contribute to clogged follicles and styes.
FAQ on How To Do Winged Eyeliner
What is the easiest way to do winged eyeliner for beginners?
Start with a felt-tip liner pen. Draw the tail first using your lower lash line as an angle guide, then connect it back to the lash line. Fill in the triangle last. Sketching with pencil before committing with liquid also helps beginners a lot.
How do you keep both wings even?
Draw both tails before filling in either eye. Step back from the mirror to compare from a distance, not up close. Use the angle of your lower lash line on each side as a reference. Symmetry checks up close are misleading because faces are not perfectly even.
What is the best liner for a sharp wing?
A felt-tip liner pen like Stila Stay All Day or NYX Epic Ink Liner. The firm tip gives consistent control without flexing mid-stroke. Gel liner with an angled brush works well too, but requires more skill to execute cleanly.
How do you do winged eyeliner on hooded eyes?
Apply liner with your eyes open, looking straight ahead. Never stretch the skin. Extend the flick outward rather than sharply upward. Draw slightly further than feels natural since the skin fold reduces visible length once your eyes are relaxed and open.
Why does my eyeliner smudge under my eyes?
Oily lids are usually the cause. Apply an eye primer before lining, then dust translucent powder along the lash line first. Set finished liner with a matching matte eyeshadow pressed on top. Waterproof formulas also help significantly on oily skin.
How do you fix a wobbly eyeliner line?
Rest your elbow on a flat surface before you start. Use short overlapping strokes instead of one long drag. A pointed Q-tip dipped in micellar water cleans up uneven edges without disturbing the rest of your liner or eye makeup.
What angle should a winged eyeliner flick be?
Follow the natural angle of your lower lash line extended outward past the outer corner. For downturned eyes, angle the tail more aggressively upward toward the tail of the brow. There is no single correct angle since eye shape changes what looks right.
How do you make winged eyeliner last all day?
Prime the lids first, then apply liner over a light dusting of translucent powder. Once the liner dries, press a matching matte eyeshadow on top to lock it. A waterproof liner formula adds extra staying power, especially in heat or humidity.
Is liquid or gel liner better for a cat eye?
Liquid felt-tip liners are easier for most people. Gel gives richer color and grips the skin well but needs an angled brush, which adds a skill variable. Beginners do better with felt-tip. Intermediate users often prefer gel for a deeper, more intense line.
How do you remove winged eyeliner without irritating the skin?
Press a soaked cotton pad against the closed eye for 10 to 15 seconds before wiping. Use an oil-based remover like DHC Deep Cleansing Oil for waterproof formulas. Micellar water such as Bioderma works well for regular liner. Never rub.
Conclusion
This conclusion is for an article presenting the full process of winged eyeliner, from tool selection to liner angle, eye shape adjustments, and removal.
The cat eye technique is learnable. A felt-tip liner pen, a stable hand, and the flick-first method handle most of the work.
Hooded eyes, downturned eyes, monolids – each shape has a fix. Liner symmetry comes from checking at distance, not up close.
Set your wing with translucent powder and a matching matte shadow. That one step alone changes how long your lash line definition holds throughout the day.
Practice matters more than product. Pick a liner, learn its dry time, and repeat the technique until the muscle memory kicks in.

- What Is Skin Tint and Why Everyone Is Obsessed - July 11, 2026
- What Is Foundation and How Do You Choose One? - July 6, 2026
- How to Make Blush Last Longer - July 3, 2026


