

Most people blame their eyeshadow palette when their eye makeup looks off. The palette is rarely the problem.
Knowing how to apply eyeshadow correctly comes down to technique: the right tools, a proper base, and understanding where each shade actually belongs on the eye.
This guide covers everything from eyeshadow primer and brush selection to color placement, blending, and setting your look for all-day wear.
By the end, you will know exactly how to build any eye makeup look, from a simple everyday wash of color to a defined crease and beyond.
What Eyeshadow Application Is

Eyeshadow application is the process of placing pigment on the eyelid using specific tools and blending methods to create depth, dimension, or color.
It is not just putting color on your eye. Done with intention, it changes the shape, depth, and overall balance of your entire face.
The distinction matters. Most people who struggle with eye makeup are not using the wrong products. They are skipping the foundational knowledge that makes color placement actually work.
The Four Eye Zones
Every eyeshadow technique operates within four specific zones. Knowing them before touching a brush is non-negotiable.
- Lid: the flat surface of the eyelid, from lash line to crease. This is where your main color goes.
- Crease: the fold above the lid. Depth and dimension live here.
- Brow bone: the area directly under the brow arch. Highlight placement here opens up the eye.
- Inner corner: the inner-most point of the eye. A light shade here adds brightness instantly.
The global eye makeup market was valued at USD 18.2 billion in 2023 and is growing at a 6.5% CAGR through 2030, according to Grand View Research.
That growth is being driven by consumers who want to understand technique, not just buy products. Tutorial content across TikTok and YouTube has shifted eyeshadow from an occasional skill to an everyday one.
Why Technique Matters More Than Product
74% of women in the U.S. wear makeup, with eyeshadow ranking in the top 5 most-used products, per a 2023 BG Falcon Media report.
Yet the most common complaint is that results look nothing like the tutorial. That gap almost always comes down to technique, not the palette.
A mid-range brush with the right motion will outperform a luxury brush used incorrectly. A drugstore eyeshadow palette blended properly will look better than a high-end one packed on without structure.
Urban Decay built an entire product category around this insight. Their Naked palettes were designed with pre-curated shade progressions that guide placement even for beginners, removing the guesswork from color order.
Eyeshadow Tools You Actually Need

Three brushes cover the majority of eyeshadow looks. Everything else is optional.
| Brush | Function | Best For |
|---|---|---|
| Flat shader brush | Packing color onto the lid | Shimmer, foil, and base shades |
| Fluffy blending brush | Diffusing edges and transitions | Crease work, soft finishes |
| Small pencil brush | Detail work and precision | Lower lash line, inner corner, cut crease |
That is your core kit. Three brushes.
Brush Brands Worth Knowing
Real Techniques is consistently the best entry-level option. Their brushes hold shape after washing, which matters more than most people realize.
Sigma Beauty sits in the mid-range and produces some of the densest fluffy brushes available. Their E25 blending brush in particular has a loyal following among working artists.
Morphe offers large brush sets at accessible prices, useful for building out a full kit without spending a lot at once.
Finger vs. Brush: When Each Works
Fingers work well for shimmers and foiled shades. The warmth and pressure of a fingertip pack pigment more efficiently than most flat brushes for those formulas.
For blending, mattes, and anything requiring soft edges, a brush always wins. Fingers do not diffuse pigment cleanly enough for crease work.
The eyeshadow primer market is projected to reach USD 6.2 billion by 2032, growing at a 6.31% CAGR (Wise Guy Reports). Demand is being driven by consumers who want longer wear and better color payoff, which is exactly what proper tools, paired with a base, deliver.
Eye Primer and Why Skipping It Is a Problem

Eyeshadow primer is a base applied to the eyelid before any color. It grips pigment, neutralizes discoloration, and prevents creasing throughout the day.
Skipping it is the single most common reason eyeshadow fades, migrates, or creases within hours of application.
What Primer Actually Does
The eyelid is one of the oiliest areas of the face. Without a base, eyeshadow pigment breaks down as skin oils build up underneath it.
Primer solves three problems at once:
- Increases color payoff by giving pigment something to grip
- Prevents oils from breaking down the shadow formula
- Neutralizes eyelid discoloration that can alter how colors appear
Product Options by Budget
The eyeshadow primer market was valued at approximately USD 450 million in 2023 and is projected to reach USD 750 million by 2032, according to Dataintelo. The category is growing because the results are visible and repeatable.
Urban Decay Primer Potion remains the category standard. It has been the benchmark for longevity since the early 2000s and still holds up against newer formulas.
For a more affordable option, the NYX HD Eye Base delivers comparable grip and crease resistance at a fraction of the price. e.l.f. Cosmetics also offers a well-regarded drugstore option that performs well for oily lids specifically.
Face Primer vs. Eye Primer
Key difference: face primer is not formulated for the eyelid.
Face primers often contain silicones that slide under the eye area, causing eyeshadow to slip rather than stick. Using a dedicated eye primer matters, especially for oily skin types and hooded eyes where shadow has more surface to travel across.
How to Map Your Eye for Eyeshadow Placement

Placement errors are the root cause of most eyeshadow failures. Blending technique gets blamed, but placement is usually the actual issue.
Mapping your eye before applying any product fixes this. It takes about 30 seconds and changes everything.
Finding Your Crease
Look straight into a mirror with your eyes open. The crease is the fold that appears where your lid meets the brow bone area above it.
To find where to place shadow in the crease, look straight ahead and place a flat brush horizontally above the rounded part of your eye. That line is your blending zone, not where your crease physically sits with eyes closed.
This is where most beginners get it wrong. They apply crease color with their eyes closed, which places pigment too low and creates a muddy, undefined look when eyes open.
Placement for Different Eye Shapes
Hooded eyes have a fold of skin that covers the crease when the eye is open. Shadow needs to be placed higher than the visible lid to remain visible after the fold falls.
Monolids do not have a visible crease to work with. Dimension comes from building color concentration from the lash line upward, using deeper shades at the root and lighter shades blending out above.
| Eye Shape | Crease Placement | Common Mistake |
|---|---|---|
| Standard almond | Follow natural crease line | Blending too high, losing definition |
| Hooded | Above visible lid, above fold | Placing color in crease that disappears when open |
| Monolid | Build from lash line upward | Over-blending, losing all depth |
| Deep-set | Keep color forward, not in socket | Heavy outer corner darkens the eye further |
Deep-set eyes sit further back in the socket. Heavy outer corner shading pushes the eye back visually. Keep color concentrated on the lid and inner areas instead.
The Order of Eyeshadow Application

Order matters. Applying shades in the wrong sequence makes blending harder and color payoff weaker.
The correct sequence builds a blendable base first, then adds depth. It goes from lightest to darkest, largest area to smallest.
Step-by-Step Sequence
Step 1: Transition shade in the crease. Use a matte shade that is slightly deeper than your skin tone. This is your blending base. It tells your other colors where to stop and creates a natural fade.
Step 2: Lid color. Pack your main shade onto the lid using a flat shader brush. Press, do not swipe. Swiping moves the transition shade around and muddles colors.
Step 3: Deepen the outer corner and crease. Use a deeper shade to add dimension. Keep it concentrated in the outer third of the crease and outer corner of the lid.
Step 4: Brow bone highlight. A matte or soft shimmer shade directly below the brow arch lifts the entire eye. This step takes 10 seconds and is skipped constantly.
Step 5: Inner corner. Apply last. A light shimmer or matte highlight here brightens and opens the eye. Applying it earlier means it gets covered by other colors during blending.
Why Order Affects Blending Results
Starting with the transition shade sets a powdery base that makes every color applied after it easier to blend.
Lid color applied second stays vibrant because it packs onto a prepped surface rather than bare skin or partially applied shadow. Depth added third layers over that structure rather than fighting through unblended product.
Eyeshadow is forecast to grow at a 4.83% CAGR through 2030, outpacing the broader eye makeup category, according to Mordor Intelligence. Part of this growth is tied to newer cream-to-powder textures specifically designed to reduce fallout and make blending more accessible for everyday users.
How to Blend Eyeshadow Without Losing the Color
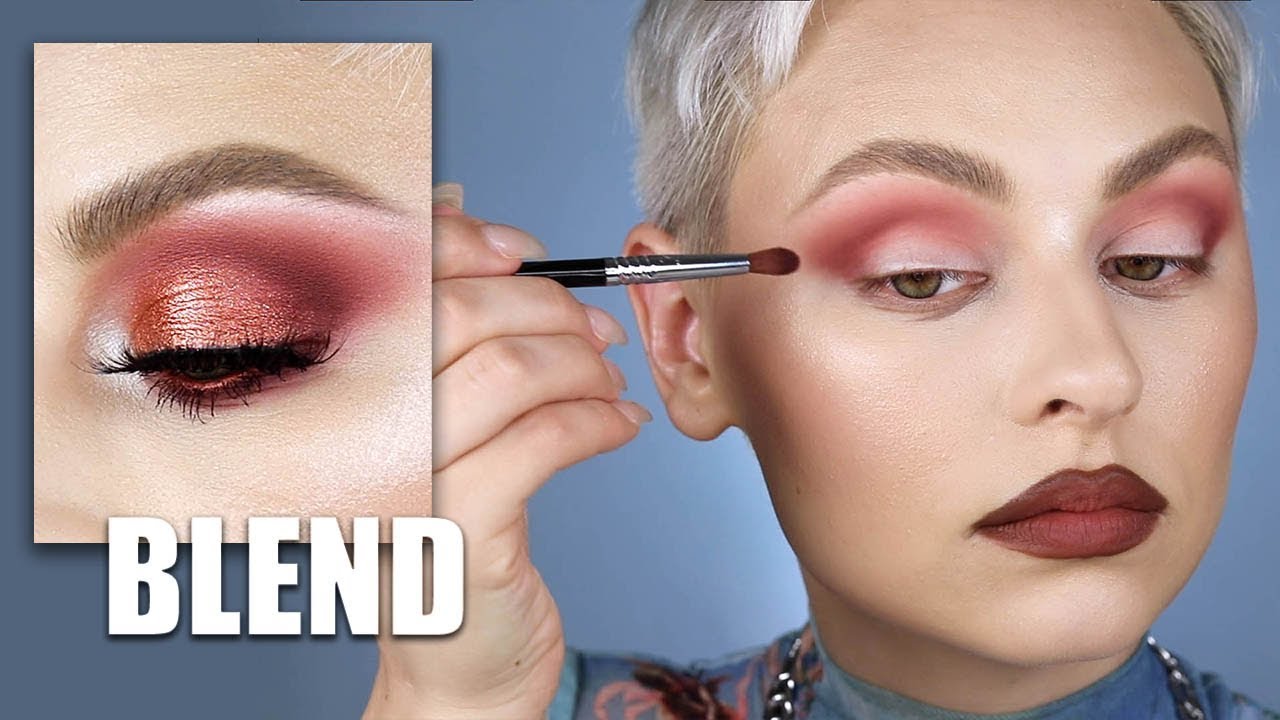
Blending is where most people either get it right or accidentally erase everything they just applied.
The goal is to diffuse the edges of color, not spread the color itself across the lid.
Blending Motion and Pressure
Two motions work well: a circular windshield-wiper motion across the crease, and small back-and-forth strokes directly on the edge of where color meets bare skin.
Pressure is the part nobody talks about enough. Less pressure, always. Heavy pressure spreads pigment. Light pressure blends edges.
A fluffy brush with almost no downward force, moved quickly back and forth, will blend a crease in under 30 seconds. The same brush pressed firmly will drag the color down and widen it past where you want it.
Dirty Brush vs. Clean Brush Blending
Dirty brush blending: using the residual pigment left on a brush from packing color to soften edges. This works well within the same color family and avoids muddiness when transitioning between similar shades.
Clean brush blending: using a fresh, product-free brush to soften edges. Better for mixing across different color families or when the transition between light and dark is very stark.
Most working artists use both in the same look, switching based on what the color situation requires.
When to Stop Blending
Over-blending washes out color faster than almost any other mistake.
Stop when edges look soft but color is still clearly visible on the lid. If you look at your eye and see barely any color remaining, you have blended too much. Re-pack the lid shade and blend only the perimeter, not the center.
A practical check: look at your eye from a normal face distance (not close up in the mirror). If the color reads clearly and edges look soft, you are done. Many people over-blend because they are checking from three inches away, which exaggerates every edge that looks perfectly fine at normal viewing distance.
For a deeper look at how eyeshadow fits into a complete eye makeup routine, including liner and lash techniques that work alongside shadow placement, the sequencing principles carry over directly.
Eyeshadow Looks by Skill Level

The biggest mistake beginners make is trying an advanced look before building the foundational skills that make it work.
Start where your technique actually is. A well-executed simple look will always read better than a botched cut crease.
Beginner: One-Shade Wash and Inner Corner
What it involves: a single matte or shimmer shade across the lid, plus a lighter highlight shade on the inner corner and brow bone.
This teaches lid placement, brush pressure, and how to identify your eye’s zones without the complexity of blending multiple colors.
Good starter palettes:
- Naked Basics (neutral mattes, nothing to overthink)
- NYX Ultimate Color Shadow Palette in Warm Neutrals
- e.l.f. Cosmetics Bite-Size Eyeshadow Palettes
Intermediate: Defined Crease, Two Shades, Lower Lash Line
The global eyeshadow palette market was valued at USD 4.48 billion in 2023, projected to reach USD 6.5 billion by 2032 at a 4.22% CAGR, according to Wise Guy Reports.
This growth reflects demand from exactly this level of user: someone who has moved past single-shade application and wants more tools for building dimension.
Intermediate technique adds:
- A transition shade in the crease that is 2-3 shades deeper than skin tone
- A secondary lid shade for depth in the outer corner
- A pencil brush along the lower lash line with the crease shade
The Anastasia Beverly Hills Soft Glam Palette was built for this level. Shade names are intuitive, and the color progression within the palette guides placement without requiring much prior knowledge.
Advanced: Cut Crease, Halo Eye, Graphic Combinations
Advanced looks are not harder because the techniques are more complex. They are harder because precision requirements are much tighter and small placement errors become very visible.
Cut crease: requires a concealer or tape line to create a sharp boundary between lid and crease color. No soft edges.
Halo eye: places the darkest shade on the inner and outer corners, with a light or shimmer shade in the center of the lid. Color order reverses from the standard progression.
The Pat McGrath Mothership Palette series has long been the standard at this level, with shades specifically built for graphic and high-contrast work.
Common Eyeshadow Mistakes and How to Fix Them

Most eyeshadow problems trace back to three sources: skipped prep, wrong application pressure, or the wrong color combination. Knowing which one you are dealing with cuts troubleshooting time significantly.
Fallout Under the Eyes
Fallout is pigment that drops from the brush or lid onto the under-eye area during application.
Prevention: apply eyeshadow before your base makeup. Any fallout lands on bare skin and wipes away cleanly with a brush or cotton swab.
If you prefer to do foundation first, apply a generous layer of translucent powder under the eye before any eyeshadow work. The fallout lands on the powder, which brushes off without disturbing the base underneath.
For intense pigments and loose glitters, a piece of tape or a business card held under the eye during application catches particles before they reach the skin.
Colors Turning Muddy
Muddy color comes from two sources: blending opposite color families together, or using a dirty brush that carries residual pigment from a contrasting shade.
Complementary shade combinations that blend cleanly:
- Browns and taupes
- Pinks and mauves
- Navies and purples
- Earth tones across warm and cool ranges (with care)
Mixing warm orange-browns with cool purples on the same brush creates mud. Clean the brush or use a separate one between significantly different color families.
Patchy Color and Creasing Mid-Day
Patchy color on the lid almost always comes from one of three things.
Missed primer is the most common. Without a base, pigment grips unevenly across areas of different oil and texture.
Wrong brush is second. A stiff, scratchy brush disturbs powder as much as it picks it up, creating bald spots.
Third: wrong application motion. Swiping a flat shader brush moves product sideways instead of pressing it into the lid. Pat, do not swipe.
For creasing mid-day specifically, the fix is layering. Apply primer, let it set for 30 seconds, then add a light dust of translucent powder before any eyeshadow color. This absorbs oils before they can break down the shadow above.
Fixing Mistakes Without Starting Over
A small angled concealer brush loaded with a damp product (concealer or face makeup) can erase most placement errors on the lid edge or under the eye without disturbing surrounding work.
For a shadow that is too dark or has migrated, pressing (not rubbing) a clean dry blending brush over the error diffuses it rather than spreading it further.
More detailed guidance on full smokey eye makeup technique covers how to manage heavy pigment and dark shade correction specifically.
How Eyeshadow Finish Types Affect Application

Finish is not just a cosmetic choice. It changes how a product needs to be applied, where it belongs on the eye, and what brush works for it.
The global eyeshadow market was valued at USD 2.8 billion in 2024 and is projected to reach USD 4.6 billion by 2033 at a 5.6% CAGR, per Marketintelo. Matte finishes lead market share, but shimmer and metallic segments together account for over 45% of liquid eyeshadow revenue, according to the same report.
Mattes: The Blending Workhorse
Matte eyeshadow dominated search volume throughout 2024, reaching a normalized peak of 100 in November 2024 on Google Trends, reflecting year-round demand for versatile, everyday wear, per Accio research.
Mattes are forgiving. Edges blend out softly, layering is predictable, and color correction is easier because there is no shimmer particle to redistribute.
Use mattes for: transition shades, crease depth, outer corner definition, and lower lash line work.
Shimmers: Lid-First, Finger-First
Shimmer eyeshadow shows eyelid texture. Every fine line, fold, and dry patch becomes more visible under a reflective finish.
Prep matters more for shimmers than for any other finish. A smooth primed lid is non-negotiable.
Application rule: pack shimmer with a flat brush or fingertip pressing directly onto the lid. Do not blend with a fluffy brush. The fine particles scatter and lose their reflectivity when blended rather than pressed.
Glitter and Special Finishes
| Finish | Base Required | Best Application Tool | Key Limitation |
|---|---|---|---|
| Glitter | Glitter glue or tacky primer | Flat synthetic brush or fingertip | Fallout heavy without adhesive base |
| Duochrome | Regular primer | Flat brush, dry application | Color shift only visible at correct angle |
| Foil/metallic | Damp brush or setting spray on brush | Flat brush pressed (not swept) | Dries quickly, apply in sections |
Glitter search interest peaked at a normalized score of 97 in December 2024, according to Google Trends data compiled by Accio, reflecting strong holiday-season demand. The glitter segment is projected to reach USD 1.3 billion by 2032, per Wise Guy Reports.
Urban Decay’s Moondust Glitter Eyeshadow range led TikTok conversation throughout 2024 and into 2025, largely because the formula stays put without a separate adhesive base, reducing the barrier to entry for glitter application.
Setting and Finishing Eyeshadow

Setting is the last step of eyeshadow application and one of the most skipped.
Done correctly, it determines whether a look lasts four hours or twelve.
Setting Spray vs. No Setting Spray
Setting spray is not always necessary for eyeshadow. If primer was applied correctly and skin is not particularly oily, the shadow can hold well through a standard day without it.
Where setting spray genuinely changes results:
- Humid environments or very oily lids
- Long events where touch-ups are not possible
- When shimmer or metallic shades need intensifying (spritz on the brush before picking up shadow)
High-quality setting sprays can extend makeup wear to 8 to 16 hours depending on skin type and formula, per product testing at Typsy Beauty. Matte formulas suit oily skin; dewy formulas work better for dry or normal types.
Baking and Under-Eye Cleanup
Baking means applying translucent powder under the eye in a generous layer, letting it sit while you complete the rest of your eye makeup, then sweeping it away with a fluffy brush.
The powder catches any fallout that lands during application. Brushing it away removes both the excess powder and the trapped pigment in one motion, leaving a clean surface beneath the eye.
This is standard practice in professional application. It solves the fallout problem after the fact rather than preventing it, which is useful when working with highly pigmented or loose formulas where fallout is unavoidable regardless of technique.
Eye-First or Foundation-First: Which Order
There is no universally correct answer. But there is a practical decision tree.
Eye-first: better when working with heavy pigment, glitter, or dark shades where fallout is significant. Foundation goes on after, covering any mess.
Foundation-first: better for soft, everyday looks with minimal fallout risk. Use translucent powder under the eye as a fallout shield if needed.
For complete guidance on how eyeshadow fits into a full face sequence, including foundation, blush, and applying setting spray, the order principles stay consistent regardless of which look you are building.
Pairing eyeshadow with the right lip product changes the entire balance of a look. Deciding between a bold matte lipstick or something softer like a sheer lipstick depends on how intense the eye is. Heavy eye work almost always pairs better with a quieter lip. And if the eye is soft and neutral, a stronger lip can carry the look.
FAQ on How To Apply Eyeshadow
Do I need eyeshadow primer before applying eyeshadow?
Yes. Eyeshadow primer prevents creasing, improves color payoff, and keeps shadow in place all day. Without it, oily lids break down pigment within hours. Urban Decay Primer Potion and NYX HD Eye Base are reliable options at different price points.
What brushes do I actually need for eyeshadow application?
Three brushes cover most looks: a flat shader brush for packing color, a fluffy blending brush for crease work, and a small pencil brush for detail. Sigma Beauty and Real Techniques both offer solid options without overspending.
What order should I apply eyeshadow shades?
Start with a transition shade in the crease, then pack lid color, deepen the outer corner, and finish with brow bone and inner corner highlights. This sequence builds a blendable base first, making every step easier.
How do I blend eyeshadow without losing the color?
Use a fluffy brush with very light pressure and a windshield-wiper motion along the crease edge. Less pressure blends; heavy pressure spreads. Stop when edges look soft but lid color is still clearly visible from a normal distance.
How do I apply eyeshadow for hooded eyes?
Place the crease shade higher than where your natural fold sits, above the visible lid. With hooded eyes, color placed in the actual crease disappears when eyes are open. Map placement with eyes open, not closed.
How do I stop eyeshadow from creasing mid-day?
Apply primer, let it set for 30 seconds, then dust a thin layer of translucent powder over the lid before adding any color. This absorbs oils before they break down the shadow sitting on top.
How do I prevent eyeshadow fallout under my eyes?
Do your eye makeup before your base. Any fallout lands on bare skin and wipes away cleanly. Alternatively, apply a generous layer of translucent powder under the eyes first, then brush it away with fallout after shadows are done.
How do I apply glitter eyeshadow without fallout?
Use a glitter glue or tacky primer as a base. Apply glitter with a flat synthetic brush or fingertip by pressing, not sweeping. Loose glitter without an adhesive base almost always drops particles onto the under-eye area.
What eyeshadow looks work for beginners?
Start with a single transition shade across the lid, plus a light highlight on the inner corner and brow bone. This builds placement and blending skills before adding complexity. The Naked Basics palette is a reliable starting point.
Does eyeshadow application order matter: eyes first or foundation first?
It depends on the look. Heavy pigment and glitter eyeshadow application calls for eyes first so fallout does not ruin your base. Soft everyday eye makeup looks can go either way with a translucent powder shield underneath.
Conclusion
This conclusion is for an article presenting how to apply eyeshadow as a skill built on fundamentals, not product budgets.
Map your eye zones, use the right brushes, and never skip a transition shade. Those three habits alone fix most color placement and blending problems.
Finish types matter too. Mattes blend forgivingly, shimmers need a primed lid, and glitter needs a tacky base.
Once the technique is solid, the look possibilities expand quickly, from an everyday inner corner highlight to a full smokey eye makeup look.
Eyeshadow longevity comes down to prep and setting. Primer in, translucent powder under the eye, and setting spray when the day is long.
Practice the sequence. The technique gets faster every time.

She started writing on the site after fielding the same questions from clients and friends often enough to just write the answers down: which red won't turn orange on a warm undertone, how to keep lipstick from feathering into fine lines, why a "12-hour" formula rarely survives dinner.
Every review on the site follows the same rule she uses with paying clients: wear it first, then decide if it's worth recommending.
- How to Choose Setting Powder for Your Skin Type - August 1, 2026
- How Long Does Eyeliner Last Before It Expires? - July 28, 2026
- What Is Contour and How Do You Apply It? - July 25, 2026


