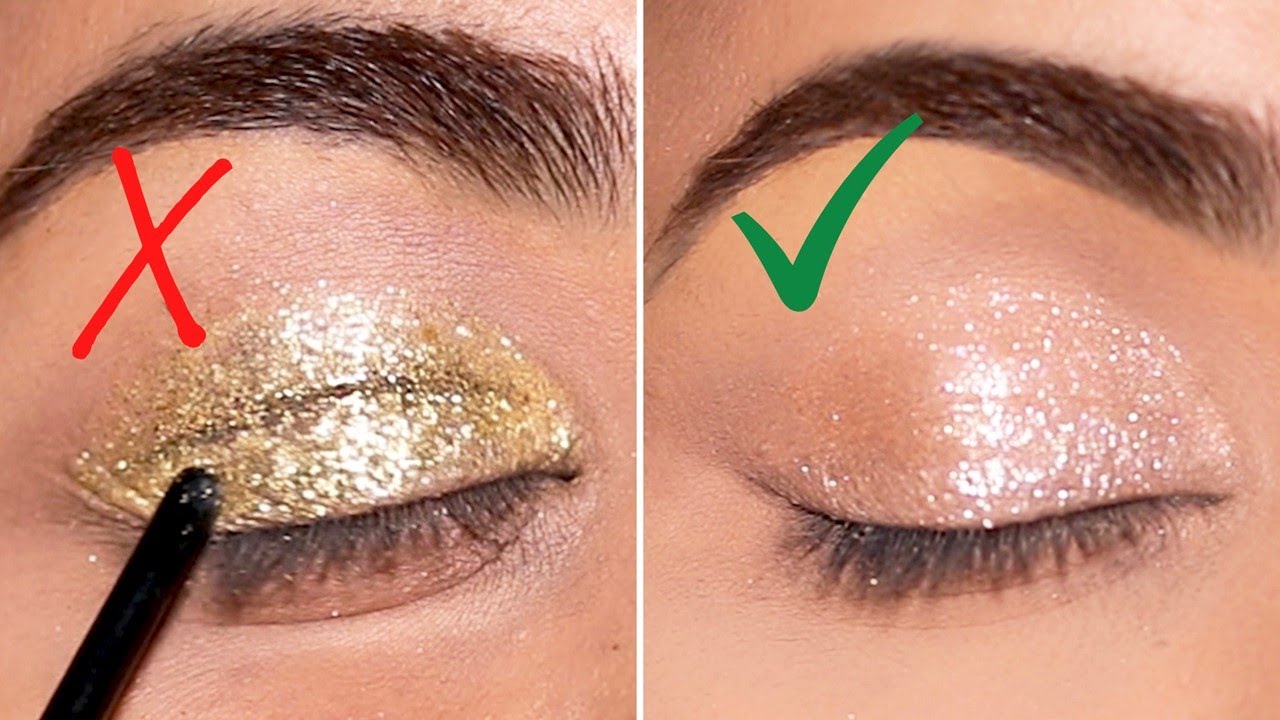
Most glitter eyeshadow problems start with the adhesive layer. Press the glitter on while it’s still wet and the particles sink and clump. Wait until it has fully dried and nothing sticks at all.
The tacky stage in between is the working window. Press glitter on in small sections during it, over a primed lid, instead of sweeping it across.
Loose glitter asks for the most control. Liquid and cream formulas go on with a fingertip and forgive a lot more.
The EU’s 2023 microplastics restriction bans loose plastic glitter for crafts and toys, yet plastic glitter in make-up stays legal to sell until 16 October 2035 (European Commission, 2025).
Loose, pressed, cream or liquid: which glitter eyeshadow formula to use
Loose glitter gives the most sparkle and makes the most mess. Pressed sits in the middle. Liquid and cream are the easiest to control, which is why I’d point most people there first.
Formula also sets how much adhesive you need and which applicator works. Cleanup time follows from that.
| Formula | Grip | Fallout | Best for |
|---|---|---|---|
| Loose (pure particles) | Needs a separate adhesive | High | Full-impact lids, experienced hands |
| Pressed (particles in a binder) | Grabs a primed lid quickly | Moderate | Quick sparkle with a flat brush |
| Cream (particles in a soft base) | Self-adhering, sets fast | Low | Fingertip application, inner corners |
| Liquid or gel (wet carrier) | Built-in adhesive | Low | Beginners, lash-line accents |
Cream and pressed formulas adhere fast, so Cult Beauty advises blending them out before they dry.
Gritty Pretty and Live That Glow both name Stila’s Glitter & Glow Liquid Eye Shadow as a dependable liquid pick. For loose pigment with bolder sparkle, Escentual points to MAKE UP FOR EVER’s Diamond Powders.
First glitter look? Start with a liquid formula and add loose glitter once the pressing motion feels natural.
Fine, medium and chunky particles
Particle size changes both the look and the fallout. MakingCosmetics specifies its cosmetic-grade Mica Sand Gold at 10 to 100 micrometers (2024 sheet), while its coarser Mica Diamond Sparkle runs 40 to 200 micrometers (January 2026 sheet).
Together those two sheets span roughly 10 to 200 micrometers, which covers fine to medium cosmetic mica. Chunky glitter runs coarser still, with some sparkle micas listed at 200 to 700 micrometers.
Fine particles read as a wash of shimmer and sit flat on the lid. Medium ones show up as individual flecks, so they’re the usual pick for the center of the lid.
Chunky pieces work better as an accent on the inner corner. They shed more easily because they’re heavier, so they need a stronger adhesive.
Holographic and multichrome finishes
Holographic glitter splits light into rainbow flashes, so it looks different from every angle.
Put it over a plain base, white for brightness or black for depth, and keep the rest of the eye quiet.
Is glitter eyeshadow safe, and what counts as cosmetic-grade?
Glitter near the eye always carries some risk. Cosmetic-grade glitter made and labeled for the eye area carries less of it than craft glitter does.
The American Academy of Ophthalmology (2022) lists glitter eye makeup as a common cause of corneal irritation or infection, especially for contact lens wearers. Larger pieces can scratch the eye the way sand or dirt does.
Cosmetic-grade versus craft glitter
Cosmetic-grade glitter has finer particles and is sold as eye makeup, with a full ingredient list and a label saying it’s meant for use around the eyes.
Craft glitter is a different animal. The pieces are large, flat and sharp-cornered, and nobody tested them for the eye area. Suppliers such as TKB Trading state outright that their large glitters are not recommended for eye use.
The FDA’s eye cosmetic guidance says to use only products intended for the eye, because a number of color additives approved for cosmetics in general are not approved for the area of the eye. Retail eye cosmetics also need an ingredient declaration, so a jar without one is a red flag.
What the FDA and EU rules say
Mica-based shimmer pigments are listed color additives, and suppliers such as MakingCosmetics document them as permitted for eye-area cosmetics. Plastic glitter is a different case.
According to TKB Trading’s regulatory FAQ, the FDA does not list polyester glitter as a permitted cosmetic color additive and has treated enforcement as discretionary. Holographic glitter, which is aluminum bonded to etched plastic film, lands in the same gap.
The EU draws the line by material. Under Regulation 2023/2055, biodegradable, soluble, natural and inorganic glitter is out of scope, so only non-biodegradable plastic glitter is restricted (European Commission, page updated July 2025).
A handful of dates and limits are worth keeping handy.
- The EU microplastics restriction began applying on 17 October 2023, banning loose plastic glitter for uses with no transitional period, such as arts and crafts (European Commission).
- From 17 October 2031, make-up must carry a label stating it contains microplastics (European Commission).
- Plastic glitter can be sold in make-up, lip and nail cosmetics until 16 October 2035, and not a day after (European Commission).
- The AAO (2022) gives 3 months as the replacement interval for eye makeup.
The Commission’s own guidance is not legally binding. A biodegradable label also speaks to the environment, not to particle edges, so eye-area labeling still matters.
Contact lenses and sensitive eyes
Contact lens wearers sit in the highest-risk group, since glitter can get trapped between the lens and the cornea, according to the Rocky Mountain Lions Eye Bank’s AAO-based guidance.
For sensitive eyes, the FDA says to stop using any eye cosmetic that causes irritation and to see a doctor if it persists. The AAO adds that you should introduce one new eye product at a time.
If glitter gets in your eye
Do not rub. Rubbing drags particles across the cornea.
Codet Vision advises flushing with sterile saline, sterile eyewash or artificial tears instead.
Pain, redness or blurred vision that lingers means an eye doctor visit.
What should go under glitter eyeshadow?
Loose glitter needs a glitter-specific primer or glitter glue under it. Oily or creasing lids also need a regular eyeshadow primer beneath that.
A regular eyeshadow primer smooths the lid and anchors the base shadow. Lashify notes it can hold glitter in a pinch, but a glitter primer grips better.
| Base | Pros | Cons |
|---|---|---|
| Regular eyeshadow primer | Smooths the lid, extends base shadow wear | Grips loose glitter less than glitter-specific bases |
| Glitter primer | Formulated to hold glitter | Stays tacky, so work in small sections |
| Glitter glue | Strong hold for chunky pieces | Dries fast and must be labeled for eye use |
| Cream shadow base | Adds color and grips fine particles | Needs a primer under it on oily lids |
Makeup artist Lerma, quoted by Makeup.com, picks NYX Professional Makeup Glitter Primer. Sephora community members pair it or Too Faced Glitter Glue with a flat packing brush.
Wait for the tacky stage
Glitter pressed onto wet adhesive sinks and clumps. Watsons advises waiting until the glue starts to dry.
Skip powder over a sticky base too. Sephora community members warn it kills the grip.
Oily lids
Oil breaks down creamy bases first. Layer a regular eyeshadow primer across the whole lid, then add glitter primer only where the glitter will sit.
Check the label
- Adhesives need eye-area labeling too (All About Vision)
- Read the ingredient list before the first use
How to apply glitter eyeshadow step by step
Keep your hands clean and give the adhesive time to turn tacky. Everything else is ordinary eye makeup order.
- Wash your hands and start with clean, dry eyelids, then pat on eyeshadow primer.
- Apply a base shadow. A white base boosts the color of the glitter above it, per Lashify.
- Blend any transition shades into the crease before the glitter goes on.
- Brush a thin layer of glitter primer or glue only where you want sparkle.
- Wait until the adhesive turns tacky.
- Press the glitter on with a flat brush or fingertip, one small section at a time.
- Keep your eyes closed for a moment so the layer settles.
- Mist setting spray, then finish with liner and mascara.
The base and transition layers follow the same blending rules as any standard eyeshadow application. Glitter goes last among the shadows, as Lashify recommends.
Pressing beats rubbing every time. Makeup artist Meg Guthrie, quoted by Gritty Pretty, presses the glitter on and locks it in with setting spray.
Close your eyes and apply setting spray from arm’s length.
Applicator and motion by formula

Loose glitter goes on with a flat brush, dampened with water (Watsons) or a spritz of Urban Decay All Nighter Spray (Escentual). Hold a folded tissue under the lower lashes to catch strays.
Pressed glitter takes a flat brush or a fingertip, and the motion is always pressing.
Cream and liquid formulas want fingertips only. Look downward while you apply, a tip Escentual gives for glitter gels and liners.
How to stop glitter fallout

The biggest fallout fix is sequence. Finish the eyes before the complexion, then lift whatever landed with tape or a spoolie.
Glitter before or after foundation
Sources disagree here, and both sides have a reason.
Two makeup artists quoted by Makeup.com favor eyeshadow before foundation, especially for glitter pigments. Artist Glazer puts anything loose or messy on bare skin because it cleans off easily. After foundation, glitter sticks to the base, drops more, and forces a redo of the complexion.
The Makeup.com writer goes the other way. She wears densely packed glitter pigment daily and still does foundation first. Shaped brows and concealer already in place also show how high the shadow should sit.
The safer call is loose glitter before foundation. Pressed and liquid formulas leave the choice open.
Lifting stray glitter
Keep a lifting tool within reach before the first particle drops.
Ruth Crilly wraps clear tape around a finger, sticky side out, and dabs the specks. If your skin is sensitive, press the tape on the back of your hand first, which dulls the stickiness. Lashify runs a spoolie over lashes and cheeks.
Sephora community members add one more trick: scotch tape works on the patch under the eyes.
Where to place glitter for different eye shapes

Place glitter where light already lands. That means the center of the lid, the inner corner and the lower lash line. Crease and outer V placements work too, but they move more.
| Placement | Effect | Watch for |
|---|---|---|
| Center of lid | Focal point, bigger-looking lid | Disappears on hooded lids when the eye opens |
| Inner corner | Brightens and opens the eye | Easy to overdo, so use a tiny amount |
| Lower lash line | Balances the lid above | Keep it off the lash line itself |
| Crease and outer V | Shape and depth next to matte shadow | Glitter can creep into the fold |
Charlotte Tilbury’s Jewel Pot instructions put the cream glitter in the crease and the inner corners, plus along the lower lash line.
Inner corner
Makeup artist Anne Kohlhagen, quoted by Makeup.com, starts with as little product as possible and builds up.
A small dab here works like an inner corner highlight, only with more shine.
Lower lash line
Stay outside the lash line itself. The American Academy of Ophthalmology (2022) says makeup placed on the lash line can block the oil glands that protect the eye’s surface.
Layering beats smearing here. Escentual suggests Urban Decay Heavy Metal Glitter Eyeliner over black liner for a double-liner effect.
Hooded eyes
Placement matters more than quantity. Makeup artist Laura Geller keeps shadow slightly above the crease and blends upward.
- Place the glitter with your eyes open, looking straight ahead.
- Blink and look again.
- Wherever glitter transfers, add more higher above the fold.
Katie Jane Hughes, speaking to Into The Gloss, notes that glitter placed with closed eyes partly disappears when they open. Check placement open-eyed first, then close your eyes to let the layer settle.
More general makeup techniques for hooded eyes apply to the rest of the look.
Glitter alone or layered over color
Glitter on its own is the simplest option, though skin tone shows through any gaps, so coverage has to be even.
Over a base shade, the color hides those gaps and adds depth. Lashify puts a white base under glitter for extra brightness.
Why glitter eyeshadow creases, clumps or slides, and how to fix it
Glitter eyeshadow tends to fail in one of a few places. The base creases, the glitter migrates into the fold, coverage turns patchy, or the adhesive gives out by evening.
| Problem | Cause | Fix |
|---|---|---|
| Creased lines in the glitter | Lid oil breaks down the base | Prime the whole lid, smooth with a clean fingertip |
| Glitter on the brow bone | Product moves into the fold when the eye opens | Place with eyes open, shift higher above the fold |
| Patchy coverage | Adhesive too thick or uneven | Tap on a thin layer, build glitter in small sections |
| Glitter fades by evening | Adhesive dried out before the glitter went on | Press glitter on while the base is still tacky |
Creasing on oily lids
Makeup artist Gabriel Almodovar, quoted by Makeup.com, blames excess lid oil mixing with the shadow and sliding into the crease. His prevention is a proper base before any shadow.
If creasing has already started, smooth it with a finger. It will crease again, so touch it up when needed rather than layering more product.
What decides wear time

Wear time depends on the layers under the glitter, not on the glitter itself.
Cult Beauty’s formula for staying power is eyeshadow primer, a base shadow and glitter glue, applied with patting instead of swiping.
When glitter eyeshadow is the wrong choice
Skip it if you wear contact lenses and have had irritation before. Skip it too with an eye infection or inflamed lids, where the FDA says to wait until the area heals and discard the products you were using.
Lids that swallow every product are a softer reason to pass. A cream shimmer is a calmer option there.
The AAO’s own advice is to avoid glitter eye makeup, the strictest position among these sources. This guide assumes you accept some risk and reduce it.
How to remove glitter eye makeup safely

Lift loose particles with tape, dissolve the adhesive with an oil-based remover held on the closed lid, then wipe gently. Rubbing is what turns cleanup into a scratch.
Standard eye makeup removal habits still apply, but glitter punishes rough handling. L’Oreal Paris warns that heavy rubbing can scrape the skin.
| Method | Best for | Watch for |
|---|---|---|
| Medical tape | Stray flecks on skin | Dab your hand first to dull the stickiness |
| Bi-phase oil-and-water eye remover (CeraVe Comforting Eye Makeup Remover) | Dissolving the adhesive | Keep it out of the eye |
| Waterproof micellar water | Light looks | Needs a second pass with oil |
| Petroleum jelly | Gentle lid cleanup | Rinse thoroughly |
Makeup artist Rose Grace, quoted by Makeup.com, uses the CeraVe remover first and follows with tape. She prefers medical tape because it is gentler on skin.
Loosening the adhesive
Hold a remover-soaked cotton pad over closed eyes for a few seconds (L’Oreal Paris), then wipe with light strokes and no pressure.
A second pass with cleansing oil or balm, massaged in and rinsed off, usually finishes the job. One method rarely clears everything, per L’Oreal Paris.
Finishing at the lash line
Run a clean cotton swab along the base of the lashes to pick up what the pad missed.
The AAO recommends baby shampoo for washing the eyelids and says to rinse remover off thoroughly.
Skip scrubs with gritty beads near the eyes. Remove all eye makeup before sleeping.
Glitter Eyeshadow FAQ
What is the difference between glitter, shimmer and sparkle eyeshadow?

Particle size is the real difference. Glitter uses larger pieces you can pick out one by one, and shimmer is a fine, light-reflecting pigment that reads as a smooth sheen.
Brands apply “sparkle” to either, so judge a product by its particle size, not its name.
Can you use concealer or eyelash glue as a glitter base?
Yes, with a caveat for lash glue. Rimmel London preps lids with a dot of concealer before glitter eyeshadow.
Makeup artist Anne Kohlhagen adds a tiny bit of clear eyelash glue at the inner corner for all-day hold. The FDA says to check the ingredients of lash adhesives because eyelids are delicate.
How do you make glitter eyeliner?
Draw a thin line of glitter primer just outside the lash line, then press glitter onto it. Lashify uses this method.
A premade glitter gel liner is the faster route, and layering it over black liner adds depth.
Can you mix loose glitter with glitter glue before applying it?
Yes. Beautylish community members dab glitter glue on the back of the hand, pour glitter on top, mix, and apply the blend to the lid.
Work in small batches because the glue sets fast, and use a glue and glitter that both carry eye-area labeling.
What to Try First With Glitter Eyeshadow
Start with a liquid or cream formula labeled for the eye area, pressed over eyeshadow primer with a fingertip. Fewer separate products mean fewer places for the look to fail.
Wear that first look at home for a full day. Check it at midday and again at night for creasing and brow-bone transfer. Glitter glue and loose glitter can wait until the look holds.
Change one layer at a time, so a failure points to a single cause. It costs a test day for every new combination, which is slower than trusting an untested look on the night.
This advice reflects the European Commission’s guidance as updated in July 2025. Formulas will shift as plastic glitter leaves European make-up, so recheck the label when you restock.
Once a first look holds, more glitter makeup looks offer placements to build toward.

She started writing on the site after fielding the same questions from clients and friends often enough to just write the answers down: which red won't turn orange on a warm undertone, how to keep lipstick from feathering into fine lines, why a "12-hour" formula rarely survives dinner.
Every review on the site follows the same rule she uses with paying clients: wear it first, then decide if it's worth recommending.
- How to Make Eyeliner Last Longer Without Smudging - August 31, 2026
- How to Make Eyeshadow Last Longer All Day - August 29, 2026
- How to Find Your Undertone in 5 Easy Steps - August 27, 2026