

Dark circles, fine lines, blemishes. One concealer, one twist.
Knowing how to use the Maybelline Eraser correctly makes a real difference in your results. This isn’t just about dabbing product under your eyes and hoping for the best.
The Maybelline Instant Age Rewind Eraser is America’s #1 concealer for a reason. Its built-in micro-corrector applicator, Haloxyl formula, and multi-use coverage set it apart from a standard concealer stick.
This guide covers everything: shade matching, application technique, blending, setting, skin-type adjustments, common mistakes, and how to keep the applicator tip clean.
By the end, you’ll know exactly how to get the most out of this drugstore concealer, whether you’re covering dark circles, correcting discoloration, or spot concealing blemishes.
What Is the Maybelline Instant Age Rewind Eraser
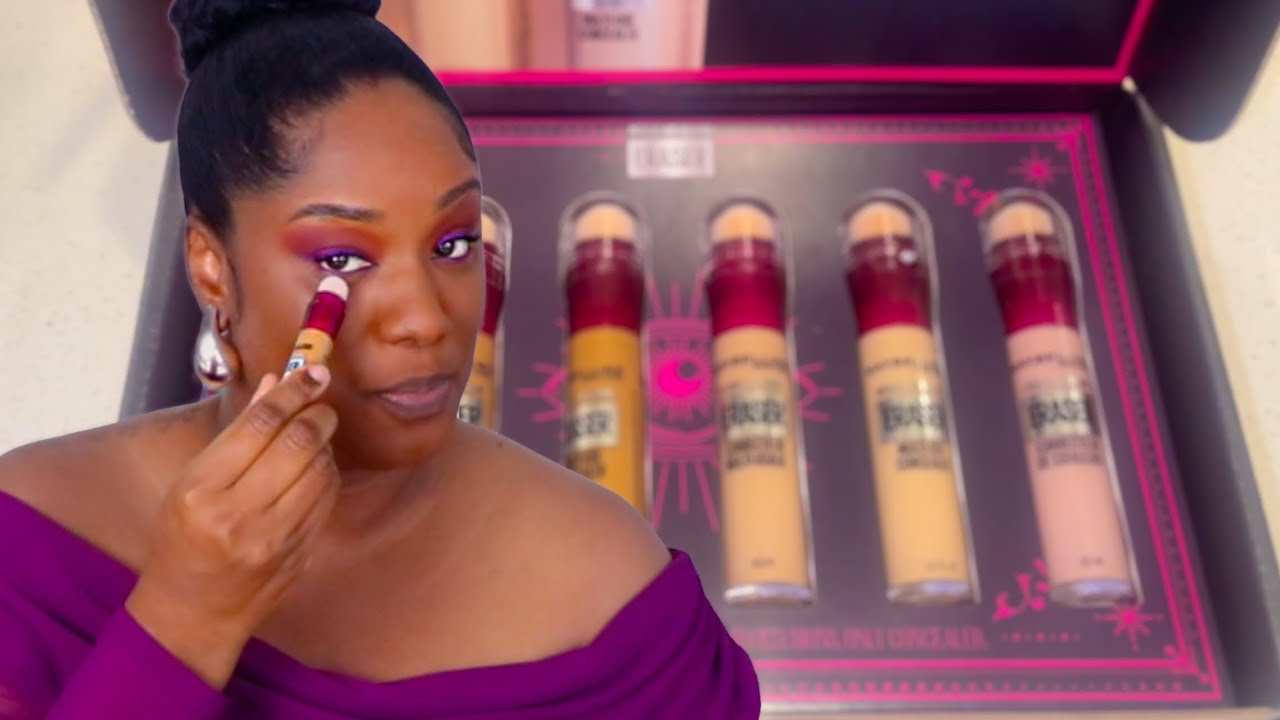
The Maybelline Instant Age Rewind Eraser is a multi-use concealer with a built-in micro-corrector applicator tip. It’s not just a standard concealer stick. The twist-up sponge tip dispenses product on demand and applies directly to the skin without a brush or finger.
Maybelline markets it as America’s #1 concealer, a claim backed by NielsenIQ sales data. With over 131,000 five-star Amazon reviews, it’s one of the best-selling concealers across both drugstore and prestige categories (Good Morning America, 2023).
The Two Core Formulas
| Formula | Best For | Key Ingredients |
|---|---|---|
| Dark Circles Treatment | Under-eye coverage, anti-aging | Haloxyl, Goji Berry |
| Color Correcting | Redness, discoloration, dark spots | Glycerin, Vitamin E, Tripeptides |
Both formulas share a crease-resistant, non-comedogenic base with up to 12 hours of moisturizing wear.
What It Targets
Dark circles. The treatment formula contains Haloxyl, a patented peptide blend by Sederma. In a clinical study, a 2% Haloxyl gel reduced under-eye darkening by an average of 63% over two months (Sederma/Skin Inc.).
Fine lines. The creamy formula doesn’t settle into fine lines the way powder-heavy concealers do.
Blemishes and discoloration. The color-correcting version comes in four shades: green (redness), yellow (blue-purple tones), pink (dullness), and orange (deep discoloration on medium to deep skin tones).
Goji Berry extract acts as an antioxidant, supporting the overall radiance of the eye area. The concealer is also vegan, paraben-free, talc-free, and mineral oil-free. Suitable for sensitive skin.
Shade Range
The Dark Circles Treatment version comes in 18 blendable shades, covering skin tones from fair to deep. This expanded range came after early versions of the product were criticized for limited options for deeper skin tones.
The Color Correcting formula has four shades, each designed to neutralize a specific tone rather than match skin.
—
Tools You Need Before You Start
The Eraser is designed to work with minimal tools. But what you put on your skin before applying it directly affects the result.
Skin Prep Essentials
Moisturizer: Apply a lightweight moisturizer and let it absorb fully. Dry, dehydrated skin makes any concealer cling to texture and crease faster. This matters even more for the under-eye area, where skin is already thinner.
Primer (optional but useful for oily skin): A makeup primer creates a smoother base and extends wear. If you skip it, your natural oils will break down the concealer faster, especially in the T-zone and around the eyes.
The global concealer market was valued at approximately $8.5 billion in 2023, growing at a 5.24% CAGR through 2032 (DataIntelo). A big driver? Consumers demanding multi-functional products that combine skincare and coverage, exactly what the Eraser was built for.
Blending Tools
The built-in sponge tip works. But if you want a more precise or seamless finish, you have options:
- Fingertip: Warm skin temperature helps blend the creamy formula naturally. Good for quick application.
- Damp Beautyblender: Gives a sheer, skin-like finish. Best for dry or mature skin that needs a lighter hand.
- Flat concealer brush: Adds buildable coverage with more control. Works well for blemish concealing.
That said, I’ve seen people get great results using nothing but the built-in tip and their ring finger to tap it in. Don’t overthink it.
Setting Products
Translucent powder: Locks the concealer in place and prevents creasing. Apply lightly with a small fluffy brush.
Banana powder: A yellow-tinted setting powder that brightens the under-eye area. Works especially well for medium to deeper skin tones.
Setting spray: An alternative to powder for dry skin types. Spritz after application to set without adding texture.
If you’re learning how to apply setting powder properly, a light press-and-roll motion with a damp sponge gives better results than brushing it on. Brushing can disturb the concealer underneath.
—
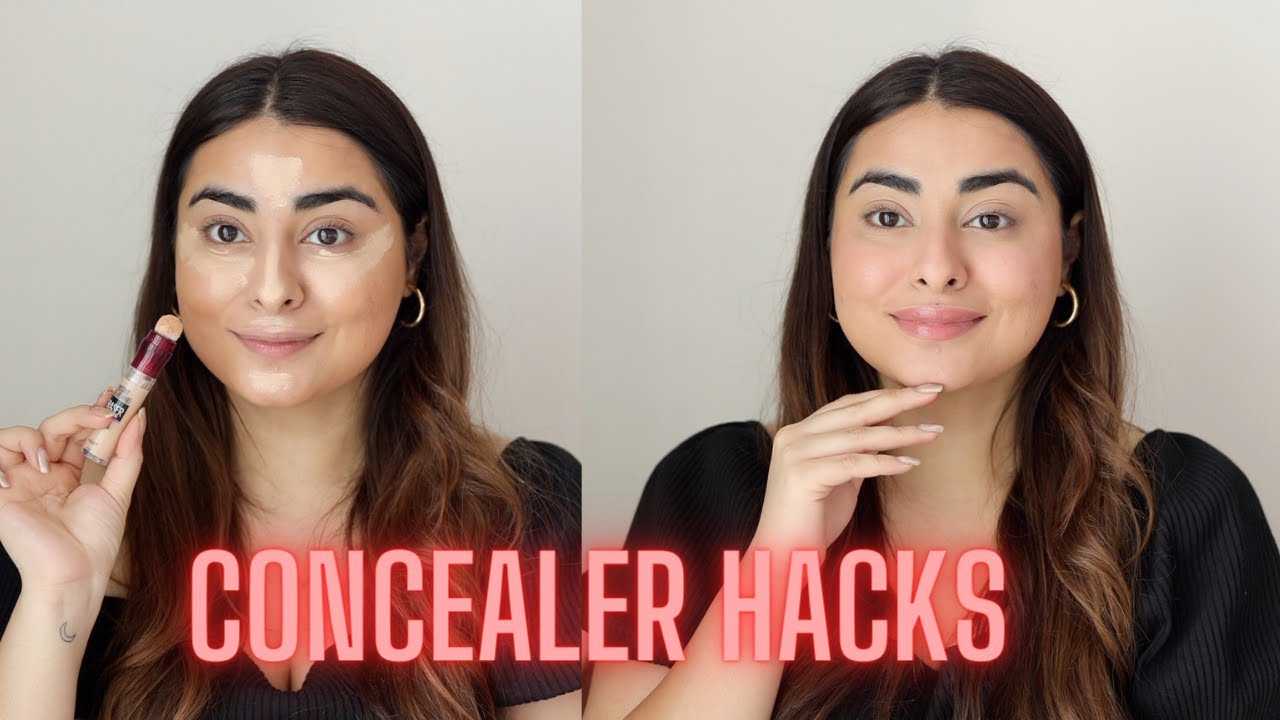
How to Apply the Maybelline Eraser Concealer

The most common mistake with this product? Twisting out too much product at once. The sponge tip holds more than it looks like it does, and over-applying leads to caking and creasing.
Twist the base of the applicator in the direction of the arrows until a small amount of product appears on the sponge. On first use, this can take several turns.
Applying for Dark Circles
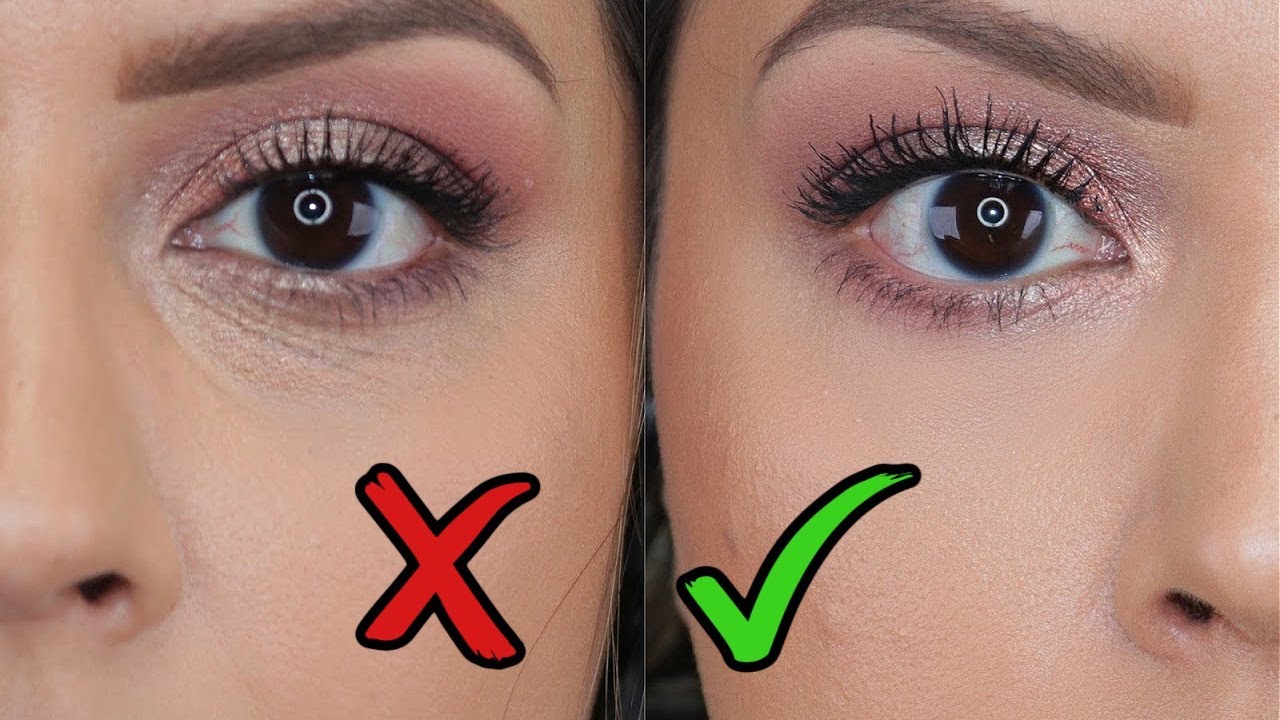
Place the sponge tip directly under the eye. Using a stippling or dabbing motion, apply the concealer in a triangle shape pointing down toward the cheek, not just in a thin line under the lash line.
This triangle technique (popularized by celebrity makeup artist Mary Phillips) brightens the entire mid-face, not just the under-eye. It’s a more natural look and uses less product overall.
Blend outward using your ring finger or a damp sponge. The ring finger has the lightest touch, which reduces pulling on delicate skin.
Applying for Blemishes and Spot Concealing
Less is more here. Dot a small amount directly onto the blemish with the sponge tip, then tap (don’t drag) to blend the edges.
Dragging the product spreads it unevenly and picks up surrounding texture. Tapping blends the edges while keeping coverage concentrated on the spot.
For red blemishes, applying the green Color Correcting shade underneath the skin-tone concealer gives better coverage. The color correction neutralizes the redness before you add coverage on top, which means you need far less concealer to finish the job.
Applying for Fine Lines and Larger Coverage Areas
Apply in thin layers. Let each layer settle for a few seconds before adding more.
Building coverage in thin coats gives a much better result than applying one heavy layer. This is especially true for mature skin, where thick product settles into lines fast.
For larger areas like forehead lines or nasolabial folds, dispense product onto the back of your hand first, then use a brush or sponge to apply. This gives you more control over the amount used compared to applying directly from the tip.
If you’re pairing the Eraser with foundation and want to understand the full process of applying foundation first, note that the order matters. Apply foundation, then concealer on top for targeted coverage. Or apply concealer first and blend foundation over it for a more natural, skin-like finish.
—
How to Blend the Eraser Concealer Properly

Blending is where most people lose the result. The Eraser’s creamy formula is forgiving, but technique still makes a real difference.
Finger-Tap vs. Sponge Blending
Finger tapping is faster and works well for everyday wear. Your skin temperature warms the product and helps it melt in naturally.
A damp beauty sponge gives a more polished, airbrushed finish. It also sheer out the coverage slightly, which is actually what you want for a natural under-eye look. Thick, opaque coverage under the eyes rarely looks good in real light.
People learning how to apply makeup with a sponge should note that the sponge needs to be damp, not wet. Squeeze out excess water before use. Too much water dilutes the product and reduces coverage.
Direction and Pressure
For under-eye application, blend in an outward motion from the inner corner toward the temple. Never drag inward toward the nose, as this moves product into the fine lines at the inner corner.
Use light pressure. Pressing too hard moves the product off the skin rather than blending it in. If you see the concealer shifting, lighten your touch.
Avoiding Creasing
Creasing happens for a few reasons:
- Too much product applied in one pass
- Skipping moisturizer, leaving dry patches for product to cling to
- Not waiting for moisturizer or primer to fully absorb before applying
- Skipping setting powder on oily skin types
A light dusting of translucent powder immediately after blending prevents the most common creasing issues. If you want to go powder-free, a quick spritz of setting spray works as an alternative, though it’s less effective for oily skin types.
Understanding how to prevent creasing under eyes long-term involves both the right product and the right layering sequence. Prep, apply, blend, set. Skip any step and the result suffers.
—
How to Set the Concealer So It Lasts
Setting is non-negotiable if you want the Eraser to hold. The creamy, moisturizing formula is great for skin, but that same creaminess makes it move without a setting step.
Translucent Powder vs. Banana Powder
| Setting Option | Best For | Finish |
|---|---|---|
| Translucent powder | Fair to light skin tones | Matte, invisible |
| Banana powder | Medium to deep skin tones | Brightening, slight warmth |
| Setting spray | Dry or mature skin | Dewy, natural |
Banana powder is underused. A lot of people with medium skin tones reach for translucent powder by default and end up with a slightly ashy under-eye. A little banana powder there instead makes a noticeable difference.
The Baking Technique
Baking means applying a generous amount of powder over the concealer, leaving it to sit for 5-10 minutes, then dusting off the excess. This is ideal for oily skin or for anyone who needs their concealer to last through a long event.
Apply loose translucent powder generously using a damp beauty sponge. The heat from your skin helps the powder bond with the concealer underneath.
After 5-10 minutes, use a fluffy brush to sweep away the excess. What’s left is a crease-resistant, long-wearing base.
Setting Spray as an Alternative
For dry or mature skin, powder can look cakey and settle into fine lines. A setting spray is a better option. Hold the bottle 8-10 inches from the face and mist lightly in an X and T motion across the face.
If you want to know how applying setting spray fits into a full routine, it goes last, after every other product is applied and set.
Avoiding Flashback in Photos
Heavy powder application causes white flashback in flash photography. This happens because powder reflects light at a flat angle, creating a pale, washed-out look in photos.
To avoid it: use a small amount of powder, avoid applying powder to areas that don’t need it, and choose a setting spray over powder if you know photos will be taken. The Maybelline Eraser itself does not cause flashback. The issue comes entirely from how much powder sits on top.
—
How to Use the Maybelline Eraser for Different Skin Types
The Eraser works across skin types, but the application tweaks vary. Using the same method on dry skin and oily skin gives very different results.
Dry Skin
Dry skin is actually where this concealer performs best. The moisturizing formula doesn’t cling to dry patches the way matte formulas do.
Key adjustments:
- Apply a hydrating moisturizer and let it absorb fully before applying concealer
- Skip heavy powder or use only a very light dusting on the under-eye
- Use a setting spray instead of powder where possible
- A damp sponge gives the most natural finish on dry skin
Avoid over-powdering. It’s the number one way dry skin looks cakey with this product.
Oily Skin
Oily skin breaks down the creamy Eraser formula faster than other skin types. You need to prep and set more deliberately.
Start with a mattifying primer. Apply the Eraser in a thinner layer than you think you need. Then set with translucent or banana powder and consider baking if you need all-day wear.
If you want a comprehensive breakdown of applying makeup for oily skin, the core principle is: control oil at every layer, not just at the end. A mattifying primer under the concealer makes more difference than any amount of powder on top.
Mature Skin
Mature skin benefits from this concealer’s hydrating base, but the application method needs to be lighter. Heavy product and heavy blending both emphasize fine lines.
Use your ring finger only. Tap lightly, don’t rub. Apply one thin layer, let it settle, and add a second only if needed. Set with a very light powder or skip powder entirely and use setting spray.
The Eraser’s Haloxyl content is worth noting for mature skin users. In a Sederma clinical study, consistent 2% Haloxyl application showed a greater than 60% reduction in under-eye dark circles over 56 days (PhaMix). As a skincare-infused concealer, it’s doing more than just covering.
Combination Skin
Treat each zone differently. Use minimal product and no powder on dry cheek areas. Apply a slightly thinner layer and set with powder on the oily T-zone and forehead.
The goal is to use concealer only where it’s needed, not as an all-over product. Spot application on combination skin always looks more natural than full-face application.
Common Mistakes When Using the Eraser Concealer

Most concealer problems come down to two things: too much product and not enough prep. The Eraser is forgiving, but it can’t fix bad habits on its own.
According to a 2024 beauty application survey, 68% of users apply concealer incorrectly, with the most common errors being shade mismatch and wrong application shape.
Dispensing Too Much Product at Once
This is the single most common mistake. The micro-corrector tip holds more product than it looks like it does.
Twist the base slowly. Stop as soon as product is visible on the sponge. One or two twists is almost always enough for a full under-eye application.
Overdispensing leads to excess product sitting on top of the skin rather than blending in. That excess causes creasing within the first hour, especially on oily skin types.
Using the Wrong Shade
A shade too light doesn’t just look unnatural. Under flash photography, it creates stark white patches under the eyes.
For concealing: match your foundation shade exactly, or go one shade lighter at most.
For highlighting: use the Brightener shade from the Instant Age Rewind line, which is specifically formulated for that purpose, rather than a random lighter concealer.
Testing shade on the back of your hand means nothing. Always test on the jawline or directly under the eye in natural daylight.
Skipping Moisturizer on Dry Skin
Dry, flaky under-eye skin makes any concealer cling to texture and emphasize rather than hide it. The Eraser’s moisturizing formula helps, but it can’t compensate for completely unprepped skin.
Apply an eye cream or lightweight moisturizer first. Wait at least 5 minutes before applying concealer. Rushing this step is one of the fastest ways to end up with patchy, uneven coverage.
Dragging Instead of Tapping
Dragging the sponge tip or finger across the skin moves product unevenly and pulls at the delicate under-eye area.
- Always use a stippling or tapping motion
- Blend edges outward, not inward
- Use your ring finger for the lightest touch
This matters more for mature skin. Dragging concealer over fine lines makes them far more visible, not less.
Not Blending the Edges
The center of the coverage is rarely the issue. It’s the hard edges left where concealer stops that give the whole thing away.
After placing product: use a clean fingertip or damp sponge to feather the edges into the surrounding skin. There should be no visible line where the concealer ends.
Pair this with the right makeup brush technique for blemish coverage. A small flat brush gives more control over edges than the built-in sponge tip alone.
—
How to Clean and Store the Applicator Tip

The Eraser’s sponge tip touches your skin every time you use it. A dirty tip transfers bacteria, old product residue, and oil back onto your face.
Aston University research found bacteria on 9 out of 10 commonly used cosmetic tools. Only 61% of beauty users clean applicators even once a month (Microban research).
Cleaning the Micro-Corrector Tip
Maybelline states the applicator tip has a built-in antimicrobial system. That helps, but it doesn’t eliminate the need for cleaning entirely.
After each use: wipe the sponge tip with a dry tissue to remove excess product. Never wet the applicator. Moisture breaks down the antimicrobial system and can cause the sponge to deteriorate faster.
For a deeper clean, use a dry brush cleaner spray on a tissue and gently press the tip into it. Let it dry fully before the next use.
How Often to Clean It
| Usage Frequency | Tip Cleaning | Method |
|---|---|---|
| Daily use | After every use | Dry tissue wipe |
| Occasional use | Before each use | Dry tissue wipe |
| Shared product | Before and after | Dry cleaner spray + tissue |
If you’re using any blending tools alongside the Eraser, like brushes or sponges, those need regular washing too. Learning how to clean makeup sponges properly removes both product buildup and bacteria that accumulate with daily use.
Storage and Product Expiry
Store the Eraser upright, cap on. Storing it on its side or upside down can cause product to dry out around the tip or leak into the sponge.
Signs the product has expired or gone bad:
- Unusual smell, noticeably different from when the product was new
- Texture changes, including separation or unusual thickness
- Sponge tip has become stiff or discolored beyond normal product residue
- Coverage and blendability noticeably worse despite normal application
Concealer generally has a 12-month shelf life after opening. The Eraser’s formula doesn’t behave differently here. If you notice any of the above signs before 12 months, don’t keep using it.
For anyone who uses multiple makeup tools alongside this concealer, understanding how to clean makeup brushes matters. Brushes used to blend the Eraser pick up the same product residue and skin oils as any other brush. Bacteria left on them gets reintroduced to your face on the next use.
FAQ on How To Use The Maybelline Eraser
How do you dispense product from the Maybelline Eraser applicator?
Twist the base in the direction of the arrows until concealer appears on the sponge tip. On first use, this takes several turns. After that, one or two twists is enough. Never squeeze the tube directly.
Do you apply the Maybelline Eraser before or after foundation?
Apply foundation first, then use the Eraser for targeted coverage. Foundation reduces how much concealer you need. Going concealer-first often leads to over-application and a cakey finish by midday.
How do you blend the Eraser concealer without creasing?
Use your ring finger or a damp Beautyblender. Tap, never drag. Apply a light dusting of translucent powder immediately after blending to lock the formula in place and prevent creasing under the eyes.
What is the best way to use the Maybelline Eraser for dark circles?
Apply in a downward triangle under the eye, not just along the lash line. Blend outward. The Haloxyl and Goji Berry formula works best when applied consistently, building coverage in thin layers rather than one heavy pass.
Can you use the Maybelline Eraser on blemishes?
Yes. Dot product directly onto the blemish with the micro-corrector tip, then tap the edges to blend. Don’t rub. For red blemishes, layer the green Color Correcting shade underneath first for cleaner, longer-lasting coverage.
How do you set the Maybelline Eraser so it lasts all day?
Press a small amount of loose translucent or banana powder over the concealer using a damp sponge. For oily skin, bake for 5 minutes then dust off the excess. Dry skin types do better with a setting spray instead.
How do you clean the sponge applicator tip?
Wipe the tip with a dry tissue after every use. Never wet it. The antimicrobial system built into the applicator helps, but daily wiping removes product buildup and reduces bacteria transferring back onto your skin.
Which Maybelline Eraser formula should you choose?
The Dark Circles Treatment targets under-eye coverage and fine lines, infused with Haloxyl and Goji Berry. The Color Correcting version addresses redness, discoloration, and dullness. Most people use both together for full complexion coverage.
How do you use the Maybelline Eraser on mature skin?
Apply one thin layer only, using your ring finger with a light tapping motion. Skip heavy powder. The moisturizing formula works well on mature skin, but over-application settles into fine lines fast. Less product, always.
How many shades does the Maybelline Instant Age Rewind Eraser come in?
The Dark Circles Treatment comes in 18 blendable shades, from fair to deep. The Color Correcting version offers four shades: green, yellow, pink, and orange. Each targets a specific skin concern rather than matching skin tone directly.
Conclusion
This conclusion is for an article presenting how to use the Maybelline Eraser, and the core message is simple: technique matters as much as the product itself.
The Instant Age Rewind Eraser handles dark circles, blemishes, fine lines, and color correction well. But only when the application method matches your skin type.
Prep your skin, dispense product sparingly, blend with a tapping motion, and set with the right powder or spray.
Mature skin, oily skin, dry skin. Each needs a slightly different approach, but the same rules apply across all of them: thin layers, light pressure, clean applicator tip.
The buildable coverage and Haloxyl formula make this one of the most versatile drugstore concealers available. Use it correctly, and it shows.

She started writing on the site after fielding the same questions from clients and friends often enough to just write the answers down: which red won't turn orange on a warm undertone, how to keep lipstick from feathering into fine lines, why a "12-hour" formula rarely survives dinner.
Every review on the site follows the same rule she uses with paying clients: wear it first, then decide if it's worth recommending.
- How to Choose Setting Powder for Your Skin Type - August 1, 2026
- How Long Does Eyeliner Last Before It Expires? - July 28, 2026
- What Is Contour and How Do You Apply It? - July 25, 2026


