The right brush technique changes everything. Most people own decent makeup but never figure out why their application looks off, and nine times out of ten, it comes down to using the wrong brush motion or loading too much product.
Learning how to apply makeup with a brush is less about buying better tools and more about understanding what each brush actually does to product on skin.
This guide covers brush types, application technique for face and eye products, brush pressure and motion, cleaning routines, and brand recommendations across every budget. By the end, you will have a clear, repeatable process that works whether you are building a starter kit or refining what you already own.
What Is Makeup Brush Application

Makeup brush application is the process of using bristled tools to place, blend, and build cosmetic products on the skin. It is different from fingers or sponges in one key way: brushes give you control over where product goes and how much of it lands on each area.
The global makeup brush market was valued at $1.6 billion in 2023 and is projected to reach $2.7 billion by 2033, growing at a CAGR of 5.1% (Allied Market Research). That kind of growth does not happen unless people are actually using these tools and noticing results.
Brush application works best when you understand what bristles actually do. They distribute pigment in thin, buildable layers. That is why a brush gives you more precision than a finger, which tends to push product around rather than deposit it evenly.
There are two bristle categories: synthetic fibers (nylon, taklon, polyester) and natural hair (goat, squirrel, sable). Synthetic bristles are non-porous, so they do not absorb liquid products. Natural hair has cuticles that pick up and release powder more gradually.
A good brush application technique also factors in product type. Liquid and cream formulas pair with synthetic bristles. Powder products like blush, bronzer, and eyeshadow work better with natural or blended fiber brushes.
If you want to go deeper on the full process, applying makeup covers the broader routine from start to finish, including where brush application fits within a complete look.
| Product Type | Bristle Choice | Why It Works |
|---|---|---|
| Liquid foundation | Synthetic | Non-porous, no product absorption |
| Cream contour/blush | Synthetic | Smooth deposit, easy to clean |
| Loose/pressed powder | Natural hair | Cuticles pick up and release powder evenly |
| Eyeshadow | Natural or blended | Soft blending, gradual color payoff |
Brush Types and What Each One Does
Using the wrong brush for a product is one of the most common reasons makeup looks patchy or muddy. The brush shape, bristle density, and fiber type all affect the outcome.
Face brushes cover the largest surface areas and need to deposit product quickly and evenly. Eye brushes do the opposite. They work in tight spaces and require precision over speed.
Face Brushes
Foundation brush: flat paddle or domed shape, dense synthetic bristles, used for spreading and buffing liquid or cream base products.
Buffing brush: dome-shaped with tightly packed bristles. Works best with circular motions to blend foundation into skin without streaks.
Powder brush: large, fluffy, often made from natural hair. Used for loose or pressed setting powder, picking up product gradually for a light, diffused finish.
Blush brush: slightly smaller than a powder brush with a tapered or domed tip. Applies color to the apples of the cheeks or along the cheekbones depending on placement.
Contour brush: angled or elongated with a firmer density. Delivers product precisely along the hollows of the cheeks, temples, and jawline.
Fan brush: thin, wide bristles spread loosely. Good for applying highlighter powder lightly or dusting off fallout.
Eye Brushes
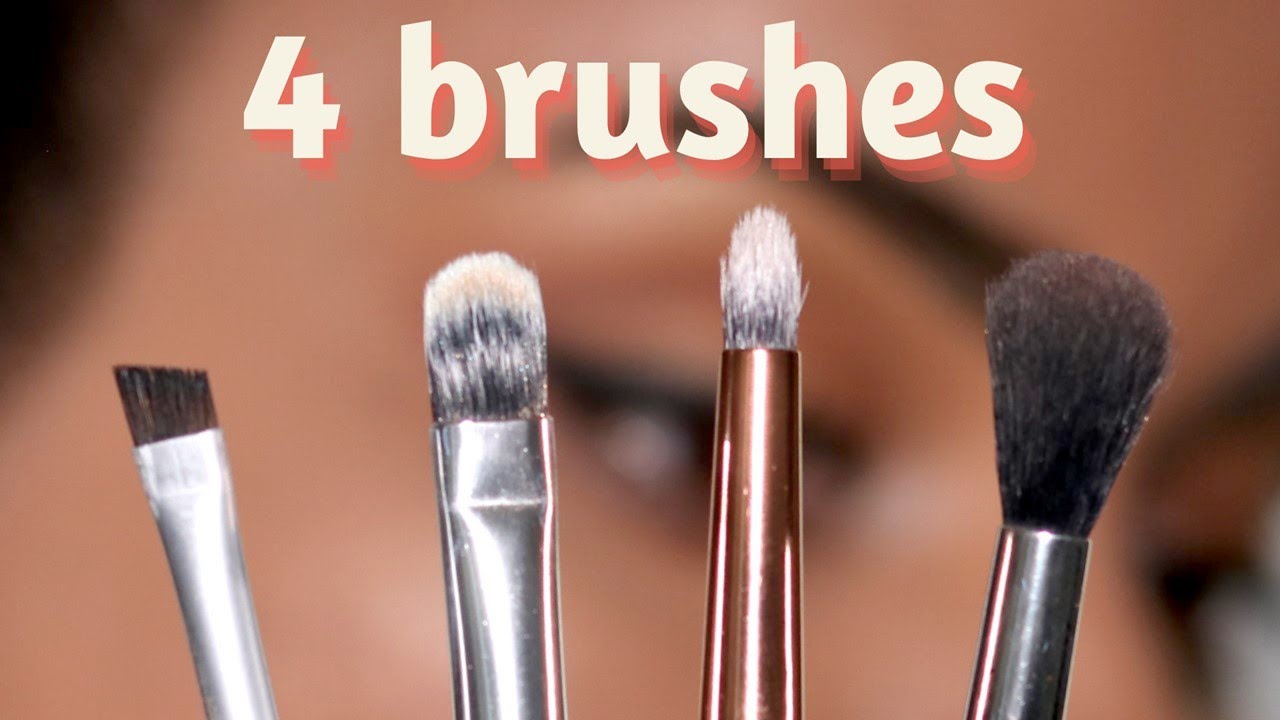
Eye work requires multiple brushes, and this is where most beginners skip steps they should not skip.
| Brush | Shape | Main Use |
|---|---|---|
| Flat shader | Dense, flat tip | Packing color onto the lid |
| Blending brush | Fluffy, dome-shaped | Diffusing edges and blending shades |
| Pencil/detail brush | Small, tapered | Lower lash line, inner corner, fine detail |
| Liner brush | Fine, angled or pointed | Gel liner, wing tips, tight definition |
| Brow brush | Angled, firm | Filling in brows with powder or pomade |
A lip brush is worth keeping around if you wear bold colors. It gives clean edges that applying lipstick straight from the bullet often misses, especially on the cupid’s bow.
How to Prep Your Brushes Before Applying Makeup

Prep matters more than most people think. Starting with a dirty or wet brush changes how product applies.
44% of makeup users have never washed their brushes, and a study found that 58% of tested brushes had high bacterial levels (survey data via Rachael Divers). A dirty brush does not just apply uneven color. It is pushing old product, oil, and bacteria back onto your face with every stroke.
Before a session, check each brush for leftover product from the last use. If the bristles look caked or stiff, do a quick spot clean.
Spot cleaning: spray or dip the bristles in a fast-drying brush cleanser, then wipe them on a clean cloth or paper towel until the color runs clear. This takes about 30 seconds per brush.
Also tap off excess product after loading a brush. Load product onto the brush tip, then tap the handle against your palm once or twice. This stops you from depositing too much in one area and prevents fallout under the eyes when working with eyeshadow.
Damp vs. dry: a damp brush intensifies pigment and gives a more packed, saturated result. A dry brush gives a softer, more diffused finish. Neither is wrong. It depends on the look you are going for.
How to Apply Foundation with a Brush

Foundation application is where brush technique has the biggest impact. A good brush applied badly still gives streaky results.
Step 1: Load the brush by dipping just the bristle tips into product on a palette or the back of your hand. Never push product deep into the bristles.
Step 2: Dot foundation on your forehead, cheeks, nose, and chin. Starting from the center of the face and blending outward prevents product buildup near the hairline and jaw.
Step 3: Choose your motion based on the finish you want.
| Motion | Finish | Best For |
|---|---|---|
| Circular buffing | Full coverage, blurred | Uneven texture, pores |
| Stippling (tapping) | Airbrushed, sheer | Blemishes, acne scars |
| Sweeping strokes | Light, natural | Even skin, light coverage |
Press-and-roll technique works well for textured skin. Press the brush firmly onto the skin, then roll it slightly. This pushes foundation into pores rather than sitting on top of them.
At the hairline, jaw, and around the ears, use much lighter pressure and fast, feathery strokes. Hard lines here are one of the most visible signs of unblended foundation.
For streaks: buff over the area with a clean, dry brush using circular motions. Never add more product over a streaky patch without blending the existing layer first.
For a full walkthrough of the base application process, applying foundation covers the key steps from prep through finish.
How to Apply Powder, Blush, and Contour with a Brush

Powder products require a different approach than liquid. The main mistake here is using too much product in one pass instead of building in thin layers.
Setting Powder
Pressing motion sets. Sweeping motion adds coverage. If you want to lock in foundation without adding any visible product, press the powder brush into the skin and hold for a second. Sweeping drags powder across the surface and can move the foundation underneath.
Loose powder is better for baking under the eyes. Pressed powder is better for quick touch-ups and travel. The brush technique is the same for both.
Blush Brush Placement
Blush placement depends on the face shape and the finish of the blush product.
- Smile and tap the brush on the apples of the cheeks for a rounded, flushed look
- Sweep along the cheekbones from the ear toward the nose for a lifted, defined effect
- Blend toward the temple to diffuse any hard color edges
Build color in two to three thin layers rather than one heavy pass. A fluffy blush brush with loose bristles makes it much harder to over-apply than a dense, firm one.
If you want to understand how blush works across different face structures, applying blush on different face shapes goes through placement for each one.
Contour Brush Technique
Contour requires a more precise brush than blush. An angled or tapered brush gives you control over exactly where the shadow falls.
Apply along the hollows under the cheekbones, starting from the ear and stopping about two fingers from the corner of the mouth. Blend the edges immediately. Unblended contour edges are more obvious than contour that is slightly too light.
For powder contour, build two layers before evaluating the depth. Cream contour (applied with a synthetic brush) is easier to over-do, so start with less and add more if needed.
Brands like Real Techniques and Sigma both make dedicated contour brushes that hold their shape well after repeated washing, which matters because contour application requires a consistent brush density.
How to Apply Eyeshadow with a Brush

Eye looks take the most brushes and the most practice. The technique here is layered, not linear. You are not painting. You are building depth in stages.
Packing and Blending Technique
Start with a flat shader brush to pack color onto the lid. Press the brush into the pan, tap off excess, then press onto the eyelid using a patting motion. Do not drag or wipe. Dragging sheer out the color before it has a chance to build.
Blending brush motion matters. Use a windshield wiper motion at the crease. Keep the brush moving constantly and use very light pressure. The goal is to soften edges, not move product.
- Pack base color on the lid with a flat shader
- Add a mid-tone to the crease with a fluffy blending brush
- Use a clean blending brush to diffuse any harsh edges
- Darken the outer corner with a smaller, denser blending brush
Work light to dark. It is much easier to add pigment than to remove it. Once the dark shade is over-blended into a neutral, there is no recovering the look without starting over.
Detail Work and Liner
A small pencil brush handles the lower lash line and inner corner. These areas are tricky because there is not much room and the skin moves.
Inner corner highlight: use a flat, narrow brush and press a light or shimmer shade directly into the inner corner. Pat, do not sweep. Sweeping smears the color outward.
For liner application with a brush, an angled liner brush gives the most control. Load gel liner onto the brush, wipe off the excess on the back of your hand, then draw in short segments rather than one continuous stroke. Connecting the segments is easier than trying to create a perfect line in one pass.
For a full eye application walkthrough, applying eyeshadow covers the steps from primer through final blending, including crease and cut crease techniques.
Brush Pressure, Motion, and Product Load

Technique is what separates a finished look from a patchy one. The brush shape matters, but how you hold it, how hard you press, and how much product you load onto it matters just as much.
Light pressure diffuses. Firm pressure packs. That one rule covers most of what goes wrong with brush application.
Choosing the Right Motion
Different brush motions do different things to product on the skin. Using the wrong one is usually why blending looks muddy or coverage ends up uneven.
| Motion | Use For | Avoid When |
|---|---|---|
| Circular buffing | Blending foundation, setting powder | Applying eyeshadow to crease |
| Windshield wiper | Blending eyeshadow in the crease | Applying heavy cream products |
| Press and pat | Packing pigment, setting under-eye | Blending out soft edges |
| Feathering strokes | Diffusing hairline and jaw edges | Building coverage in one pass |
The windshield wiper technique moves the brush back and forth horizontally across the crease. It works for eyeshadow blending because it keeps product contained to the crease line without dragging it up toward the brow bone.
How Much Product to Load
This is where most people go wrong. Overloaded brushes cause fallout, patchy coverage, and hard-to-blend edges.
Load product onto the brush tip only. Never push the bristles deep into a pan or pot. After loading, tap the handle against your palm once to knock off the excess before touching your face.
For powder products, the rule is: less on the brush, more passes on the skin. Building coverage with three light layers gives you more control than one heavy one.
Pressure and Brush Density
Dense brushes hold firm pressure well. Fluffy brushes do not. If you press a fluffy blending brush hard into the skin, the bristles splay and spread product wider than intended, losing all precision in the process.
For eye work: rest your elbow on a table or your knee. The steadier your hand, the better the result, especially on the lower lash line.
For face application, keep movements free and fluid. Stiff, robotic strokes transfer that rigidity to the finish.
How to Clean Makeup Brushes
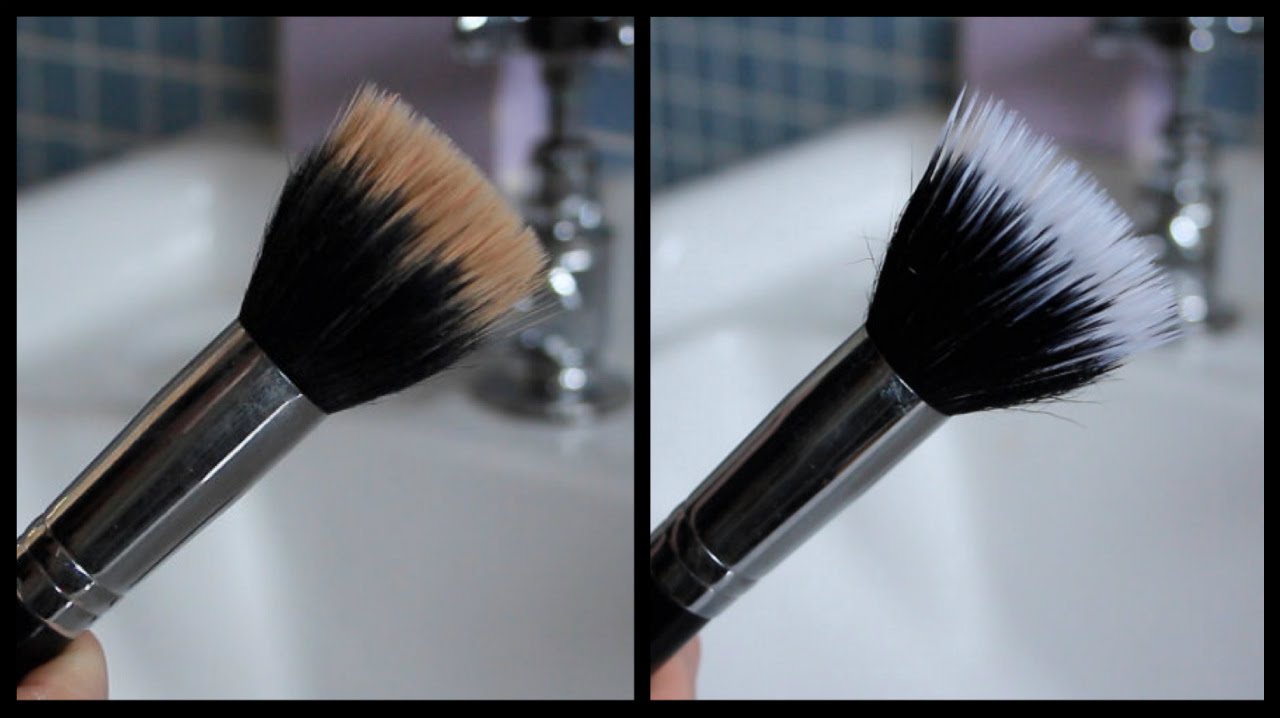
A study published in the Journal of Applied Microbiology found that 70 to 90% of makeup brushes tested contained bacteria and fungus, including Staphylococcus and E. coli. Dirty brushes do not just ruin application. They are a direct skin health issue.
For a complete step-by-step routine, cleaning makeup brushes covers the full process from daily spot cleaning through deep washing and drying.
Daily Spot Cleaning
Spot cleaning: spray brush cleanser directly onto bristles or onto a paper towel, then swipe the brush across the towel until color stops transferring. Most spray cleansers dry within 30 to 60 seconds.
Do this between colors during a single session and after applying bold shades like red or deep plum. It stops color contamination without interrupting your routine.
Spot cleaning does not replace a full wash. It removes surface color but leaves oils and bacteria in the bristle shaft.
Deep Cleaning Method
The American Academy of Dermatology recommends washing brushes every 7 to 10 days. Foundation and concealer brushes, which pick up oil with every use, should be cleaned more often. Eye brushes can wait two weeks.
- Wet only the bristle tips under lukewarm water, never the ferrule
- Swirl the brush in a small amount of gentle shampoo or baby shampoo in your palm
- Rinse under running water until the water runs completely clear
- Squeeze out excess moisture with a clean towel without twisting
- Reshape bristles and lay flat with tips hanging over a counter edge
Never dry brushes upright in a cup while wet. Water runs down into the ferrule, loosens the glue, and causes shedding. MasterClass notes that drying time ranges from 2 to 12 hours depending on brush density, so plan ahead.
What Ruins Brushes During Cleaning
A few habits that shorten brush life significantly:
Hot water breaks down the ferrule glue faster than anything else.
Blow drying warps bristle shape and accelerates shedding.
Twisting the bristles when squeezing out water causes fraying and misshapen brush heads that never recover their original form.
Brands like Charlotte Tilbury and e.l.f. both recommend avoiding alcohol-based cleansers for regular deep cleaning, as they dry out bristles over time even if they do disinfect on contact.
Brush Application for Beginners vs. Practiced Users

Where you start and where you end up with brushes are genuinely different places. The tools you need as a beginner are not the same ones you will reach for once you have put in the hours.
Where Beginners Should Start
Three brushes cover most of what a beginner needs to produce a complete face of makeup.
Foundation brush (synthetic, buffing or flat): handles base application across the whole face.
Powder brush (fluffy, natural or blended): sets foundation and applies blush or bronzer without over-depositing.
Blending brush (fluffy dome, medium density): handles eyeshadow blending and crease work once you are ready to move past a single lid shade.
Real Techniques and e.l.f. both sell beginner-ready brush kits under $20 that cover these three categories. Consumer Reports tested both brands and found they held up through repeated washing without shedding or losing shape.
Most Common Beginner Mistakes
The issues that show up most often, in rough order of frequency:
- Using a fluffy brush for liquid foundation (it drags and goes patchy)
- Pressing too hard on the blending brush and moving product instead of diffusing it
- Loading too much product and then trying to blend out the excess
- Skipping the edge blend at the hairline and jaw
All of these come down to the same thing: not enough passes with light pressure. More strokes, less product per stroke, lighter touch.
Techniques That Take Practice
Two things genuinely require repetition to get right. Not because they are complicated but because the muscle memory takes time.
Crease blending: the windshield wiper motion needs a consistent arc height. Too high and the shadow creeps toward the brow. Too low and it sits on the lid. This only clicks after a few dozen attempts.
Contour blending: knowing when to stop is the hard part. Over-blended contour disappears. Under-blended contour has visible edges. The difference between the two is about three or four passes.
Best Brushes by Budget and Brand
You do not need to spend a lot to get brushes that perform. The gap between drugstore and mid-range has narrowed significantly. The gap between mid-range and high-end is largely about feel, longevity, and bristle softness rather than application outcome.
According to InStyle, luxury synthetic fibers are now outperforming animal hair across most categories, which means even budget-range synthetic brushes have a clear performance case behind them.
Drugstore Picks That Perform
Real Techniques and e.l.f. are the two most consistently recommended drugstore options by professional makeup artists and consumer testing groups.
Real Techniques: most brushes fall between $5 and $15. Soft synthetic bristles, durable after repeated washing, and widely recommended for cream and liquid products. Their powder brush in particular outperformed the Sigma equivalent in several independent comparisons.
e.l.f. Cosmetics: individual brushes often under $5. Good entry point for beginners building a starter kit. The kabuki and putty blush brush are frequently highlighted as overperformers for the price point.
Mid-Range Options Worth the Step Up
Sigma Beauty individual brushes run $10 to $30 and are a step up in durability for daily users. Their SigmaTech synthetic fiber holds its shape through high-frequency washing and is durable enough to last years with proper care.
Morphe is reliable for large-volume brush sets at $40 to $60, though individual brush quality is inconsistent across the range. Good for building a collection fast without committing to premium prices per brush.
High-End Brushes and Whether the Difference Is Real
Honestly? For most looks, no. Technique matters more than price.
That said, there are two situations where investing in better brushes makes a noticeable difference. First, very soft powder blending on mature or textured skin, where coarser bristles drag and highlight texture rather than diffusing over it. Second, professional or high-frequency use, where durability and consistent bristle density across hundreds of washes actually matter.
Hakuhodo brushes ($30 to $300+) use premium natural hair and are considered an industry standard by working makeup artists. Charlotte Tilbury’s blush brush retails at $55, and Business of Fashion noted in December 2024 that luxury brushes like these are increasingly purchased as aspirational tools rather than purely functional ones.
| Price Tier | Brand Examples | Best For |
|---|---|---|
| Under $15 | Real Techniques, e.l.f. | Beginners, everyday use |
| $15 to $40 | Sigma, Morphe, Zoeva | Regular users, mid-tier sets |
| $40 to $80 | MAC, Charlotte Tilbury, Bobbi Brown | Professionals, specific premium brushes |
| $80+ | Hakuhodo, Wayne Goss | High-frequency use, collectors |
If you are building a kit from scratch, start with Real Techniques or e.l.f. for the basics. Add one or two Sigma or MAC brushes where you notice a specific gap in performance. There is no reason to replace everything at once.
For a broader look at the full routine these brushes support, applying setting powder covers how to finish a brush-applied base correctly, and applying bronzer walks through the brush technique and placement for a finished, dimensional result.
FAQ on How To Apply Makeup With A Brush
What brush should I use to apply foundation?
Use a synthetic buffing or flat foundation brush. Synthetic bristles do not absorb liquid products, so less formula is wasted. A dense, dome-shaped buffing brush blends most liquid and cream foundations without streaks.
How do I avoid streaks when applying foundation with a brush?
Use circular buffing motions instead of back-and-forth strokes. Load only the bristle tips with product, tap off the excess, and work in thin layers. Stippling on textured skin also reduces visible streaking significantly.
What is the correct brush motion for blending eyeshadow?
Use a windshield wiper motion with a fluffy blending brush in the crease. Keep pressure light. The goal is diffusing edges, not moving product. Circular motions work for softening harsh lines after blending.
How much product should I load onto a makeup brush?
Load only the bristle tips. Tap the brush handle against your palm once to knock off excess. For powders especially, less product per pass and more passes gives better control than one heavy application.
Can I use the same brush for powder and cream products?
Not recommended. Cream products cling to bristles and contaminate the next powder you pick up. Keep separate brushes for liquid or cream formulas and powder products. Spot cleaning between uses helps but does not fully solve it.
How often should I clean my makeup brushes?
The American Academy of Dermatology recommends every 7 to 10 days. Foundation and concealer brushes should be washed more frequently. Eye brushes can go up to two weeks. Dirty brushes cause breakouts and muddy color payoff.
What is the difference between a buffing brush and a stippling brush?
A buffing brush uses circular motions to build full coverage. A stippling brush has dual-fiber bristles and uses a tapping motion to create an airbrushed, sheer finish. Both work with liquid foundation, but the results differ.
Do I need expensive brushes to get a good result?
No. Real Techniques and e.l.f. both deliver solid brush application at drugstore prices. Technique matters more than cost. Higher-end brushes from brands like Sigma or MAC last longer but do not produce dramatically better results for most looks.
How do I apply eyeshadow with a brush as a beginner?
Start with a flat shader brush to pack a base color onto the lid. Then use a fluffy blending brush in the crease with light windshield wiper strokes. Work light to dark. Build color gradually rather than applying too much at once.
What is the best way to apply setting powder with a brush?
Press, do not sweep. Use a large fluffy powder brush and press the bristles into the skin to lock in foundation without adding visible coverage. Applying powder foundation follows the same pressing technique for a smooth, non-cakey finish.
Conclusion
This conclusion is for an article presenting how to apply makeup with a brush as a skill built on three things: the right tool for the product, the right motion for the finish, and clean bristles every time.
Brush density, bristle type, and product load affect every result you get, from foundation coverage to eyeshadow blending.
You do not need an expensive kit. A flat shader brush, a fluffy blending brush, and a powder brush cover most looks.
Build the habit of spot cleaning between sessions and deep cleaning weekly. Your skin and your brush application technique will both improve for it.
Start with the basics. Refine from there.

She started writing on the site after fielding the same questions from clients and friends often enough to just write the answers down: which red won't turn orange on a warm undertone, how to keep lipstick from feathering into fine lines, why a "12-hour" formula rarely survives dinner.
Every review on the site follows the same rule she uses with paying clients: wear it first, then decide if it's worth recommending.
- How to Make Eyeliner Last Longer Without Smudging - August 31, 2026
- How to Make Eyeshadow Last Longer All Day - August 29, 2026
- How to Find Your Undertone in 5 Easy Steps - August 27, 2026