

Dark circles, redness, and uneven skin tone do not always disappear under regular concealer. That is exactly where color correcting concealer comes in.
Knowing how to use NYX color correcting concealer correctly makes a real difference. The wrong shade, the wrong order, or too much product and the whole base looks off.
This guide covers everything: which NYX shade targets which concern, how to apply it by skin tone, the right layering sequence, and how to make it last all day.
What Is Color Correcting Concealer

Color correcting concealer is a tinted makeup product that neutralizes skin discolorations using opposing colors on the color wheel. It does not cover imperfections the way a standard concealer does. Instead, it cancels them out.
Regular concealer works by covering a problem area with a skin-matching tone. Color correcting concealer works before that step. It targets the underlying color of the discoloration so that less product is needed on top.
The science behind it is straightforward: colors directly opposite each other on the color wheel cancel each other out. Green cancels red. Yellow and peach cancel purple and blue. Lavender cancels yellow. This is not a new principle. Artists and photographers have used it for decades. It just migrated into everyday makeup routines.
NYX Professional Makeup generates around $1.0 billion in annual U.S. sales (2024 data), and its color-correcting line is a consistent part of that output. The Pro Fix Stick Correcting Concealer and the Color Correcting Palette are both widely stocked at Ulta, Target, and online. Neither costs more than $15, which makes this technique accessible without a high barrier to entry.
Color Corrector vs. Regular Concealer
Color corrector: non-skin-toned, applied to specific discolored areas, sits underneath foundation.
Regular concealer: skin-matched, used after foundation to cover remaining spots or brighten the under-eye.
You typically need both in the same routine. Color correctors are not a replacement for concealer. They are a first layer that makes the concealer do less heavy lifting.
NYX’s Pro Fix Stick line illustrates this well: it comes in 6 correcting shades and 18 complexion shades in the same product range, with the idea that you grab a correcting shade first, then layer a complexion shade on top.
When Color Correction Is Needed
Not every skin concern calls for color correction. A single red spot that foundation covers easily does not need a green corrector underneath. But if redness, dark circles, or hyperpigmentation consistently show through your regular base routine, that is when color correction earns its place.
Common situations where it helps:
- Dark circles that look grayish or purple through concealer
- Redness that warms and pinks up your overall base
- Post-acne marks that stay pink or red even under full-coverage foundation
- Sallow skin that looks yellow or dull regardless of foundation shade
If foundation alone gets the job done, skip it. Color correction adds a step. It is only worth adding if the result is noticeably better.
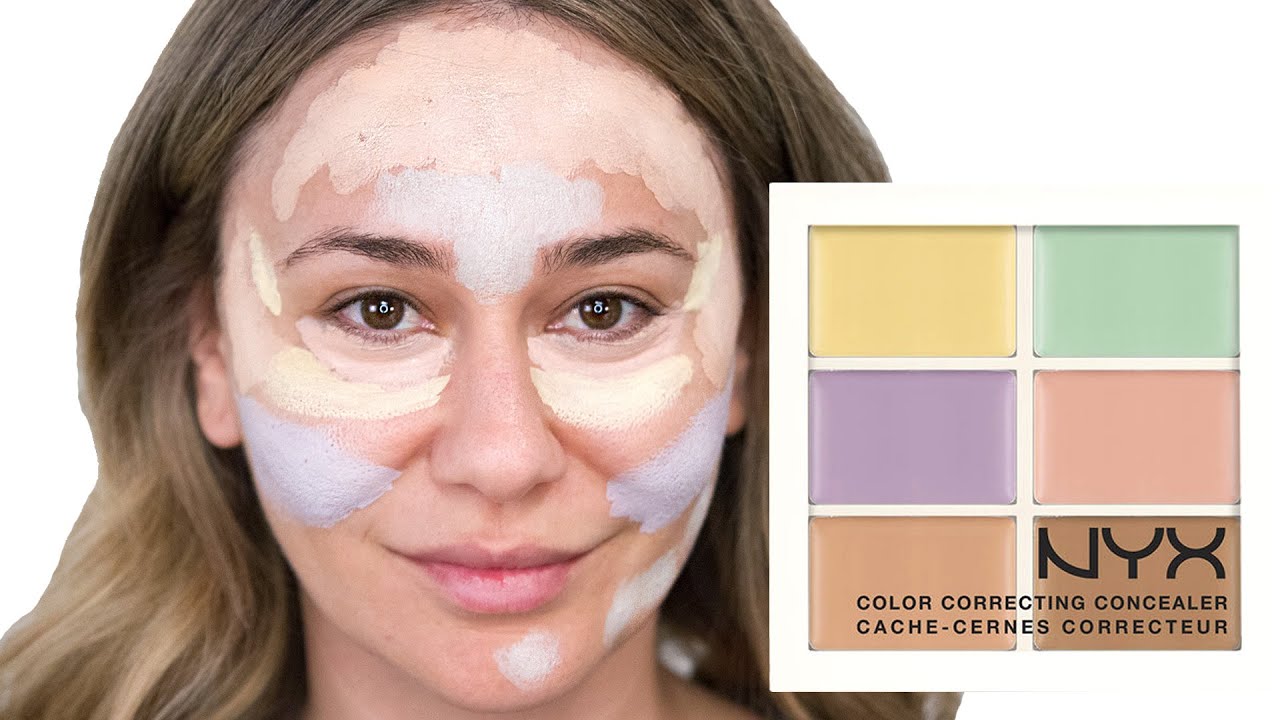
What Each NYX Color Correcting Shade Targets

Choosing the wrong shade does nothing. NYX’s correcting range covers six distinct color concerns, and each one has a specific purpose tied to color theory.
| Shade | What It Cancels | Works Best For |
|---|---|---|
| Green | Redness, pink tones | Acne, rosacea, sunburn, post-breakout marks |
| Yellow / Light Peach | Purple and blue tones | Dark circles on fair to light skin |
| Peach (Dark Peach) | Blue-purple tones | Dark circles on medium skin tones |
| Apricot / Orange | Deep discoloration | Hyperpigmentation, dark circles on deep skin |
| Lavender | Yellow and sallow tones | Dull, yellowish skin on fair complexions |
| Pink | Dullness and uneven tone | Brightening fair to medium skin |
NYX labels these clearly in the Pro Fix Stick line: Green (0.1) neutralizes redness on light to medium skin. Pink (0.2) brightens fair to medium tones. Yellow (0.3) works on fair to light. Dark Peach (0.4) targets medium to deep. Apricot (0.5) handles hyperpigmentation on deeper skin. Brick Red (0.6) corrects deep discoloration on rich, deep tones.
Picking the Right Shade for Your Skin Tone
Fair skin: yellow or light peach under eyes, green for redness, lavender for sallowness.
Medium skin: peach (dark peach) under eyes, green for redness on the face.
Deep skin: apricot or brick red for dark circles and hyperpigmentation, orange-based shades cancel dark spots more effectively than yellow on deeper skin tones.
A quick test before buying: press the shade lightly onto the inner wrist. If it visually softens the tone you want to cancel, it will do the same job on your face. If it looks jarring or too vivid, try one shade warmer or cooler.
Green Corrector: The Redness Fix
Green is the most misused shade. People apply too much, blend it over a wide area, and end up with a mint wash across their face. That is not how it works.
Apply it only to the reddest part of the spot or patch. A small dot, not a sweep. Blend the edges outward gently with a fingertip or small brush, then let it set before doing anything on top.
For rosacea and chronic redness, green is still the right call. Just use a light hand and layer slowly rather than applying a thick layer all at once.
Tools and Products Needed Before You Start

You do not need a lot. But the tools you use matter more than most people expect when it comes to blending color correctors cleanly.
What to have ready:
- The NYX color correcting shade suited to your concern
- A damp beauty sponge (for patting and blending)
- A small flat concealer brush (for precise, targeted application)
- Setting powder
- Foundation or a skin-matching NYX complexion shade to layer on top
The damp beauty sponge is better for most people. It deposits product without moving it around, which matters a lot when you are working with a correcting shade. Swiping a dry brush across a corrector layer can displace it entirely.
Brush vs. Sponge: When to Use Each
The choice comes down to how precise you need to be.
Flat concealer brush: best for small, specific areas like a single acne spot or the inner corner of the under-eye. More control, less spread.
Damp beauty sponge: better for larger areas like overall redness, or for blending the edges of a corrector into the surrounding skin without a hard line.
For the under-eye area specifically, a sponge works well because it pats gently without tugging. The skin there is thinner and more reactive to pulling.
Skin Prep
Moisturized skin gives color correctors a better base to grip. Dry, flaky skin causes product to cling unevenly and patch up.
A lightweight moisturizer or primer applied before color correction helps the product blend more smoothly. For oily skin, a mattifying primer is worth adding before the corrector step. It keeps everything from moving around mid-application.
NYX’s Marshmellow Primer is specifically designed to work in this routine. Clean, moisturized skin then primer, then corrector is the cleanest sequence.
How to Apply NYX Color Correcting Concealer Step by Step

The order matters here. A lot of people layer in the wrong sequence, then wonder why their coverage looks thick or patchy. This is the correct build.
Skin Prep
Wash your face and apply moisturizer. Let it absorb before moving on. If your skin is oily or you want the makeup to last, follow with a thin layer of primer.
Do not skip moisture, even for oily skin. Correctors apply more evenly on hydrated skin and blend out cleaner at the edges.
Applying the Color Corrector
Use significantly less product than you think you need. Start with a small dot or a very thin swipe directly on the discolored area.
Pat, do not rub. Use a fingertip, a small brush, or the damp sponge to tap the product gently into the skin. Blend just the outer edges outward so there are no hard lines, but keep the bulk of the product concentrated on the problem area.
Let it set for 30 to 60 seconds before moving on. NYX’s Pro Fix Stick formula is transfer-resistant and rated for up to 12 hours of wear, but it needs a moment to set before you layer anything on top.
According to NYX’s own application guidance, one of the most common errors is applying too much corrector and then over-blending it, which dilutes the neutralizing effect and leaves a faint color cast on the skin.
Layering Foundation and Concealer on Top
Once the corrector has set, apply a light to medium coverage foundation over the face. Use a buildable formula so you can add coverage without pressing through the corrector layer underneath.
Pat (not drag) the foundation over corrected areas with a sponge.
After foundation, use a skin-matching concealer only if further coverage is needed. At this point, the corrector has done most of the work. The concealer is just finishing. Layering makeup in this sequence keeps the base from looking thick.
Set with a light dusting of setting powder, especially under the eyes where creasing is more likely.
Common Application Mistakes and How to Fix Them
Most color correction problems come down to a few repeatable errors. These show up in almost every beginner routine.
Using Too Much Product

This is the most common issue. One layer of corrector does not need to be opaque to work. It just needs to be present.
A small amount patted on and blended lightly at the edges is enough. Piling on a thick layer creates a colored base that is difficult to cover and often shifts the skin tone in the wrong direction once foundation goes on top.
If you have over-applied, remove excess gently with a damp sponge by lightly dabbing (not wiping) before the product sets.
Rubbing Instead of Patting
Rubbing pulls corrector off the area you placed it, redistributes it across surrounding skin, and ultimately defeats the purpose.
Pat. Always. Whether you are applying, blending edges, or smoothing. This is especially true under the eyes, where the skin is delicate and thin.
Skipping the Setting Step
Corrector left without setting powder or spray will transfer into your foundation as you layer on top.
Quick fix: after blending the corrector, press a very light dusting of translucent or setting powder over it before applying foundation. This locks the corrector in place so it does not migrate.
The setting powder step also helps prevent the corrector shade from peeking through your base later in the day.
Wrong Shade for the Concern
Green under the eyes does not help. Peach on redness does not help. The shade has to match the concern, not just be a color corrector in general.
If the corrector seems to not be doing anything, the shade is likely off. Check the color theory logic: you need the color that sits directly opposite the discoloration on the color wheel.
How to Color Correct Specific Areas on the Face
Different areas need different approaches. The under-eye zone behaves completely differently from a cheek with redness. Treating them the same way leads to uneven results.
Under-Eye Dark Circles
Dark circles vary in color depending on skin depth and genetics. Bluish or purple circles on fair skin respond to yellow. Brownish or deeper circles on medium to deep skin respond to peach or orange.
Apply only to the darkest part of the circle, not the entire under-eye area. Most dark circles are concentrated in the inner corner and along the lower lash line. Covering the whole socket with corrector creates a chalky base that is hard to conceal naturally.
Pat a very small amount with a fingertip or damp sponge. Blend edges. Let it set before applying makeup with a sponge on top.
Redness and Acne Spots
Use green corrector, applied only to the visible red area. Not the whole cheek. Not a large patch.
For isolated breakout spots: a flat brush lets you place the product precisely without disturbing the surrounding skin.
For broader redness from rosacea or irritation: a light layer across the red zone, patted in gently, then set before layering.
After covering redness with makeup during a breakout, the area should look more neutral and skin-toned, not green. If you can still see the corrector shade after blending, you have used too much or it has not set properly.
Dull or Sallow Skin
Lavender corrector is applied more broadly than the targeted shades. It works across the center of the face and the jawline where yellowing tends to concentrate.
The key with lavender: use an extremely light touch. A faint wash across the skin is all that is needed. Too much creates an obvious purple tint that is difficult to blend out.
Pink corrector works similarly on very fair, dull skin to add warmth and life. Apply it where the skin looks flat, typically the cheeks and the bridge of the nose, then blend well before applying makeup on top.
How to Match NYX Color Corrector to Your Skin Tone

Shade selection is where most people get stuck. The correcting shade has to address your specific discoloration, but it also has to work within your skin’s depth and warmth. Those two things together determine the right pick.
| Skin Tone | Dark Circles | Redness | Sallowness |
|---|---|---|---|
| Fair | Yellow (0.3) | Green (0.1) | Lavender |
| Light-Medium | Light Peach / Pink (0.2) | Green (0.1) | Lavender |
| Medium | Dark Peach (0.4) | Green (0.1) | Pink (0.2) |
| Deep | Apricot (0.5) or Brick Red (0.6) | Green (0.1) | Peach (0.4) |
Green works across all skin tones for redness. Every other correcting shade is more specific to skin depth and undertone.
Testing a Shade Before Buying
Quick test: press the correcting shade lightly onto the inner wrist. Watch how it reads against your natural tone. If it visually softens or cancels the discoloration you want to fix, it will do the same on your face. If it looks more vivid or bright than expected, try one shade warmer.
Ulta and Target both carry NYX in-store with testers. Worth using before committing, especially for the under-eye shades where yellow versus peach makes a real difference.
Fair Skin Specifics
Yellow corrector is the most common recommendation for fair skin dark circles. But it depends on the color of your circles. Bluish or purple circles respond well to yellow. Pinkish or brownish circles on fair skin can actually respond better to a very light peach.
Lavender corrector on fair skin works well for brightening an overall dull or tired-looking base. Use it very lightly across the center of the face, not just targeted spots.
Deep Skin Specifics
Yellow does little to nothing for dark circles on deeper skin tones. The discoloration runs deeper and warmer, so you need an orange-based shade to neutralize it effectively.
NYX’s Apricot (0.5) handles general hyperpigmentation and dark spots on deep skin. Brick Red (0.6) is for rich, deep tones with heavy discoloration around the mouth, nose, or under eyes. These are the shades most drugstore brands skip. NYX including them is actually one of the stronger parts of their correcting line.
How Long NYX Color Correcting Concealer Lasts and How to Make It Last Longer

NYX rates the Pro Fix Stick formula at up to 12 hours of wear. Real-world results vary by skin type. Oily skin tends to break it down faster. Dry skin tends to preserve it longer but can emphasize texture if the skin is not well-hydrated underneath.
A 2024 study in the Journal of Cosmetic Dermatology found that foundation significantly alters moisture and sebum levels on the skin within just 20 minutes of activity, which confirms why the setting step matters so much for base products, including color correctors.
Setting for Longevity
The key sequence:
- Corrector applied and blended
- Light dusting of translucent setting powder pressed (not swept) over corrected areas
- Foundation applied on top with a patting motion
- Setting spray misted over the finished base
The most reliable way to make makeup last involves setting from both ends: primer before and setting spray after. Makeup artist Tisha Thompson, founder of LYS Beauty, recommends this dual approach specifically because oil and sweat break down base products from the inside out.
Baking Under the Eyes
Baking is worth trying if under-eye creasing is your main problem. Apply a generous amount of loose setting powder over the corrected under-eye area, let it sit for 5 to 10 minutes while doing the rest of your makeup, then brush off the excess.
This technique absorbs excess oil and locks the corrector in place before foundation goes on top. The result is a smoother, longer-lasting finish under the eyes where creasing is most common.
Caution: use a light-handed dusting of fine translucent powder. A heavy layer of loose powder under the eyes can settle into fine lines and look dry by midday, particularly on anyone over 30 or with drier skin.
Skin Type Adjustments
Wear time behaves differently depending on what your skin is doing underneath.
Oily skin: mattifying primer before application, translucent powder pressed firmly into corrected areas, setting spray to finish. The Pro Fix Stick can fade in humid conditions on oily skin without these steps.
Dry skin: moisturizer first, let it absorb fully. Skip heavy powder over corrected areas. A hydrating setting spray is better than powder for locking in the base without emphasizing texture. NYX’s formula contains hyaluronic acid, which helps, but dry skin still needs moisture underneath the product.
Combination skin: treat each zone separately. Press powder only into oily areas like the T-zone. Let drier zones set naturally or finish with a light hydrating mist.
Touch-Up Tips Throughout the Day
Color corrector is the one layer you generally cannot touch up mid-day. Once foundation is on top, re-applying corrector is not practical.
Instead:
- Blot oil with blotting paper before it breaks down the base
- Dust a very small amount of translucent powder over any areas showing breakdown
- Use a setting spray to refresh and re-melt the layers back together
The goal mid-day is to preserve what is already there, not rebuild from scratch. If your corrector is setting well and you are not touching your face, the base should hold through a standard workday without issues.
Prepping skin well the night before also matters more than most people expect. Clean skin, a solid overnight care routine, and going into your morning application with properly hydrated skin all contribute to how long the finished result lasts.
FAQ on How To Use NYX Color Correcting Concealer
Do you apply NYX color corrector before or after foundation?
Always before. Apply the color correcting concealer directly on the discolored area, let it set, then layer foundation on top. This order keeps the corrector working underneath without getting disrupted by foundation application.
Which NYX correcting shade covers dark circles?
It depends on your skin tone. Yellow (0.3) works for fair skin, dark peach (0.4) for medium skin, and apricot (0.5) for deeper skin tones. Match the shade to both your skin depth and the undertone of your circles.
How much NYX color corrector should you use?
Less than you think. A small dot directly on the problem area is enough. Too much product creates a colored cast that shows through foundation. Build slowly if needed rather than applying a heavy layer from the start.
Can you wear NYX color corrector without foundation on top?
Yes, but only if you blend it out very well. A sheer, fully blended corrector layer can work alone on low-makeup days. Without anything on top, even a faint green or peach tint will be visible if the product is not sheered out properly.
What is the best tool for applying NYX color correcting concealer?
A damp beauty sponge for blending, a small flat brush for precision. Use the brush to place the product on a targeted spot, then pat edges outward with the sponge. Rubbing with any tool shifts the corrector off the area.
Does NYX color corrector work for rosacea?
The green shade (0.1) neutralizes redness from rosacea effectively. Apply only to the reddest patches, not the entire face. Follow with foundation to cover the corrected areas. It will not eliminate rosacea, but it significantly reduces how much redness reads through your base.
How do you stop NYX color corrector from creasing under the eyes?
Set it with a light dusting of translucent powder before applying foundation. Try the baking technique for extra hold: press powder over the under-eye, wait five minutes, then brush off. Moisturizing the under-eye area beforehand also helps prevent creasing.
Can you use NYX color corrector on acne-prone skin?
Yes. The green shade is specifically useful for covering post-breakout redness and active spots. NYX’s Pro Fix Stick formula is also vegan and cruelty-free, though anyone with acne-prone skin should patch test first and avoid applying too much product in one area.
How long does NYX color correcting concealer last?
NYX rates the Pro Fix Stick at up to 12 hours. Real wear time depends on skin type and prep. Oily skin breaks it down faster. Setting with translucent powder and finishing with a setting spray extends wear time noticeably for most skin types.
Is NYX color correcting concealer good for beginners?
It is one of the more beginner-friendly options. The stick format makes application straightforward. Shades are clearly labeled by concern. And at under $15, there is little risk in experimenting. Applying color corrector correctly takes a few tries, but the learning curve is short.
Conclusion
This conclusion is for an article presenting how to use NYX color correcting concealer as part of a complete base routine, not a standalone fix.
The right shade matters. Green for redness, peach or apricot for dark circles, lavender for sallow skin. Get that wrong and the whole application falls apart.
Technique matters just as much as shade selection. Pat, do not rub. Use less product than you think. Let each layer set before adding the next.
The Pro Fix Stick is a solid, budget-friendly entry point into color correction. Under $15, with six correcting shades covering every skin tone concern from hyperpigmentation to post-acne redness.
Nail the layering sequence and your foundation does less work. That is really the whole point.

She started writing on the site after fielding the same questions from clients and friends often enough to just write the answers down: which red won't turn orange on a warm undertone, how to keep lipstick from feathering into fine lines, why a "12-hour" formula rarely survives dinner.
Every review on the site follows the same rule she uses with paying clients: wear it first, then decide if it's worth recommending.
- What Is Lash Glue and How Do You Use It? - July 20, 2026
- What Is CC Cream and How Is It Different? - July 16, 2026
- What Is Skin Tint and Why Everyone Is Obsessed - July 11, 2026


