

Your cheeks do most of the talking. Blush placement, contour depth, highlighter position, these choices shape how your entire face reads more than any eyeshadow palette or lipstick shade.
Cheek makeup looks have exploded in the last few years. The prestige blush market nearly doubled between 2022 and 2024, and techniques like draping, sunburn blush, and under-eye color placement have moved from editorial backstages to everyday routines.
This guide breaks down the specific looks, from sculpted contour to natural flush to bold graphic blush. You’ll find shade recommendations by skin tone, placement maps by face shape, the right tools for each technique, and the layering order that keeps bronzer, blush, and highlighter from turning muddy.
What Are Cheek Makeup Looks

A cheek makeup look is a deliberate combination of blush, bronzer, contour, and highlighter placed on and around the cheekbone area to create a specific visual effect. It goes beyond just swiping some color on your face and calling it a day.
The difference between “wearing blush” and executing a cheek makeup look comes down to intention. One is a single product. The other is a planned arrangement of color, dimension, and light working together.
Three product categories build every cheek look:
- Color: blush in any form (powder, cream, liquid, gel) that adds pigment to the skin
- Dimension: contour and bronzer that create depth and warmth across the face
- Light: highlighter that catches and reflects where you want attention drawn
You don’t always need all three. Some looks skip highlighter entirely. Others drop the contour. But understanding these building blocks matters because it changes how you approach your face.
Circana data shows the U.S. prestige blush market jumped from $266.6 million in 2022 to $481.8 million by 2024. That kind of growth tells you people aren’t just buying blush anymore. They’re investing in cheek looks as a whole category.
Your face shape, skin tone, the occasion, even the lighting you’ll be in, all of these shift which cheek look works best. A sculpted contour that looks incredible in photos can read as harsh stripes under office fluorescents. A soft natural flush that’s perfect for a Tuesday morning might vanish completely at a night out.
The cheek is where most of your face’s personality lives. Get it right and everything else clicks into place.
Draping as a Cheek Makeup Technique
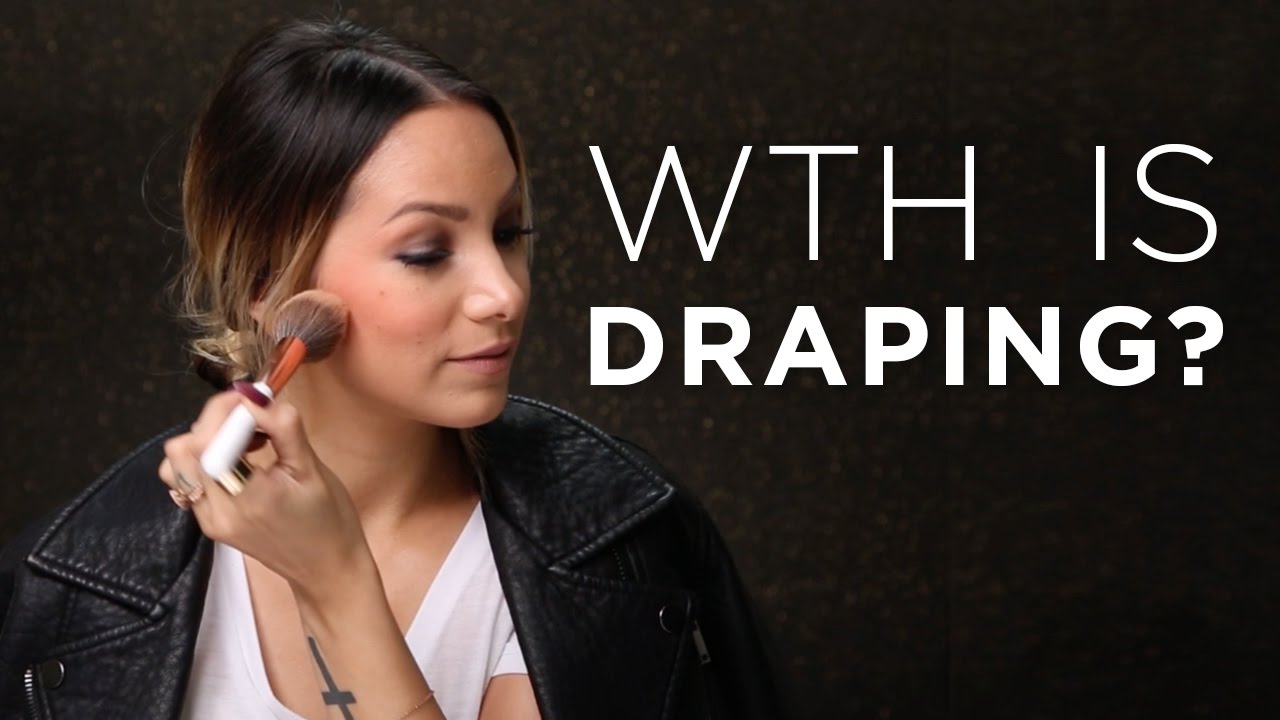
Draping uses blush in place of bronzer and contour to shape the face entirely through color. Instead of carving out cheekbone hollows with brown-toned products, you sculpt with pink, peach, berry, or coral.
The technique goes back to American makeup artist Way Bandy in the 1970s. He called it “color glow” and used bold sweeps of blush along the cheekbones and up toward the temples on clients like Cher. Think Debbie Harry with pigment pulled all the way to her hairline. That was draping before anyone called it that.
Then it mostly disappeared for decades. Bronzer took over in the 2000s. Kim Kardashian brought heavy contour into the mainstream around 2012. But blush started clawing back territory around 2016 when Marc Jacobs Beauty showcased the technique at a product launch event. And Rihanna’s 2017 Met Gala look, with fuchsia blush swept dramatically from her eyelids to her temples, basically reignited the whole trend.
Trendalytics data from 2024 shows liquid blush market adoption rose 36% year-over-year, with cream blush formats also climbing 12%. Draping works especially well with these formulas because they blend into skin without visible edges.
Monochromatic Draping vs. Multi-Tone Draping
Monochromatic draping uses a single blush shade across the cheekbone, temple, eyelid, and sometimes the bridge of the nose. One color, everywhere. It reads as a unified flush and looks surprisingly natural even when the placement is dramatic.
Multi-tone draping layers two shades. A deeper blush sits in the cheekbone hollow (where you’d normally contour), and a brighter shade goes on top along the high point of the cheek. The darker shade creates structure while the lighter one lifts.
Patrick Ta’s Major Headlines Double-Take Creme and Powder Blush Duo was basically built for this. The compact gives you both shades in one product. That’s partly why it became a TikTok favorite, along with Alix Earle constantly using it on camera.
Draping Placement by Face Shape
Where you sweep the color changes everything depending on your bone structure.
| Placement Goal | Modern Formula Recommendation | Why It Works |
| Precision Sculpting | Cream-to-Powder Blush | Blends like a cream, sets like a matte powder for “stay-put” placement. |
| Soft Diffusion | Baked Mineralized Blush | Provides a soft-focus finish that mimics the “airbrushed” studio look. |
| High-Contrast Draping | Highly Pigmented Matte Powder | Allows for the “heavy application/brush off” technique to create sharp angles. |
Cream and liquid blushes work best for draping because they look skin-like once blended. Powder can work too, but only if it’s buildable. Extra-creamy or glittery formulas tend to slide and crease when you spread them across a large area, so save those for smaller, more targeted placement. If you want to learn more about applying blush on different face shapes, the placement principles carry over to draping as well.
Natural “No-Makeup” Cheek Looks

This is the look that’s supposed to make people think you just got back from a walk outside. A flush that seems like it came from your skin, not from a product.
A Beauty Buddy survey found that 67% of consumers use blush every day. And the “no-makeup” approach is driving a huge portion of that daily use. People want buildable cheek color that doesn’t announce itself.
The pinch test is probably the simplest way to pick the right shade. Pinch your cheek, look at the color that shows up, then find a blush that matches it. That’s your natural flush tone. For most people, this ends up being a soft pink, muted peach, or dusty rose.
Product format matters here more than anywhere else. Cream and liquid blushes give you that second-skin finish that powders just can’t replicate for this specific look. Rare Beauty’s Soft Pinch Liquid Blush became one of Sephora’s top sellers partly because it nails this exact effect. The brand sold one Soft Pinch Liquid Blush every three seconds globally in 2024, according to Glossy. ILIA’s Multi-Stick is another go-to because it doubles as lip color, keeping the whole face cohesive.
For placement, focus on the apple of the cheek and blend upward with your fingers or a damp beauty sponge. Fingers work surprisingly well here because your body heat melts the product into your skin. If you’re curious about applying liquid blush for the first time, starting with this natural look is the most forgiving entry point.
Skip the highlighter. Or use a barely-there sheen, nothing with visible shimmer. The whole point is that nobody should be able to tell where your skin ends and the product begins.
Common mistakes that ruin the natural look:
- Using too much product on the first application (start with one small dot)
- Picking a shade that’s too bright or too cool for your undertone
- Layering powder on top, which kills the dewy, skin-like finish
If this stripped-back style appeals to you, it pairs beautifully with a no-makeup makeup approach across the rest of the face. Or go a step further into the clean girl makeup aesthetic where your cheek flush becomes the focal point.
Sculpted and Contoured Cheek Looks

Contour is the opposite end of the spectrum from the natural flush. It’s about structure, definition, and making your bone structure louder.
The key distinction that trips people up: contour and bronzer are not the same thing. Contour products are cool-toned and meant to mimic shadow. Bronzer is warm-toned and meant to add sun-kissed warmth. Using warm bronzer in the cheek hollows for contouring is the single most common mistake I see people make. It just looks muddy.
Mario Dedivanovic popularized the “3 shape” technique through his work with Kim Kardashian, applying contour along the forehead, cheek hollows, and jawline in a figure-3 pattern. That approach kicked off what became a full-blown contouring movement that peaked around 2015 but never actually went away.
Circana’s first-half 2024 data flagged liquid blush, stick bronzer, and balm bronzer as standout performers in the prestige makeup category. The formats are shifting, but the desire for sculpted cheeks isn’t going anywhere.
Soft Sculpt vs. Hard Contour
Soft sculpt uses less product and more blending. You’re placing contour in the hollows but diffusing the edges until the shadow is almost imperceptible. It reads as “your face but somehow better” and works for everyday wear.
Hard contour uses more pigment with sharper edges. It shows up clearly in photos and under stage lighting. This is what drag performers and editorial artists use because it needs to read from a distance. In person, hard contour can look severe if the blending isn’t precise.
Most people default to hard contour when they should be doing soft sculpt. Your mileage may vary, but unless you’re getting photographed, soft sculpt almost always looks better in real life.
Cream Contour Stick Techniques
Cream contour sticks are faster than powder for most people. You draw directly onto the face, then blend with a sponge or duo-fiber brush.
The trick that changed everything for me: apply contour before foundation for a softer result. This is called “underpainting” and it gives you visible dimension without obvious lines. Charlotte Tilbury’s Filmstar Bronze and Glow kit works well for this layered approach. For anyone new to using cream contour, underpainting is a much more forgiving entry point than trying to blend on top of set foundation.
Pair sculpted cheeks with a sharp highlighter along the cheekbone ridge. Kevyn Aucoin’s Sculpting Powder for the contour, then a precise stripe of cream highlighter right above it. That contrast between shadow and light is what makes contoured cheeks actually pop.
Sun-Kissed and Bronzed Cheek Looks

Bronzer-forward cheek looks are less about precision and more about warmth. You’re trying to recreate what a weekend at the beach does to your face, minus the UV damage.
Placement follows where the sun naturally hits. Across the cheekbones, over the bridge of the nose, lightly on the forehead, and sometimes along the jawline. The face blush market was estimated at $4.17 billion in 2024, according to 360iResearch, and bronzer-blush hybrids are a meaningful driver of that growth as people lean toward warmer, lived-in cheek looks.
Benefit Cosmetics’ Hoola Bronzer has been the go-to matte option for years. Fenty Beauty’s Sun Stalk’r gives you more shade range for deeper skin tones, which historically got ignored by bronzer brands. Took the industry way too long to figure that out.
Matte vs. luminous bronzer creates totally different results:
| Lighting Goal | Recommended Finish | Application Tip |
| High-Contrast Noir | Matte | Focus on the “3” shape (Temple, Cheek, Jawline). |
| Soft Focus / Technicolor | Satin | Use a large, fluffy fan brush to “whisper” color onto the skin. |
| Evening / Gala Glow | Luminous | Apply only to the “high points” where the sun naturally hits. |
Layering bronzer with a warm-toned blush gives you dimension that bronzer alone can’t achieve. Apply bronzer first for the base warmth, then add a peach or coral blush on the apple of the cheek. The two together read as “naturally sun-kissed” rather than “I put brown powder on my face.” For detailed technique on applying bronzer, the E-shape method (forehead, cheeks, jawline) is the most reliable starting point.
Then there’s the sunburn blush trend. Red and orange-toned blush applied across the nose and cheeks, sometimes even the forehead. It’s supposed to look like a mild sunburn. Trendalytics data showed peach blush searches climbed 21% year-over-year in 2024, with coral shades up 39%. This look ties into the broader summer makeup mood that dominates social media from May through September.
On deeper skin tones, the biggest challenge with bronzer is avoiding ashiness. Choose a bronzer that’s only one or two shades deeper than your skin, with warm red or copper undertones rather than gray-brown ones. If the swatch looks dusty on your hand, it’ll look dusty on your face.
Editorial and Bold Cheek Looks

This is where cheek makeup stops being polite and starts getting interesting.
Editorial cheek looks break every placement rule on purpose. Blush under the eyes. Blush across the nose bridge. Blush pulled all the way to the temples and onto the eyelids. These looks are designed to be noticed, photographed, and talked about.
At the 2024 Met Gala, Cynthia Erivo, Greta Lee, and Ayo Edebiri all showed up with dramatic blush draping that recalled Rihanna’s 2017 fuchsia moment. The red carpet proved that bold cheek color had moved from backstage-only into mainstream fashion events.
Market Reports World data indicates that nearly 60% of blush products launched globally in 2024 included skincare benefits like hydration or UV protection. Even the bold stuff is getting formulated to feel comfortable during long editorial shoots and event wear.
Graphic Blush Placement Styles
Under-eye blush: Color placed directly below the lower lash line, sometimes blended slightly onto the cheekbone. It started on TikTok as part of the “I’m Cold” makeup technique and stuck around because it photographs really well and adds youthful color to the mid-face.
Nose bridge blush: A stripe of blush across the bridge of the nose connecting both cheeks. This creates a flushed, almost feverish look that’s become a staple of Korean makeup aesthetics.
Temple blush: Color pulled from the cheek all the way up to the temple and sometimes into the hairline. This is the modern version of Way Bandy’s original draping technique, dialed up for camera impact. MAC and Valentino Beauty have both built editorial collections around this exact placement style.
Glossy and Wet-Look Cheek Finishes
Clear balm or face gloss layered over pigment on the cheeks. The result is a high-shine, almost vinyl-looking finish that catches light differently from any powder or cream.
This is tricky to pull off because the glossy layer can break down foundation underneath and attract dust or hair. But when it works, nothing else looks like it.
Danessa Myricks’ Yummy Skin Blurring Balm Powder works here because it gives you that glazed texture without complete product breakdown. Apply your blush first, let it set for a minute, then pat a thin layer of clear balm on top. Don’t rub. Pat.
Scaling editorial looks down for real life is about keeping the placement but reducing the intensity. Instead of neon fuchsia blush under your eyes, try a dusty rose. Instead of high-gloss on the whole cheek, hit just the cheekbone peak with a highlighter. The editorial makeup energy stays without looking like you’re headed to a runway show at the grocery store.
Cheek Makeup Looks by Skin Tone

The same blush shade can look completely different on two people. What reads as a natural flush on fair skin might disappear entirely on a deep complexion. Undertone matters just as much as depth.
Market Reports World data shows over 70% of new blush launches in 2024 were marketed as vegan, paraben-free, or cruelty-free, but shade range expansion has been slower to catch up. Brands like Rare Beauty and Patrick Ta are leading the push toward more inclusive color options, while others still offer five shades and call it a range.
Fair Skin Cheek Color
Best shades: muted pinks, soft peach, light coral, baby rose.
The biggest risk on fair skin is blush that looks like a rash. Anything too bright or too cool-toned against very pale skin creates blotchy patches instead of a flush. Sheer formulas with buildable coverage work better here than heavily pigmented liquids.
If you have cool undertones, stick with soft rose or carnation pink. Warm undertones look better in light peach. Neutral undertones can go either direction. Charlotte Tilbury’s Pillow Talk Matte Beauty Blush Wand in Pink Pop was specifically developed for this skin depth range. For coordinating your lip color, check options for lipstick colors for fair skin that complement pink-toned cheeks.
Medium Skin Cheek Color
Medium skin is the most versatile range for cheek color. Coral, mauve, warm berry, dusty rose, and even burnt orange all work.
Undertone pairing guide:
- Cool: mauve, berry, cool pink
- Warm: coral, peach, apricot
- Neutral: dusty rose, soft plum
Trendalytics reported that coral blush searches climbed 39% year-over-year in 2024, largely driven by medium skin tones looking for that sun-warmed effect without bronzer.
Deep Skin Cheek Color
Deeper complexions need saturated pigment. Sheer washes of pink won’t show up at all, or worse, they’ll leave an ashy cast.
Rich plums, burnt oranges, true reds, warm berry, and deep fuchsia all perform well. Charlotte Tilbury recommends cherry reds and punchy berries for dark skin because these shades complement the richness of deeper complexions rather than fighting against it.
The right highlighter shade matters just as much on deep skin. Skip silver and icy pink reflects. Go with gold, copper, or warm bronze instead. These catch light without creating a chalky stripe across the cheekbone.
Highlighter Shade Selection
| Format | Best For | Studio Secret |
| Liquid | Dry skin, “No-Makeup” looks | Mix a drop into your foundation for a “lit-from-within” base. |
| Cream | Texture-smoothing, everyday wear | Tap on with fingers to “melt” the product into the skin. |
| Powder | High-impact, photography, oily skin | Apply with a small, tapered brush for surgical precision. |
Bobbi Brown’s Shimmer Brick has been a go-to for years because the multi-shade design lets you customize the reflect by picking up more of one shade than another with your brush. For a full face that looks pulled together, matching makeup to your skin tone across all products makes the cheek look read as intentional rather than random.
Cheek Makeup Looks by Face Shape

Blush placement does more heavy lifting than most people realize. Where you put the color changes the perceived proportions of your entire face. Two people can use the same product and look completely different based purely on placement.
GM Insights valued the makeup brush and tools market at $7 billion in 2024, growing at 6.3% annually. A big chunk of that growth comes from consumers buying specific brush shapes for targeted cheek placement rather than using one all-purpose brush for everything.
| Environment | Intensity Level | Blending Tip |
| Direct Sunlight | Low (Sheer) | Use a damp sponge to “melt” the edges into your skin. |
| Studio / Office | Medium (Built) | Use a “duo-fiber” brush to stipple the color so it doesn’t look like a stripe. |
| Evening / Flash | High (Saturated) | Layer a powder blush over a cream blush to lock the placement in place. |
Round faces benefit most from diagonal placement. Start at the center of the cheekbone and sweep up toward the temple in a straight line. Avoid the apple-of-the-cheek placement that every beginner tutorial teaches because it adds width exactly where a round face doesn’t need it.
Oval faces are the most forgiving shape. Almost any placement works. The classic smile-and-apply method is fine here because the proportions are already balanced.
Square and rectangular faces need softness. Round, circular motions on the apples with a fluffy brush. No sharp angles. No dramatic diagonal sweeps. The last thing you want is to add more straight lines to a face that already has strong ones.
Heart-shaped faces have the opposite problem from round faces. The forehead is wide and the chin is narrow. Blush goes low on the cheeks, and contour sits at the temples to visually narrow the top half. Skip blush on the temple area entirely.
If you’re working with a round face, the angled blush technique can be paired with contour in the hollows to create even more visible structure. And for anyone with an oval face shape, the freedom to experiment is one of the best things about your proportions.
Tools and Application Methods for Cheek Looks
The tool you use changes everything about how the same product performs on your face. A cream blush applied with a brush looks completely different from the same blush applied with your fingers.
BK Beauty Brushes went viral on TikTok Shop in late 2023, selling 2,800 units in a single day by January 2024, according to GM Insights. That kind of demand shows how much consumers care about having the right tools now, not just the right products.
Brush Types and What They Do
Fan brush: deposits a sheer, diffused wash of powder. Best for light, natural finishes.
Duo-fiber brush: picks up less product per stroke, giving you more control over buildup. Ideal for blending liquid and cream blush without streaks.
Dense kabuki: packs pigment on more intensely. Use this when you want bold, saturated cheek color with fewer passes. Real Techniques and Sigma Beauty both make popular options in this category.
Angled brush: creates a lifted, sculpted blush shape. The angle naturally follows the cheekbone line upward.
Finger and Sponge Application
Your body heat melts cream and liquid formulas directly into the skin. That’s why finger application produces the most skin-like finish.
Use your middle and ring finger. Pat, don’t sweep. Sweeping moves product around and can disturb foundation underneath. A damp beauty sponge gives a similar effect with more control over the edges.
Stippling (bouncing the sponge or brush) builds coverage without pushing product into fine lines. This is the method most working makeup artists default to for editorial and bridal cheek application.
Layering Blush, Bronzer, and Highlighter Together

Using multiple cheek products without them canceling each other out is the part most people struggle with. The order matters. The technique matters. And knowing when to skip a product matters most of all.
Circana’s 2024 year-end data confirmed that prestige makeup grew 5% in the U.S., with varied formats like liquid blush, stick bronzer, and balm bronzer called out as standout performers. Consumers are buying more types of cheek products, which means they need to know how to layer them.
Application Order
Contour first. Blush second. Highlighter last.
Contour goes down first because it creates the shadow structure that blush and highlight build on top of. If you put blush first and then contour over it, the contour product muddies the blush color.
Highlighter goes last because it’s the most reflective layer. Anything applied on top of highlighter disrupts its light-catching ability.
The Cream-Under-Powder Rule
If you’re mixing textures, cream products go on before powder products. Always. Cream over powder creates a patchy, pilled mess because the cream grabs onto the powder particles and drags them around.
Workable layering combos:
- Cream contour + cream blush + powder highlighter
- Cream contour + powder blush + powder highlighter
- All powder (easiest for beginners)
For anyone building a full layered cheek look, layering makeup properly across the whole face follows the same cream-before-powder logic.
Setting Cheek Makeup for Longevity
A light dusting of translucent powder over cream cheek products locks them in place. But go light. Heavy powder kills the luminosity of cream blush and turns dewy finishes flat.
Makeup artist Lan Nguyen-Grealis recommends layering a powder blush on top of a cream blush in a similar shade. The cream gives you the skin-like finish. The powder sets it and boosts the color payoff at the same time. Finish with a setting spray to meld everything together.
Common Cheek Makeup Mistakes
Most cheek makeup failures come down to placement, product choice, or blending. These are fixable problems once you know what to look for.
Makeup artist Christen Dominique put it plainly in a viral TikTok: “Blush is basically an instant facelift if you place it right.” The flip side is that bad placement does the opposite.
Blush Placed Too Low
This is the most common mistake by far. Applying blush below the cheekbone drags the face downward and makes features look heavier. The standard advice of “smile and apply to the apples” actually causes this problem in many cases because when you stop smiling, the blush sits lower than where it looked right while your cheeks were lifted.
Fix: apply with a neutral expression. Place blush at or above the cheekbone line, roughly in line with where your pupil sits when you look straight ahead. Celebrity makeup artist Caroline Barnes uses this pupil-alignment method on clients like Gillian Anderson.
Wrong Highlighter Shade
A highlighter that’s too light for your skin tone creates a visible white or silver stripe across the cheekbone. It draws attention for the wrong reason. If you want to understand the full range of blush types available, it helps to also consider which highlighter textures pair best with each format.
Fix: your highlighter should be close to your skin tone but with added shimmer or sheen. On deep skin, copper or gold. On medium skin, rose gold. On fair skin, champagne.
Over-Blending Contour
Blending is good. Over-blending makes your contour disappear or turn muddy and shapeless. At some point the shadow effect just becomes a slightly darker smudge that adds nothing to the face.
Fix: stop blending when the edges are soft but the center of the contour shade is still visible. The shadow needs to read from at least arm’s length. If you can’t see it in the mirror from a step back, you’ve gone too far.
Ignoring Lighting
Overhead lighting creates shadows on the face that don’t exist in natural light. Bathroom mirrors with overhead fixtures make contour look deeper and blush look more pigmented than it actually is.
Fix: always check your cheek makeup in natural daylight before you leave. Or use a daylight-balanced LED mirror. The difference between how makeup reads under bathroom lights versus outside can be dramatic, and it’s the reason so many people show up to work with noticeably uneven cheek color.
Not Blending Edges Into Surrounding Skin
Blush, bronzer, and highlighter all need their edges blended into the foundation or bare skin around them. Hard stops where color meets skin make cheek products look like they’re sitting on top of the face rather than being part of it.
Fix: after applying any cheek product, take a clean fluffy brush or dry sponge and buff the outer edges only. Don’t touch the center where the color is concentrated. Just soften where the product fades into nothing. For a full breakdown of applying cream blush with proper edge blending, the technique is worth getting right from the start.
FAQ on Cheek Makeup Looks
What is the best blush placement for a lifted look?
Apply blush at or above the cheekbone, roughly aligned with your pupil when looking straight ahead. Sweep upward toward the temple. Avoid placing color below the cheekbone, which drags features downward instead of lifting them.
What is the difference between draping and contouring?
Draping uses blush to sculpt the face with color, sweeping pigment along the cheekbones and temples. Contouring uses cool-toned bronzer or contour powder to create shadow. Draping gives a softer, more colorful result than traditional contour.
Which blush formula works best for natural cheek looks?
Cream and liquid blush formulas deliver the most skin-like finish for natural looks. They melt into the skin when blended with fingers or a damp sponge. Powder blush works too but reads slightly more visible on the surface.
How do I choose blush color for my skin tone?
Pinch your cheek and match the color that appears. Fair skin suits soft pinks and peach. Medium skin works with coral and mauve. Deep skin looks best in rich plums, burnt orange, and true reds.
Should I apply blush before or after bronzer?
Bronzer goes first. It creates the base warmth and dimension. Blush layers on top for color, and highlighter goes last to catch light. This order prevents products from muddying each other during blending.
Can I use cream blush over powder foundation?
It’s tricky. Cream over powder can look patchy because the cream grabs onto powder particles. If your base is powder, stick with powder blush. Or use a very light hand and pat (don’t rub) the cream product on.
What is the sunburn blush trend?
Sunburn blush places red or orange-toned color across the nose bridge, cheeks, and sometimes the forehead. It mimics a mild sunburn. The look gained popularity on TikTok and pairs well with sun-kissed bronzed cheek looks.
How do I stop my blush from fading throughout the day?
Layer a cream blush underneath a powder blush in a similar shade. The cream bonds to skin while the powder sets it. Finish with setting spray. This two-layer method keeps cheek color visible for hours longer.
What brush shape is best for applying blush?
An angled brush creates a lifted, sculpted shape along the cheekbone. A fan brush gives a sheer, diffused wash. A dense kabuki packs on bold pigment. Choose based on the intensity and placement style you want.
How do I layer blush, bronzer, and highlighter without looking overdone?
Start light with each product and build. Apply contour in the hollows, blush on the cheekbone, and highlighter at the peak. Blend edges where products meet. Skip highlighter entirely if the look feels too heavy.
Conclusion
Every cheek makeup look comes down to three decisions: what product, what placement, and what tools. Get those right and the rest follows.
Whether you’re working with a cream blush stick for a quick natural flush or layering contour, blush, and highlighter for a sculpted editorial finish, the techniques stay consistent. Build light. Blend edges. Match your undertone.
Face shape changes where the color goes. Skin tone changes which shades work. But the fundamentals of buildable cheek color and proper application order apply to everyone.
Start with one technique that fits your routine. A simple draping method or a two-product bronzer and blush combo. Master that before adding complexity. Your cheeks don’t need every product in the drawer. They need the right ones, placed well.

She started writing on the site after fielding the same questions from clients and friends often enough to just write the answers down: which red won't turn orange on a warm undertone, how to keep lipstick from feathering into fine lines, why a "12-hour" formula rarely survives dinner.
Every review on the site follows the same rule she uses with paying clients: wear it first, then decide if it's worth recommending.
- How to Choose Setting Powder for Your Skin Type - August 1, 2026
- How Long Does Eyeliner Last Before It Expires? - July 28, 2026
- What Is Contour and How Do You Apply It? - July 25, 2026


