

Summarize this article with:
Cream highlighter does something powder cannot: it melts into skin instead of sitting on top of it.
Knowing how to apply cream highlighter correctly is the difference between a natural, dewy glow and a finish that looks patchy or overdone.
This guide covers everything from placement zones and tools to shade selection and wear time, including techniques for both everyday and editorial looks.
By the end, you will know exactly how to get the right highlight intensity for your skin type, face shape, and finish goal.
What Is Cream Highlighter

Cream highlighter is a pigmented, emollient-based makeup product that blends into the skin rather than sitting on top of it. It contains light-catching particles suspended in a creamy base, which gives skin a dewy, luminous finish instead of the drier, more powdery effect you get from pressed formulas.
The key difference from powder comes down to texture and skin behavior. Powder highlighters rest on the surface. Cream melts in, which is exactly why the finish looks more skin-like.
Cream/liquid highlighters are the fastest-growing sub-segment in the broader market, driven by rising demand for dewy, natural-looking radiance (Verified Market Reports, 2023). That shift makes sense. The glass skin effect and wet-look makeup trends have pushed cream formulas into the spotlight over the last few years.
Finish Types and What They Actually Look Like
| Finish | What It Looks Like | Best For |
|---|---|---|
| Dewy | Soft, lit-from-within glow | Everyday wear, natural look |
| Satin | Subtle sheen, not glittery | Mature skin, office looks |
| Glass skin | Wet, reflective, high-shine | Editorial, event makeup |
| Metallic | Bold, dimensional shimmer | Night out, bold looks |
Common Cream Highlighter Forms
You will find cream highlighter in several formats, and the format affects how you apply it.
- Stick: Precise, portable, easy to place directly on skin
- Pot: Most pigmented, requires a brush or finger
- Liquid: Sheerest coverage, mixable with foundation
- Cushion: Buildable, controlled application with the included puff
Cream highlighter works best on dry to normal skin and mature skin. The hydrating ingredients in the formula sit well on drier complexions without emphasizing texture or fine lines.
Tools for Applying Cream Highlighter

The tool you use changes the finish more than most people realize. Same product, different tool, completely different result. Worth spending a minute on this before you start.
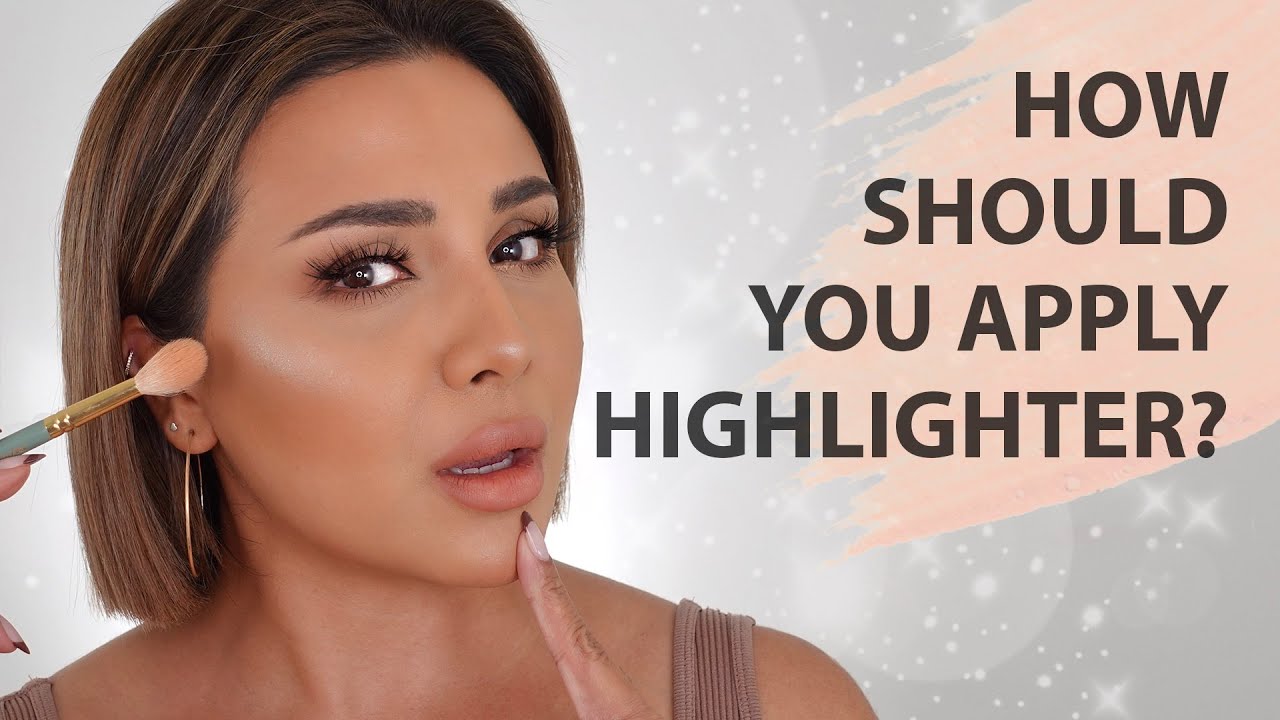
Fingers
Most natural finish. The warmth of your fingertips melts the cream into the skin, giving you that seamless, skin-like glow that no brush can fully replicate.
Use your ring finger specifically. It has the lightest touch of all your fingers, so you avoid pressing too much product at once.
This method works best for dewy and glass skin finishes. Not ideal if you want sharp, precise placement.
Damp Beauty Sponge
A damp sponge sheers out the product and diffuses the glow outward. Good for blending edges after you have placed product with your finger.
Use this when: you want a softer, more diffused highlight that blends into the surrounding skin without a visible edge.
Fan Brush or Flat Brush
More precision, less warmth. A flat brush deposits more product in one pass, which is useful for editorial looks where you want intensity.
A fan brush gives a lighter, swept-on application. Less control than a flat brush, but faster for a quick everyday look.
| Tool | Finish | Best For |
|---|---|---|
| Ring finger | Dewy, natural | Dry skin, everyday glow |
| Damp sponge | Diffused, sheer | Blending edges, soft looks |
| Flat brush | Intense, precise | Editorial, night looks |
| Fan brush | Light, swept-on | Quick application, beginners |
One thing worth noting: if your cream highlighter pills or moves around when you try to blend it with a brush, switch to your finger. The warmth fixes that almost every time.
Where to Apply Cream Highlighter on the Face

Placement is everything. Put it in the wrong spot and you add shine where you do not want it. Get it right and the whole face looks lifted and more awake.
The basic rule: highlight where light would naturally hit your face if you were standing in sunlight.
Primary Placement Zones
- Tops of cheekbones: The most common spot. Apply just above the hollow of the cheek, not on the apple.
- Inner corners of the eyes: A small dot here makes eyes look bigger and less tired.
- Brow bone: Just beneath the arch of the brow. Lifts the eye area visually.
- Cupid’s bow: A thin line along the top edge of the upper lip creates the illusion of fuller lips.
- Bridge of the nose: A light swipe down the center, stopping before the tip. Use a very light hand here.
- Center of the forehead and chin: For a full-face glow. Optional, not standard.
The Rare Beauty Positive Light Liquid Luminizer, for example, was specifically designed for these placement points and has a buildable formula that works well on all six zones without looking overdone.
Placement for Different Face Shapes
Round faces: Focus highlight on the very tops of the cheekbones, close to the temples. Avoid placing it on the center or apple of the cheek, which adds width.
Angular faces: You can be more generous with cheekbone placement. The highlight adds softness rather than definition, so a slightly wider sweep works well.
Oval faces: Most placements work. Standard cheekbone, brow bone, and inner corner placement all land well without adjusting much.
If you want more guidance on applying blush on different face shapes, the principles carry over directly to cream highlighter placement.
How to Layer Cream Highlighter in a Full Face of Makeup

Order matters here. Get it wrong and you either end up with pilling or a muddy-looking finish where your products fought each other.
Correct layering order: foundation, concealer, cream blush, cream highlighter, setting powder (if needed), powder products last.
Where Cream Highlighter Fits in the Routine
Apply after your foundation and concealer, while your base is still slightly fresh. This gives the cream something to grip and blend into.
Cream products must go before setting powder. Applying powder first and then a cream on top is one of the most common mistakes. The powder creates a barrier that stops the cream from blending properly, and you end up with a patchy, uneven finish.
If you want to know more about layering makeup correctly beyond just highlighter, the same cream-before-powder principle applies across the full routine.
Pairing With Cream Blush
Apply cream blush first, then highlighter. Blush goes on the cheeks, then you add highlight on top of or just above the blush at the cheekbone. Blending the two together where they meet gives a natural, flushed-glow effect.
For full guidance on applying cream blush before you add the highlight layer, the application technique is similar: fingers or a damp sponge, dabbing rather than sweeping.
Setting or Not Setting
Whether you set the highlighter depends entirely on the finish you want.
- Leave unset: Maximum glow, dewy finish, shorter wear time
- Set lightly: Slightly reduced shine, better wear, still radiant
- Layer powder on top: Most intense finish, editorial-level highlight
For oily skin, a light dust of translucent powder around (not directly on) the highlight helps the surrounding areas stay matte without killing the glow itself.
How to Apply Cream Highlighter for a Natural Look

Less product, more blending. That is the whole approach for an everyday, natural finish.
The most common mistake here is using too much product at once. One small dot per placement zone, blended outward, is all you need. You can always add more. You cannot easily take it away without disturbing the whole base underneath.
Step-by-Step for an Everyday Glow
Step 1: Pick up a small amount of product on your ring finger. Smaller than you think you need.
Step 2: Press it onto the top of your cheekbone with a light tapping motion. No sweeping.
Step 3: Blend outward toward the temple with the same finger. The edges should fade into the skin with no visible line.
Step 4: Add inner corner highlight if you want extra brightness. One small tap is enough.
For shades, stick close to your skin tone. Champagne, pearl, and soft rose gold read naturally on most light to medium skin tones. Going more than two shades lighter than your skin can look patchy rather than glowy.
Fixing Over-Application
Applied too much? Do not try to wipe it off. Take a clean damp sponge and press it over the area to absorb excess product without dragging.
If the highlight looks too intense after setting your makeup, a very light dusting of translucent powder directly over it will dial back the shine to a more natural level.
Building a good skin prep routine helps a lot here. Hydrated, well-moisturized skin holds cream products more evenly and requires less product overall. If you want to work on prepping skin before makeup, that step alone makes cream products sit better and blend more easily.
How to Apply Cream Highlighter for a Bold, Editorial Look
More product, less blending. The approach flips completely.
Highlighter sales in Europe rose 31% in the first half of 2024 compared to the same period in 2023, with the UK seeing a 57% surge year over year (Circana, Cosmetics Business 2024). That level of growth lines up with the shift toward bolder, more maximalist makeup that has been driving editorial and runway trends.
Building Intensity
Layer the product in thin passes rather than applying a thick amount at once. Two or three thin layers give more intensity and better control than one heavy application.
For a wet-look effect: mix a small amount of cream highlighter with a clear gloss or facial oil before applying. The added slickness amplifies the shine and extends the dewy finish significantly.
ILIA’s Lightshift Cream Highlighter, for example, was formulated to shift from a silky cream to a weightless powder finish on skin, making it a reliable pick for building from subtle to editorial without changing products.
Layering With Powder for Maximum Impact
Apply the cream base first, then dust a powder highlighter directly on top once the cream has settled for about 30 seconds.
The cream creates adhesion. The powder on top catches more light and adds dimension that a cream alone cannot replicate. This is the technique most frequently used in editorial and runway makeup for dramatic, long-lasting highlight intensity.
For a full picture of how to use highlighter makeup across both cream and powder formulas, understanding when to layer versus when to use one product alone makes a real difference in the final result.
Full-face placement for editorial looks: cheekbones, brow bone, bridge of the nose, cupid’s bow, center of the forehead, and sometimes the chin. It is a lot of highlight. That is the point. The key is keeping the rest of the makeup clean so the glow reads as intentional rather than overwhelming.
Cream Highlighter Shades by Skin Tone

Shade selection is where most people get tripped up. The wrong shade does not just look off. It can read ashy, muddy, or overpowering depending on how far off-base you went.
General rule: choose a highlighter one to two shades lighter than your skin tone (NYX Cosmetics). Match the undertone of the shade to your own, not just the depth.
How to Identify Your Undertone
Look at the veins on the inside of your wrist in natural light. Blue or purple veins signal cool undertones. Green veins indicate warm. A mix of both means neutral.
Cool undertones pull toward pink, blue, or red hues in the skin. They look washed out in warm golds and bronze.
Warm undertones have a golden or yellow cast. Icy silvers and white-based pearls can look ashy against them.
Shade Guide by Skin Tone
| Skin Tone | Best Shades | Avoid |
|---|---|---|
| Fair | Pearl, champagne, soft pink | Deep golds, heavy bronze |
| Light to medium | Rose gold, warm champagne, light gold | Stark white, icy silver |
| Medium to tan | Warm gold, peachy gold, soft bronze | Frosty or pale icy shades |
| Deep | Rich gold, copper, bronze, cognac | Opalescent, frosty shades |
Westman Atelier’s Lit Up Highlight range demonstrates this well. Their Brulée shade (a warm bronze gold) reads as a sun-kissed glow on fair to medium skin and a traditional brightening highlight on deeper tones, which is a good example of how undertone interacts with depth.
Universal Shades
Warm champagne and rose gold work across the widest range of skin tones. Both sit in a middle ground between cool and warm, which makes them forgiving shade choices if you are unsure where to start.
Clear balm or facial oil applied to the cheekbones also reads as highlight on every skin tone. No shimmer, no undertone conflict. According to makeup artist Melissa Collazo, it is one of the most flattering options precisely because it adds dimension without introducing color.
If you want to pair your highlight choices with the right bronzer application, the same undertone rules apply. Warm bronzers pair with warm highlight shades, cool bronzers with cooler shimmer tones.
Common Mistakes When Applying Cream Highlighter
Even experienced people make these. The good news is most are easy to fix once you know what to look for.
Too Much Product at Once
The most common mistake by far. One heavy application is harder to blend than two light ones, and it is much harder to pull back once it is on the skin.
Fix it: press a clean damp sponge over the area to absorb the excess without dragging the product or disturbing the base underneath.
Wrong Placement on the Cheek
Applying highlight onto the apple of the cheek instead of the bone above it. The apple is too low and too round. It adds shine in a spot that does not lift the face.
Keep it on the upper cheekbone, starting close to the temple and sweeping down no further than the pupil line when looking straight ahead. That boundary stops the highlight from sliding into apple territory.
Applying Over Powder Base
Powder creates a dry barrier. Cream applied on top of it has nowhere to grip, so it sits on the surface, pills, or moves when blended.
- Cream always goes before powder
- If you have already set your base, use a liquid or powder highlight instead
- Or press the cream on very lightly with a fingertip rather than blending, which reduces pilling
Skipping Edge Blending
The product itself can look fine at the center but leave a hard line at the edges where it stops. That line is what makes highlight look like a product sitting on skin rather than coming from within it.
After placing the highlight, use a clean finger or lightly dampened sponge to blur the outer edges only. The center stays concentrated, the perimeter fades out.
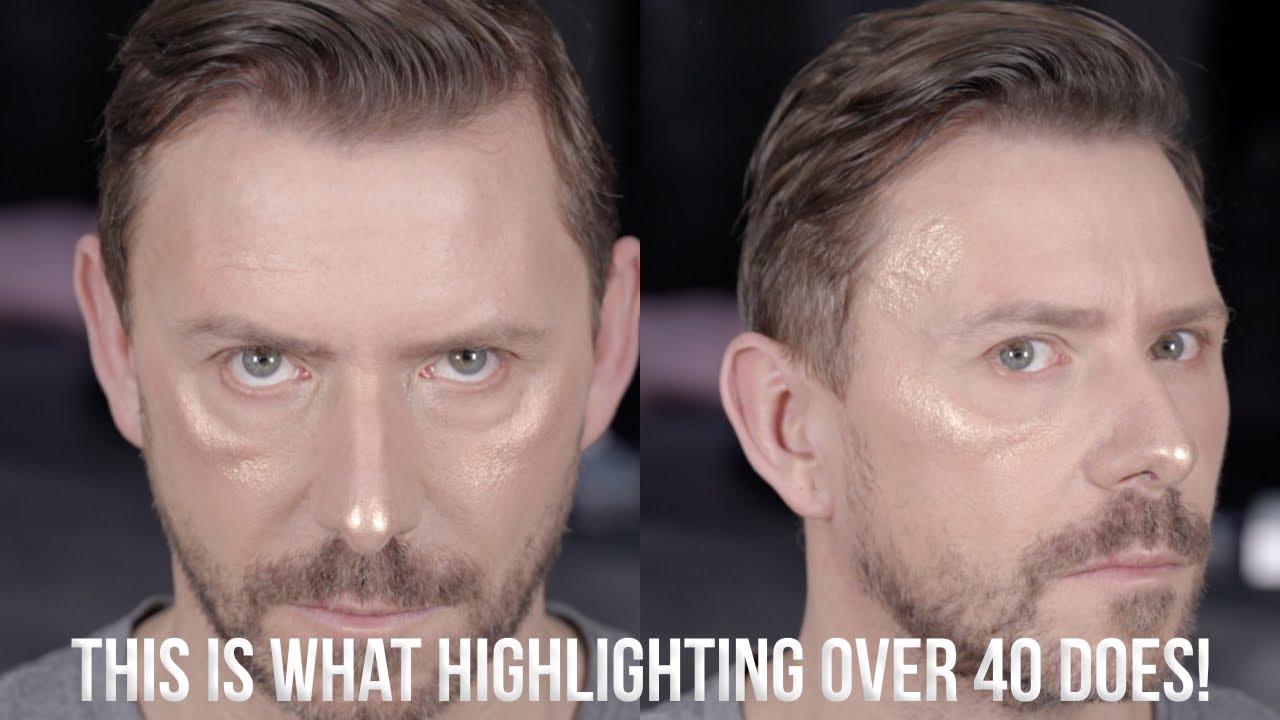
Checking the Look Only in Indoor Lighting
What looks subtle in bathroom lighting can look like tinfoil outdoors. A shade that read as champagne inside can turn reflective and flat under natural light at noon.
Swatch and check your highlight in daylight before committing. Step back from the mirror. If it catches light three feet away in a mirror, it will be visible much further in direct sunlight.
If you are doing makeup for a photoshoot, this matters even more. Camera flash changes how highlight reads entirely, and finely milled particles photograph very differently from chunky glitter-based formulas.
How to Make Cream Highlighter Last Longer

Cream formulas can move, transfer, and fade faster than powder. That does not mean they cannot last. It means the prep and setting steps matter more.
The global setting spray market was valued at USD 966.4 million in 2023, growing at a CAGR of 7.6% through 2030, driven largely by demand for makeup that holds through long days and environmental stress (Grand View Research). That growth tells you something: wear time is a real consumer concern, not just a marketing angle.
Start with Skin Prep
Hydrated skin holds cream products better. Apply moisturizer and let it absorb fully before any makeup. Dry, flaky skin breaks up cream formulas and creates uneven patches.
A makeup primer also helps. Use a hydrating primer for dry skin and an oil-controlling primer for oilier complexions. Both give the cream something consistent to adhere to rather than bare, variable skin texture.
Well-prepped skin means you use less product overall. Less product means less movement. It is a straightforward chain.
Setting Techniques That Work
Goop’s interview with celebrity makeup artist Gita Bass confirms the most reliable approach: apply cream highlight first, then tap a finely milled powder highlight on top. The cream provides adhesion and the dewy base. The powder locks it without killing the finish.
For oily skin specifically:
- Use a thin layer of translucent powder on the surrounding cheek area, not directly on the highlight itself
- Apply setting spray after the full look is complete
- Avoid touching the highlighted area throughout the day
Touch-Up Without Disrupting the Look
Mid-day touch-ups are tricky with cream. You cannot just re-apply on top without risking pilling or moving the base underneath.
Blotting papers first. Press them onto the cheekbone area to absorb any oil or sweat before adding anything on top.
Then press a small amount of product with your fingertip, no blending, just light pressure to deposit. Or use a powder highlight for the touch-up instead, which sits more forgivingly over the worn-down cream base.
If your full makeup routine includes locking down the whole look, including your eye and lip steps, making makeup last all day across every product follows the same cream-before-powder principle throughout the entire application order.
FAQ on How To Apply Cream Highlighter
Do you apply cream highlighter before or after foundation?
After foundation and concealer, before setting powder. Cream products need a slightly fresh base to grip and blend into. Applying after powder causes pilling. The only exception is underpainting, where you press cream highlight directly onto bare primed skin before foundation.
What is the best tool to apply cream highlighter?
Your ring finger gives the most natural finish. The warmth melts the product into skin. A damp beauty sponge diffuses intensity for a softer glow. A flat brush works for precise, editorial placement with more pigment payoff.
Where exactly do you put cream highlighter on your face?
Tops of the cheekbones, brow bone, inner corners of the eyes, cupid’s bow, and the bridge of the nose. These are the high points where light naturally hits the face. Start with cheekbones if you are new to highlight placement.
Can you use cream highlighter on oily skin?
Yes, but prep matters. Use a mattifying primer first, apply a thin layer of cream highlighter, then set the surrounding area with translucent powder. Avoid the T-zone entirely. A light dusting of powder highlighter on top locks the cream finish without removing the glow.
How do you stop cream highlighter from looking greasy?
Use less product. One small dot per placement zone, blended outward, is enough. Check in natural daylight before finishing. If it still looks too shiny, press a damp sponge over the area to absorb excess without disturbing the base.
Can you layer cream and powder highlighter together?
Yes. Apply cream first, let it settle for 30 seconds, then dust a finely milled powder highlighter directly on top. The cream creates adhesion and a dewy base. The powder amplifies intensity and improves wear time significantly, especially on oily skin.
What cream highlighter shade works for dark skin?
Rich gold, copper, bronze, and cognac tones work best. Avoid opalescent or frosty shades, which can read ashy on deeper complexions. High-pigment formulas are key since lighter, sheer shades may not show up with enough contrast to create a visible glow.
How do you fix too much cream highlighter?
Do not wipe it off. Press a clean damp sponge directly onto the area with light tapping pressure to absorb the excess. If it still reads too intense after that, a very light dusting of translucent powder directly over the highlight will reduce the shine.
How do you make cream highlighter last all day?
Start with hydrated, well-moisturized skin and a primer suited to your skin type. Apply a thin layer of cream highlighter, then set it by pressing powder highlighter on top. Finish the full look with a setting spray for longer wear.
Is cream highlighter good for mature skin?
Yes. Cream formulas blend into skin rather than settling into fine lines the way powder can. Apply with your ring finger using a pressing motion, not sweeping. Stick to a satin or dewy finish rather than a metallic one, which can emphasize texture.
Conclusion
This conclusion is for an article presenting how to apply cream highlighter in a way that actually works for your skin type, face shape, and finish goal.
The right shade selection, tool choice, and layering order make the difference between a glow that reads as skin and one that reads as product.
Placement matters. So does prep. Hydrated skin, the correct application sequence, and a light hand go further than any single formula ever will.
Whether you are building a natural dewy finish or a bold editorial look, the techniques here scale to both without needing different products.
Start small, blend well, and check in natural light. That is the whole approach.

- What Is Skin Tint and Why Everyone Is Obsessed - July 11, 2026
- What Is Foundation and How Do You Choose One? - July 6, 2026
- How to Make Blush Last Longer - July 3, 2026


