

Summarize this article with:
Polished, glowing, and never overdone. That is exactly what soft glam delivers.
Learning how to do soft glam makeup means mastering the balance between a natural finish and a look that is clearly intentional. Neutral-warm eyeshadow, luminous skin, blended liner, and a nude or muted lip.
It is one of the most requested looks for weddings, date nights, and everyday wear because it flatters every skin tone and photographs cleanly without looking heavy in person.
This guide covers everything step by step: skin prep, base application, the soft glam eye look, brow technique, setting, and how to adjust the look across different skin tones.
What Is Soft Glam Makeup

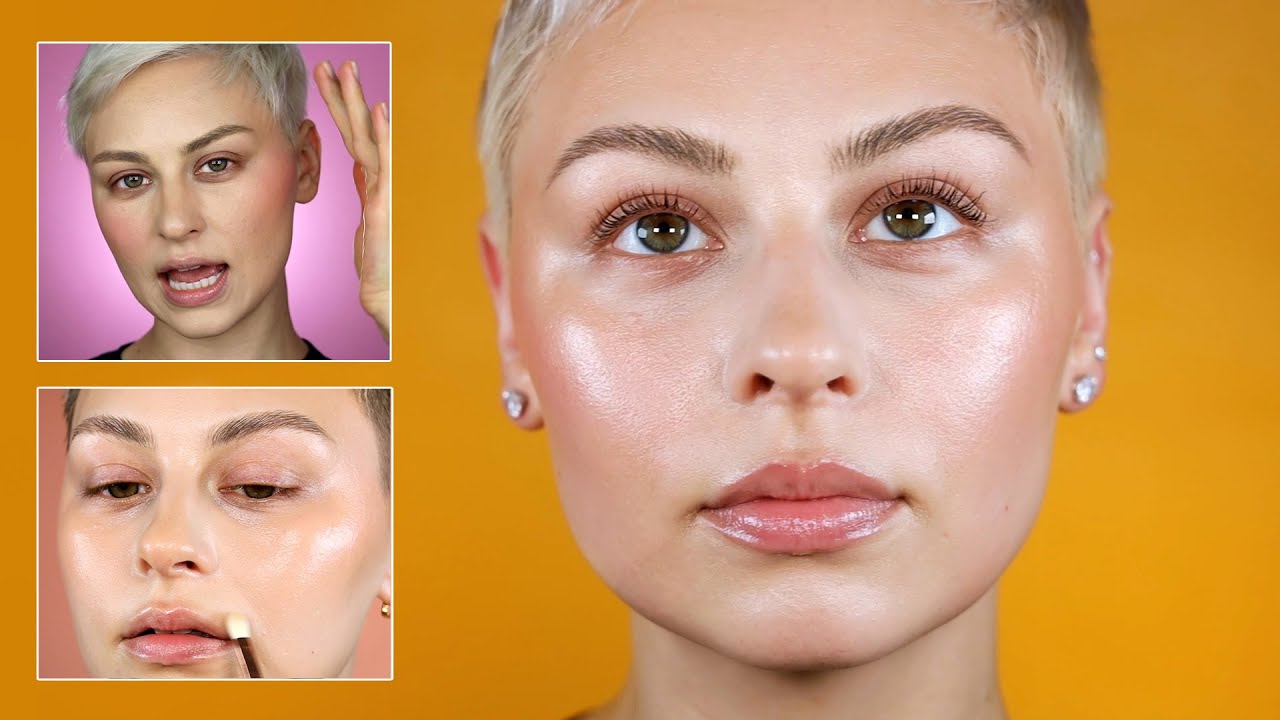
Soft glam makeup is a polished, natural-looking style that sits exactly between no-makeup makeup and full glam. It enhances your features without covering them up. The finish is luminous, the lines are blended, and nothing looks overdone.
Think glowing skin, neutral-warm eyeshadow, softly defined lashes, and a nude or muted lip. That’s the core of it.
According to ULTIMA II, soft glam was one of the standout makeup trends of 2025 specifically because it combines a flawless complexion with subtle shimmer around the eyes. Polished, but never heavy.
What makes it work for so many people is the balance. The eye look has depth. The skin has glow. The lip stays soft. No single element overpowers the rest.
Lancôme describes it well: soft glam is characterized by neutral and warm tones, blended lines, and a touch of shimmer that plays up natural beauty rather than transforming it. Skin has a natural finish with warmth from bronzer, eyes sit softly defined, brows look fluffy and filled, and lips stay in a nude-to-soft-pink range.
It works for weddings, date nights, bridal events, job interviews, and everyday wear. That versatility is exactly why it keeps coming back as a top trend cycle after cycle.
The global makeup market was valued at $45.95 billion in 2025, according to Fortune Business Insights, and neutral glam finishes continue to drive product sales in the face and eye categories.
Who Is Soft Glam For
Short answer: almost everyone.
The look adapts to fair, medium, and deep skin tones with shade swaps. It works on hooded eyes, monolids, mature skin, and oily skin types. The technique stays the same. The products change slightly.
- Beginners respond well to it because the blending is forgiving
- Makeup artists use it for bridal and editorial work where the look needs to photograph cleanly
- People who dislike heavy makeup find it gives them the polished look they want without the weight
TikTok creator Mikayla Nogueira demonstrated a version of this look specifically for hooded eyes, showing how the technique adjusts for different eye shapes without losing the core soft glam aesthetic.
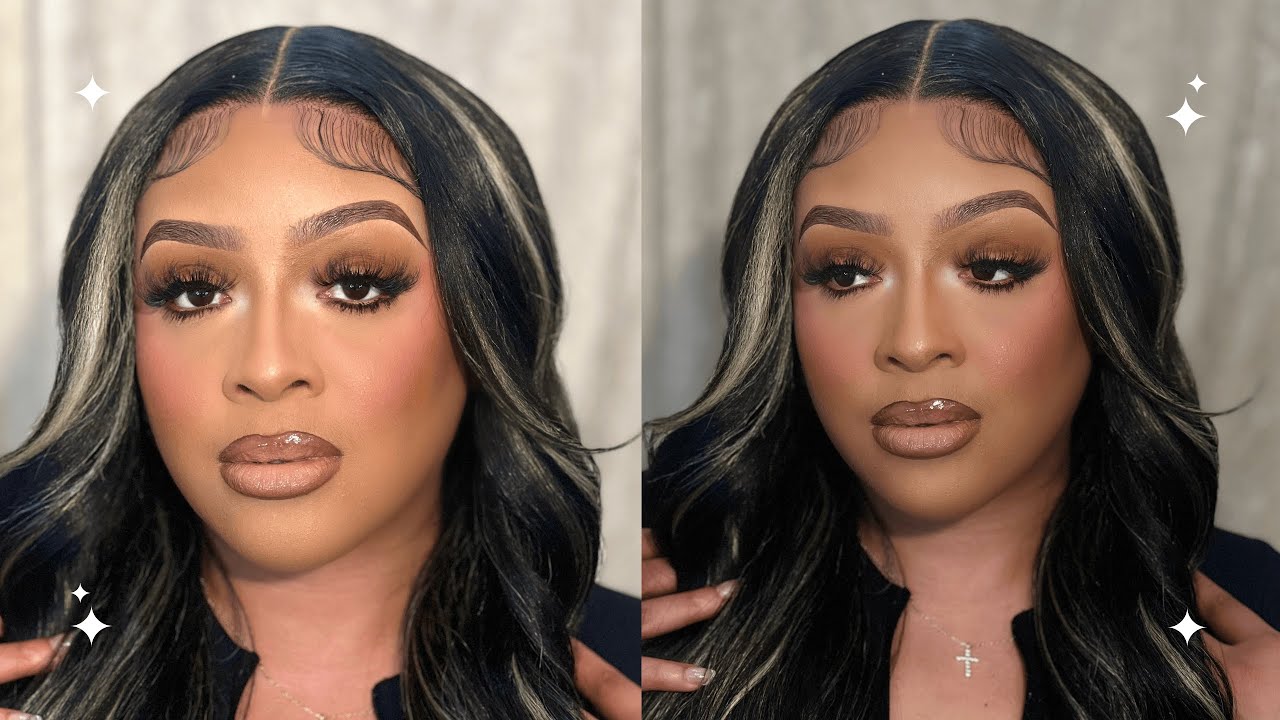
Soft Glam vs. Full Glam: Key Differences

These two looks get confused constantly. The short version: soft glam whispers, full glam announces.
Full glam was built for the stage. Sharp contour, graphic liner, heavy pigment, stacked lashes. Up close in natural light, it reads as theatrical. Soft glam does the opposite. It is designed to look natural from three feet away and still hold up in HD photos.
| Element | Soft Glam | Full Glam |
|---|---|---|
| Foundation finish | Satin or natural glow | Full coverage, matte or high-shine |
| Contour | Diffused, barely visible | Sharp, sculpted lines |
| Eye intensity | Blended neutral shadows | Saturated pigment, cut crease |
| Liner | Tight-line or soft smudge | Graphic, winged, precise |
| Lashes | Natural-dramatic or clusters | Full strip, stacked, voluminous |
| Highlight | Subtle, high points only | Intense, all-over glow |
| Lip | Nude, MLBB, satin finish | Bold color, defined liner, slightly overdrawn |
Where Full Glam Still Makes Sense
Stage, performance, and high-production photography. Full glam was created for environments where features get lost without intensity. Under studio lights or from 30 feet away, soft glam can disappear. Full glam holds.
For everything else, including weddings, events, dates, and everyday wear, soft glam photographs cleaner and reads more naturally in person. Makeup artist Lauren Garfitt notes that soft glam is the better choice for bridal work specifically because it enhances features without looking heavy when guests are standing close in daylight.
The color palette difference matters too. Full glam often uses bold, saturated, or dark shades. Soft glam stays in the warm-neutral range: taupes, soft browns, champagne shimmer, peachy blush, muted mauve lips. The monochromatic quality of the palette is part of what makes the look feel cohesive and soft rather than high-contrast.
Tools and Products You Need

You do not need a 50-piece kit. The right eight to ten products, used correctly, are enough.
Brushes
The brushes matter more than most people realize. A cheap foundation brush will streak. A low-quality blending brush will not diffuse eyeshadow the way soft glam requires.
- Large fluffy blending brush: for crease work and transition shades, a dense brush cuts the blend too short
- Flat shader brush: packing shimmer onto the lid, not sweeping it
- Small detail brush: lower lash line definition and inner corner work
- Fan brush: applying highlight without overdoing the intensity
- Damp beauty sponge: blending foundation for that skin-like finish; Beautyblender is the standard here
- Spoolie: grooming brows before and after product
Sigma Beauty and Real Techniques both make solid blending brushes at accessible price points. The Sigma F80 flat kabuki is particularly good for building a soft-skin base.
Base Products
Soft glam skin reads luminous but never greasy. That requires the right base combination.
| Product | What to Look For | Examples |
|---|---|---|
| Primer | Hydrating, not overly pore-blurring | Charlotte Tilbury Flawless Filter, e.l.f. Putty Primer |
| Foundation | Medium coverage, satin or natural finish | NARS Sheer Glow, Rare Beauty Tinted Moisturizer |
| Concealer | Buildable, smooth (not chalky) | NARS Radiant Creamy Concealer, e.l.f. Halo Glow |
| Setting powder | Translucent, applied lightly | NARS Light Reflecting Setting Powder, Laura Mercier |
| Setting spray | Dewy finish to restore glow after powder | Charlotte Tilbury Setting Spray, MAC Fix+ |
Eye and Face Products
The Anastasia Beverly Hills Soft Glam Eyeshadow Palette is the most-referenced product for this look across TikTok and YouTube tutorials. It contains warm neutrals, taupes, and rich browns in both matte and shimmer finishes, all in the right range for the look.
For blush, cream formulas like Rare Beauty’s Soft Pinch Liquid Blush or the Benefit Hoola Bronzer pair well with the satin skin finish. NARS Orgasm Blush in powder form is a reliable fallback for medium skin tones.
Beyond that: a neutral pencil liner or gel liner for tight-lining, a lengthening mascara, individual lash clusters if you want to add drama without a full strip, and a brow pencil or tinted brow gel like the Anastasia Beverly Hills Brow Wiz.
How to Prep Skin for Soft Glam

Skin prep is not optional here. It is 60 percent of the look. If the base slides or looks patchy, no amount of blending will fix it.
Start with a clean, moisturized face. Let your moisturizer absorb for at least five minutes before applying primer. Rushing this step is the most common reason foundation looks cakey by mid-day.
Primer Selection
For soft glam, a hydrating primer works better than a pore-blurring one. Silicone-heavy pore-filling primers can separate from foundation over the course of the day, which causes pilling and patchy coverage. A water-based or hybrid primer gives a better bond.
The Charlotte Tilbury Flawless Filter is technically a primer-highlighter hybrid, and it has become one of the most common prep products for this look. It gives the skin a lit-from-within quality before foundation even goes on.
If you have oily skin, apply a thin layer of pore-minimizing primer only in the T-zone. Let hydrating primer cover the rest. This keeps the skin from going flat while controlling shine where it actually matters.
Color Correcting When Needed
Color correcting before foundation keeps the base lighter and more natural. For soft glam, the goal is to correct, not cover.
- Peach or orange corrector: under-eye darkness on medium to deep skin tones
- Peach or salmon: under-eye darkness on fair to light skin tones
- Green: isolated redness, acne spots
Apply correctors only where needed. Spot-correcting is more effective than covering the full face, and it lets you use less foundation overall. For soft glam, that skin-like, medium-coverage finish is what everything is built on.
How to Apply a Soft Glam Base
The base for soft glam is not a full-coverage mask. It is medium coverage applied in thin layers, built only where the skin actually needs it.
A damp sponge is the standard application tool for this look. It sheers out foundation as it blends, preventing the heavy, flat finish that kills the skin-like quality soft glam requires. Stipple, do not wipe. Bouncing motions push product into skin rather than dragging it across.
Dot foundation across the forehead, cheeks, nose, and chin. Blend outward from the center. Add a second thin layer only where coverage is uneven. Set under the eyes and T-zone with a translucent setting powder. Leave the cheeks alone, that is where the glow lives.
Contour Placement
Soft glam contour should be invisible from three feet away. If you can see a line, it is too much.
Placement:
- Under cheekbones: blend upward toward the temples
- Hairline temples: close to the hairline, blended into nothing
- Jawline: optional, and only if you want subtle definition
Use a cool-toned matte powder one to two shades deeper than your foundation. Warm-toned contour reads as bronzer and changes the effect entirely. Urban Decay’s Stay Naked Threesome Bronzer, Highlighter, Blush is a common choice here because the formula blends easily without looking muddy.
Blush and Highlight Placement
Blush placement makes or breaks the soft glam finish. The current approach applies blush from the apples of the cheeks upward toward the temples, sometimes extending close to the lower lash line for a flushed, lifted effect.
Cream blush on a skin that has not been heavily powdered gives the most natural integration. Rare Beauty Soft Pinch and NARS Orgasm are both referenced constantly in tutorials for this reason: they blend into the skin rather than sitting on top of it.
Highlight stays targeted. Inner corners of the eyes, high point of the cheekbones, and the bow of the upper lip if you want to define it. Champagne and rose gold tones work for most skin tones. Avoid pure white or ice-pink highlights on deeper skin, they read ashy rather than glowing.
According to McKinsey’s State of Beauty 2025 report, the beauty industry grew at 7% annually from 2022 to 2024, with cream and hybrid complexion products among the fastest-growing segments. That growth tracks with the shift toward softer, skin-focused finishes.
Soft Glam Eye Makeup Step by Step

The eye look is where most people either nail soft glam or veer into something else. Get this right and the whole look comes together. Rush it and you end up with either a flat neutral eye or an accidental smokey eye.
Prime the lids first. This prevents creasing and keeps the shimmer from migrating. Urban Decay Eyeshadow Primer Potion is the standard, but any eyeshadow primer works.
Then build in this order:
- Apply a nude or skin-tone matte shade all over the lid as a base
- Buff a light taupe or warm brown transition shade into the crease with a fluffy brush using windshield-wiper motions
- Deepen the outer V with a medium-dark matte brown, blending edges until there is no visible line
- Pat (do not sweep) shimmer onto the center lid and inner corner
- Define the lower lash line with a small brush and a soft matte shade, no harsh line
- Tight-line with a gel or pencil liner, keeping it close to the lash roots
The Anastasia Beverly Hills Soft Glam palette contains all the shades needed in one product. MAC Soft Brown eyeshadow is the most popular single shade for transition work.
How to Blend Without Losing Definition
Blending is the technical skill soft glam lives and dies on. Over-blend and the eye goes flat. Under-blend and you get harsh lines.
The rule: blend the edges, not the color placement itself.
Keep a clean fluffy brush dedicated to blending only. After placing each shadow, use the clean brush to diffuse the edges in circular motions. Do not go back into the color with the blending brush or it will pick up and distribute the pigment too wide.
If the eye looks muddy or the crease shade has gone too far, do not add more product. Use a clean brush to blend excess outward, or dip the brush in setting powder to create a barrier and reset the edge.
Lashes for Soft Glam
Lashes for this look sit between natural and dramatic. The goal is defined, fanned-out, and slightly lifted, not clumped or stacked.
Curl lashes before mascara. After curling, apply one coat, let it dry for 30 seconds, then apply a second coat only to the upper lashes. This gives length and lift without the spider-leg effect.
For added impact without a full strip lash: individual lash clusters placed at the outer corners give a noticeable lift that still reads natural up close. Ardell individual clusters and Lilly Lashes singles are two of the most commonly referenced options in soft glam tutorials across TikTok and Instagram beauty content.
The Lancôme Idole Lash Lifting Mascara is specifically designed for the fanned-out, fluttery finish this look requires. But any lengthening formula that does not add extreme volume will work. Volume mascaras tend to read heavier than soft glam calls for.
Brows for Soft Glam
Brows make or break this look. A heavy, drawn-on brow immediately pulls the softness out of everything else you’ve built.
For soft glam, the goal is fluffy, filled, and feathered, not sculpted or laminated. You want shape without structure. You want definition without the brow becoming the loudest thing on your face.
Search interest in nano brows rose 56% in 2024 according to Who What Wear, and natural, feathered brow looks continued to dominate TikTok and editorial work through 2025, with fluffy brow content accumulating hundreds of millions of views on the platform.
How to Get the Right Brow Shape
Start with a spoolie. Brush hairs upward before applying any product. This tells you where the sparse patches are, how much natural arch you have, and which direction the hairs grow.
Fill only what needs filling. Use a fine brow pencil like the Anastasia Beverly Hills Brow Wiz or the NYX Micro Brow Pencil to create hair-like strokes in gaps. Do not draw along the entire brow shape, it creates a hard edge that contradicts everything the rest of the look is doing.
Finish with a tinted or clear brow gel to hold hairs in place. The Charlotte Tilbury Legendary Brows gel is commonly referenced for this look because it tints and sets without stiffness.
What Brow Products Work Best
Avoid pomade for soft glam brows. Pomade fills in too much and creates a dense, drawn look. It belongs in full glam, not here.
| Product Type | Finish | Best For |
|---|---|---|
| Micro brow pencil | Fine, hair-like strokes | Sparse brows needing precise filling |
| Brow powder | Soft, diffused color | Creating shape without harsh lines |
| Tinted brow gel | Fluffy, natural tint | Fuller brows that need light definition and hold |
| Clear brow gel | Transparent hold | Setting already-filled brows in place |
One shade lighter than your hair color is a good general rule for brow products. Going too dark pulls contrast into the look, which is the opposite of what soft glam requires.
Setting and Finishing the Look

Setting is where soft glam either holds together all day or slowly falls apart. Most people under-set or set incorrectly, and the look migrates by afternoon.
The global setting spray market was valued at $1.02 billion in 2024 and is projected to reach $1.94 billion by 2034 at a 6.7% CAGR, according to GMInsights. Search interest in setting sprays doubled from 90,500 to over 201,000 in January 2024 alone (Alibaba Reads). The category is growing because people are demanding looks that last, and soft glam is no exception.
Setting Powder vs. Setting Spray
These two do different things. Use both.
Setting powder goes on first, pressed (not dusted) under the eyes and in the T-zone. Pressing gives more coverage and prevents creasing. Loose translucent powders work well here. NARS Light Reflecting Setting Powder and the Laura Mercier Translucent Setting Powder are the two most consistently referenced in tutorials because both avoid the white cast that cheaper options can leave on deeper skin tones.
Setting spray goes last, after everything is done. It does two jobs: it locks the look in place, and it melts powder together so the finish returns to skin rather than sitting on top of it. Charlotte Tilbury’s setting spray and MAC Fix+ are both widely used for this reason. For soft glam, the dewy or radiant setting spray formulas are better than matte ones. Matte setting sprays can flatten the glow that is central to the whole look.
Lip Options for Soft Glam
The lip is the last decision, and it should balance the eye intensity rather than compete with it.
- Nude gloss or sheer lip tint: the most common soft glam lip, works on most skin tones
- Satin MLBB (my-lips-but-better) shade: slightly more polished than a gloss, stays natural
- Warm mauve or rose: adds color without overshadowing the eye work
- Soft berry or caramel: good for deeper skin tones where nude shades can look ashy
A lip liner applied all over the lip before color extends wear time and keeps everything clean. Satin lipstick is the most common finish for soft glam because it gives definition without the dryness of matte or the high shine of gloss. Charlotte Tilbury Pillow Talk remains the most referenced shade across soft glam tutorials globally: it is a muted pink-mauve that works across a wide range of fair to medium skin tones.
The Final Check
Before stepping away from the mirror, scan for balance.
The rule: if the eye is dramatic, keep the lip soft. If the lip has color, keep the eye more muted. Soft glam does not lean into both at once.
Check that the contour has disappeared. If you can still see a line along the cheekbone from two feet away, blend it further. Check that the highlight is not too intense, the inner corner and high point of the cheek only, nothing running down the nose bridge.
Finish with a light mist of setting spray held about 12 inches from the face. Let it dry naturally. Do not fan or blot. The mist needs to merge the layers together, not get wiped away.
Common Soft Glam Mistakes
Most soft glam failures come down to four things: too much product, wrong undertones, not enough blending time, and over-powdering. Any one of these pulls the look into territory it should not be in.
Eye Mistakes
Going too dark in the crease is the fastest way to accidentally create a smoky eye instead of soft glam. The crease shade should be a medium-dark matte brown, not a deep black or charcoal. If you are using a warm taupe as your transition shade and a deeper brown in the outer V, you have the right depth range.
Over-blending is also real. Once you lose placement and everything turns into one flat neutral wash on the lid, the eye loses dimension. The fix is to re-apply the mid-lid shimmer and pat a slightly darker matte back into the outer corner before blending edges again.
Base and Highlight Mistakes
Too much powder kills the soft-skin finish that soft glam is built on.
Set only where you need to, which is the T-zone and under the eyes. Leave the cheeks and temples alone. If the whole face gets powdered evenly, the luminous foundation base disappears and the skin looks flat and dry.
Overhighlighting is the other common error. Highlight should catch the light when you turn your head, not appear as a solid bright stripe across the cheekbone at every angle. If you can see your highlight in a mirror from a normal distance without moving, you have used too much. Tap excess off with a clean brush or blot gently with a tissue before it sets.
Foundation and Brow Pitfalls
Wrong undertone in the eyeshadow palette makes the whole look muddy. If your skin has warm undertones and you reach for a cool-toned taupe palette, the colors will fight with your skin rather than blend into it. The Charlotte Tilbury Pillow Talk palette leans warm-pink. The Anastasia Beverly Hills Soft Glam palette runs warm-brown and terracotta. Both of these align with the warm-neutral range soft glam calls for.
Brows drawn on rather than filled in are an instant tell. Once the brow has a visible outline, the softness of the look is gone. If you over-filled, a spoolie brushed through the brow immediately after application will diffuse excess product and soften any sharp edges before they dry.
Soft Glam Adjustments for Different Skin Tones

The technique stays the same across every skin tone. The product selection shifts significantly.
Inclusive beauty brands grew 1.5 times faster than their less inclusive competitors in 2024, according to Circana data cited in Arbelle’s State of Inclusivity in Beauty report. The market has responded to demand for products that actually work across the full range of skin tones, and most of the products referenced in soft glam tutorials now have viable options for fair through deep skin.
Fair Skin
The risk with fair skin and soft glam: going too cool or too pale and washing the look out.
Warm up the palette. Choose eyeshadow in warm taupes and soft browns rather than cool grays or stark beiges. Avoid champagne highlights with a pink or silver base, they can read frosty rather than glowing. Gold or warm peach highlights are a better fit.
For blush: rose, soft peach, and warm pink work well. Avoid coral on very fair skin as it can look orange. Foundation matching on fair skin benefits from avoiding pink-heavy formulas that can turn ashy in photos. Neutral-warm undertones photograph more naturally.
Medium Skin
Medium skin tones have the widest range of options for soft glam. Most warm-neutral palettes land well.
Shade family sweet spot: bronze taupes, warm medium browns, mauve eyeshadow, champagne or rose gold shimmer. Blush in peach-coral or warm rose. Highlight in rose gold or soft gold.
The Anastasia Beverly Hills Soft Glam palette was designed with this range in mind and has been widely praised specifically for medium skin tones. NARS Orgasm Blush, a peach-gold, is a standard for medium skin tones and is universally mentioned in soft glam tutorials across YouTube and TikTok.
Deep Skin
Pastels and cool taupes dull the look on deeper skin tones. Both need to be avoided.
Go richer and warmer across every product. Eyeshadow shades that work best: terracotta, burnt orange-brown, rich mauve, deep bronze, and warm gold shimmer. Blush in brick-rose, warm berry, or deep peach. Highlight in copper-gold or bronze rather than pearl or champagne, which can look gray.
For lip color on deeper skin tones, caramel, warm berry, deep mauve, and bronzed nude are the most flattering soft glam shades. Nude lipstick that reads as nude on fair skin often reads flat or ashy on deeper tones. The safest approach is to go two shades deeper than whatever neutral you would initially reach for.
Fenty Beauty was built specifically for this gap. Their Pro Filt’r Foundation and Soft Pinch Blush range both have shades calibrated for deep skin tones, and both are widely used in soft glam tutorials for deeper complexions. Choosing the right lip shades for dark skin follows the same logic as the eye and cheek choices: warmer, richer, and slightly more saturated than the soft glam formula used for lighter tones.
Skin Tone Quick Reference
| Skin Tone | Eyeshadow Range | Blush | Highlight | Lip |
|---|---|---|---|---|
| Fair | Warm taupe, soft brown | Rose, soft peach | Warm gold, peach | Nude-pink, rose |
| Medium | Bronze taupe, medium brown | Peach-coral, warm rose | Rose gold, champagne | Mauve, warm nude |
| Deep | Terracotta, rich bronze, gold shimmer | Brick-rose, warm berry | Copper-gold, bronze | Caramel, deep mauve, warm berry |
The look also adjusts based on occasion. For bridal soft glam, add individual lash clusters and a slightly deeper contour that holds up under flash photography. For everyday wear, pull back on the shimmer and swap the lash clusters for one solid coat of lengthening mascara.
You can find more inspiration and specific examples in these soft glam makeup looks, or explore how soft glam compares with other natural glam makeup looks if you want to dial back the intensity further.
FAQ on How To Do Soft Glam Makeup
What exactly is soft glam makeup?
Soft glam is a polished, natural-looking style that sits between no-makeup makeup and full glam. It uses neutral-warm tones, blended eyeshadow, luminous skin, and a muted lip. Nothing is overdone. Everything is intentional.
What products do I need for a soft glam look?
You need a medium-coverage foundation, concealer, setting powder, a neutral eyeshadow palette, cream blush, highlight, mascara or lash clusters, a brow pencil or tinted brow gel, and setting spray. That covers the full look.
How do I blend eyeshadow for soft glam?
Start with a nude base shade across the lid. Buff a warm taupe into the crease using windshield-wiper motions. Deepen the outer corner with a matte brown. Pat shimmer onto the center lid. Blend edges only, not the color itself.
What is the difference between soft glam and full glam?
Full glam uses sharp contour, graphic liner, saturated pigments, and stacked lashes. Soft glam uses diffused contour, blended neutral shadows, tight-line only, and natural-dramatic lashes. The color palette stays warm and muted rather than bold or high-contrast.
How do I make soft glam last all day?
Prime skin and eyelids before starting. Set the T-zone and under eyes with setting powder. Finish with a dewy or radiant setting spray. Carry blotting sheets for midday touch-ups. Avoid touching your face. That combination will hold the look for 8 to 12 hours.
What lip color works best for soft glam?
A nude lipstick, soft mauve, or MLBB satin shade works well. Fair skin suits rose-nude. Medium skin suits warm mauve. Deep skin suits caramel or berry-nude. Avoid matte overdrawing or bright shades, they shift the balance away from the eyes.
Can beginners do soft glam makeup?
Yes. Start with cream products since they are easier to blend with fingers. Limit the eye look to three shadows: a base, a crease shade, and a shimmer. Build slowly. Cream blush on bare skin is more forgiving than powder on a set face.
How do I do soft glam for hooded eyes?
Apply eyeshadow with eyes open to see where it lands when the lid is visible. Place the transition shade higher than the natural crease. Skip a full liner wing. Tight-line only. Individual lash clusters at the outer corners open up the eye without adding bulk.
What eyeshadow palette is best for soft glam?
The Anastasia Beverly Hills Soft Glam palette is the most widely used. It contains warm taupes, matte browns, and shimmer shades in the exact range the look requires. The Charlotte Tilbury Sophisticate palette is a solid alternative for a slightly more pink-leaning neutral finish.
How do I adjust soft glam for deeper skin tones?
Swap cool taupes for terracotta and rich bronze eyeshadow. Use copper-gold highlight instead of champagne. Choose brick-rose or warm berry blush. For lips, caramel and deep mauve read more naturally than light nudes, which can look ashy on deeper complexions.
Conclusion
This conclusion is for an article presenting the full process behind achieving a soft glam makeup look, from skin prep and base application through to blush placement, brow technique, and finishing.
The look works because every element stays balanced. Neutral eyeshadow blending, a luminous foundation finish, diffused contour, and a satin lip all pull in the same direction.
Adjust the shade palette for your skin tone and the intensity for your occasion. The technique stays the same.
Whether you are doing makeup for a wedding, a date, or just a Tuesday, soft glam step by step gives you a polished result without the heavy feel of full glam.

- What Is Skin Tint and Why Everyone Is Obsessed - July 11, 2026
- What Is Foundation and How Do You Choose One? - July 6, 2026
- How to Make Blush Last Longer - July 3, 2026


