

One dot. That’s genuinely all it takes with the Rare Beauty Soft Pinch Liquid Blush, and most people use five times too much on their first try.
Knowing how to apply Rare Beauty blush correctly changes everything. The formula is highly pigmented, fast-drying, and completely unforgiving if you skip the right technique.
This guide covers the full process: tools, skin prep, placement by face shape, blending method, layering, and shade selection for every skin tone.
No guesswork. Just a repeatable routine that actually works.
What Rare Beauty Blush Is

The Rare Beauty Soft Pinch Liquid Blush is a water-based, featherlight formula built around pure color pigments in a transparent base. It delivers a natural, second-skin flush rather than the flat, powdery finish most blushes leave behind.
The formula contains key skin-loving ingredients: dimethicone for slip, glycerin for hydration, mica for a soft light-reflecting finish, and a botanical blend of lotus, gardenia, and white water lily to calm and nourish the skin while you wear it.
Two finishes. Very different results.
| Finish | Skin Effect | Best For |
|---|---|---|
| Matte | Flat, no-shine color | Oily skin, full-coverage looks |
| Dewy | Luminous, glass-skin glow | Dry skin, no-makeup looks |
The formula is derm-tested, non-comedogenic, and free of parabens, sulfates, and mineral oil. It also holds a 4.6/5 rating across over 21,300 reviews on Sephora alone (Insider Beauty, 2025).
This is not your average drugstore blush. The pigment concentration is what makes it different. One dot covers both cheeks. That’s not a suggestion, it’s actually how the formula works. It blends fast, dries down quickly, and adheres to skin for up to 12 hours.
Rare Beauty sold 3.1 million units of this blush in 2022 and generated $70 million in blush revenue that year alone (Bloomberg). By 2024, the brand sold one Soft Pinch Liquid Blush every three seconds across all sales channels (Glossy, 2025). The formula clearly does something right.
Liquid blush as a category hit $2.6 billion in global sales in 2023, driven heavily by social media and the same demand for blendable, buildable, skin-forward formulas this product helped popularize (Market Reports World, 2024).
Tools That Work Best for This Formula

The wrong tool with this blush is an expensive mistake. Fluffy powder brushes spread it too thin and streak. Dense brushes can push too much product into one spot before you even realize it.
Damp beauty sponge: The most beginner-friendly option. Wet it, wring it out, then dot and press. The damp surface prevents the sponge from absorbing too much product and gives you better control over where the pigment lands.
Stippling brush: Good for a more precise, airbrushed result. Use circular tapping motions starting at the cheekbone and work outward toward the hairline. Celebrity makeup artist Erica Taylor (L’Oreal Paris) describes this as the technique that gives liquid blush a “second-skin finish.”
Fingers: Actually effective for this formula. The warmth from your fingertips helps the product melt into skin. Apply a few small dabs to the cheekbone, then press gently with light tapping motions (NewBeauty, 2024). Works best for a soft, natural flush.
Flat foundation brush: Underrated for this product. Dip lightly, sweep onto the cheeks, and blend edges with circular motions for a sculpted look.
What NOT to use: fluffy powder brushes, fan brushes for initial application, or any dry sponge. Dry tools absorb the product instead of blending it, leaving patchy results.
Rare Beauty sells its own Soft Pinch Blush Brush, which works well here. But honestly, a damp sponge gets the job done just as well and is more forgiving if you’re still figuring out how much product to use.
Skin Prep Before Applying Rare Beauty Blush
Skipping prep is how you end up with patchy, streaky blush that lifts off your skin by noon.
Dry skin needs extra attention. Apply a moisturizer first and let it absorb fully. Dry patches grab pigment unevenly, making the blush look splotchy. A hydrating primer on top of moisturizer gives even more insurance.
The layering order matters:
- Moisturizer
- Primer (optional, but helpful for dry or oily skin)
- Foundation or skin tint
- Concealer
- Liquid blush (applied here, before any powder)
- Setting powder
- Setting spray
Celebrity makeup artist Nikki Wolff puts it plainly: liquids layer best on top of other liquids (Bustle, 2024). Apply the Soft Pinch Liquid Blush before any powder products, not after. Powder on skin before liquid blush creates a barrier that prevents proper blending and causes patchiness.
One trick worth trying: mist your face lightly with setting spray before applying the blush. It keeps the base slightly damp, which gives you a longer working window to blend before the product sets.
For applying makeup on dry skin, extra hydration in the prep stage is non-negotiable. Skipping it is the number one reason liquid blush looks uneven.
How Much Product to Use
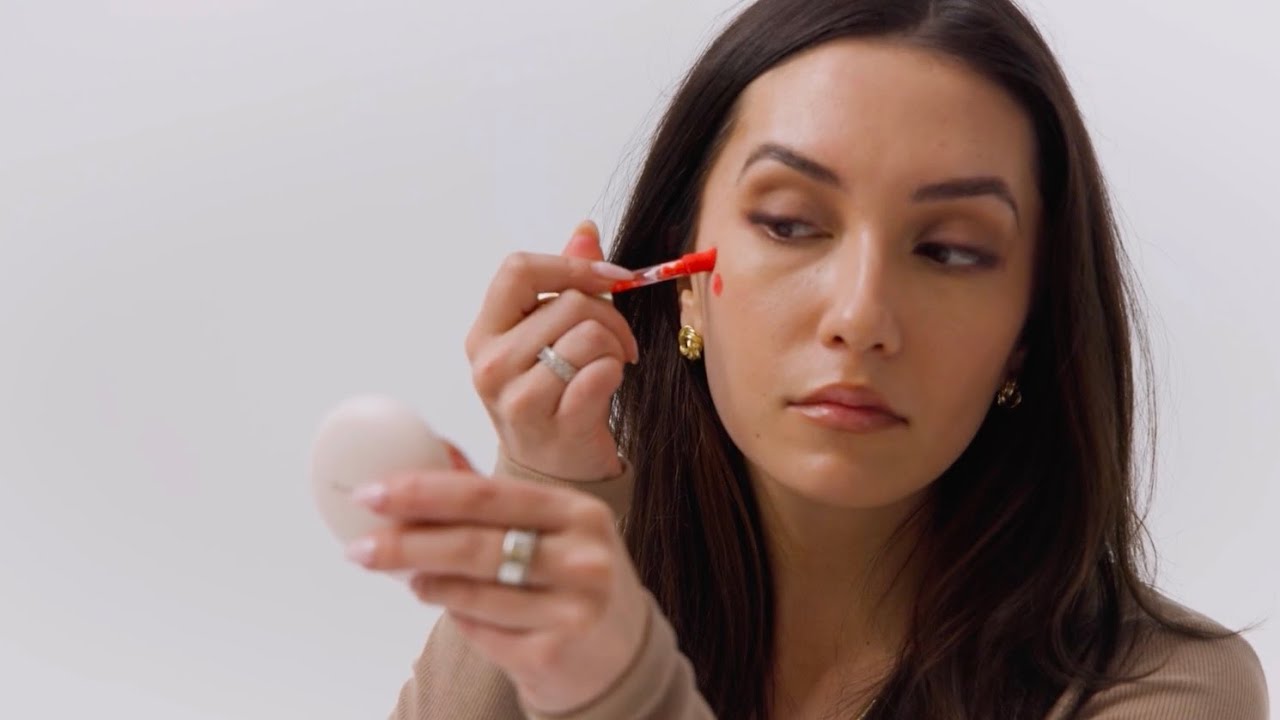
This is where most people go wrong. One small dot. That’s it.
Dispense the product by gently pressing the applicator against the inside of the bottle cap, then dotting it directly onto your cheek. One dot per cheek is enough for a natural flush. Two dots on each side if you want a stronger, more pigmented look.
Less is genuinely more here. Because the pigment concentration in this formula is so high, starting with too much gives you no easy fix. Blending can diffuse some of it, but there’s a point where no amount of sponge work will fix an overapplication.
If you over-apply, move quickly. While the product is still wet, use a clean damp sponge to press and diffuse the edges outward. This spreads the pigment and softens the intensity. Once it dries down, your options shrink fast.
Build in layers instead of loading product at once:
- Start with one dot, blend fully
- Assess the color payoff in natural light
- Add a second dot only if needed
At $23 a bottle, this product lasts a long time precisely because a tiny amount goes such a long way. One bottle can last six months or more with daily use if you use it correctly.
Placement Techniques by Face Shape
Blush placement changes everything. The same shade applied to different parts of the face creates completely different effects, and what works for one face shape can flatten or widen another.
| Face Shape | Placement | Direction |
|---|---|---|
| Round | High on cheekbones | Blend upward toward temples |
| Oval | Across cheekbone, horizontally | Sweep toward ears |
| Long / Oblong | Lower cheek, more horizontal | Blend toward ears, not temples |
| Heart-shaped | Lower cheek area | Blend outward to balance forehead |
For any face shape, finding your cheekbone is simple: press your fingers along the outer edge of your face just below your eye socket until you feel the bone. That’s your starting point.
For a more in-depth look at applying blush on different face shapes, placement varies significantly based on face structure and what you want to highlight or minimize.
Draping With Rare Beauty Blush
Draping uses blush as a hybrid between color and contour. Instead of applying it only to the cheeks, you sweep it from the cheekbone up along the temples, replacing traditional bronzer or contour placement with color.
The Soft Pinch Liquid Blush is easier to drape with than powder because it blends seamlessly without hard lines. Apply a dot to the cheekbone, blend upward toward the temple, and carry the color lightly along the hairline.
Best shades for draping: deeper roses, terracotta tones, and muted corals. Sheer pinks get lost when spread over a larger area. You need a shade with enough pigment to carry across the cheekbone and temple without fading completely.
Blending Method Step by Step

Never swipe the applicator directly onto your cheek in a stroke. That deposits too much product in a line and makes even blending nearly impossible.
The correct sequence:
- Remove excess product from the applicator before touching skin
- Place 1-2 dots on the cheekbone (do not drag or swipe)
- Use fingertips or a damp sponge to tap and press outward from the dot
- Blend edges upward and outward using tapping, not circular, motions
- Check in natural light before adding more product
Tapping beats circular blending here. Circular motions pick up the product and move it around unpredictably. Tapping presses pigment into the skin and diffuses the edges more naturally.
Working window is short. This formula sets faster than cream blush. Blend within the first 30-60 seconds of application. After that, the product grips the skin and becomes much harder to move.
For an alternative approach using a brush, dispense one dot onto the back of your hand first. Pick up the product with a stippling brush and stipple onto the cheekbone in small pressing motions. This gives you more control over the exact placement and makes it easier to layer gradually.
The liquid blush application process is less forgiving than powder, but the finish it creates, that skin-from-within flush, is worth the extra attention to technique.
Layering Rare Beauty Blush With Other Products

The Soft Pinch Liquid Blush was built for layering. It sits cleanly under powder products without disturbing what’s underneath, and it works alongside bronzer, highlighter, and powder blush without turning cakey.
Liquid before powder. Always. This is the rule that most people skip, and it’s why their blush looks patchy or lifts off by midday. Celebrity makeup artist Nikki Wolff confirms that liquids layer best on top of other liquids (Bustle, 2024). Apply the liquid blush first, let it set for 30 seconds, then move to any powder products.
Mintel’s Global Beauty Trends Report (2024) noted that cream-based color products saw a 27% rise in consumer preference since mid-2023, driven by demand for that layered, skin-like finish liquid blush delivers so well.
Pairing With Bronzer
Apply bronzer first along the perimeter of the face, then add the liquid blush on top of or just beside it on the cheekbone.
Blend where the two meet using a tapping motion. The goal is a gradient, not a hard edge where one product stops and the other starts.
Order: bronzer first, liquid blush second, powder to set.
Mixing With Highlighter
Two options here, and they give very different results.
On fingers before applying: Mix one dot of blush with a small amount of cream or liquid highlighter on the back of your hand. Apply the blend to the cheekbone in one step. This gives a soft, lit-from-within glow without layering multiple products separately.
Applied after: Sweep a liquid or cream highlighter lightly over the top of the blush once it’s set. L’Oreal Paris makeup artist Erica Taylor notes that applying highlighter before blush lets the blush softly blend into the highlighter for a more seamless finish.
For more on using highlighter makeup alongside liquid blush, the sequence and formula type matter more than most people realize.
Adding Powder Blush on Top
A thin layer of powder blush over the liquid formula does two things: sets the product and adds an extra dimension of color. e.l.f. Cosmetics notes that layering powder blush on top of liquid creates a grip between the two formulas that significantly extends wear time.
Use a light hand. The liquid blush already has strong pigment payoff. The powder layer is purely for longevity and texture, not additional color intensity.
Pair warm shades together (terracotta liquid + warm rose powder) or stay tonal within the same shade family for a more natural result. Mixing a warm liquid with a cool powder can create an odd, muddied tone on the skin.
Making It Last Through the Day
The Soft Pinch Liquid Blush claims up to 12 hours of wear, and it does deliver. But that number assumes proper setting. Without it, oily skin can break it down in three to four hours.
| Skin Type | Setting Method | Touch-Up Approach |
|---|---|---|
| Oily | Translucent powder + matte setting spray | Blot first, then lightly dust powder blush |
| Dry | Dewy setting spray only | Press with a damp sponge to revive |
| Combination | Powder on T-zone, spray on cheeks | Spot blot oily areas; avoid the cheek area |
| Normal | Light setting spray | Rarely needed |
Translucent powder: Apply with a pressing motion, not a sweeping one. Sweeping drags the blush across the face and distorts the placement. Press gently over the blush with a fluffy powder brush, then tap off any excess.
Setting spray goes on last. Mist the face in an X and T pattern, holding the bottle about 10 inches away. Let it dry naturally. Don’t fan or blot it dry, that lifts product.
For applying setting spray correctly, technique affects the final finish more than the product itself. A rushed application can create an uneven, patchy seal.
Blotting papers are worth keeping nearby for oily skin. Blot the T-zone before touching up, then dust a small amount of translucent powder over the cheeks if the blush has faded. Never apply more liquid blush directly over a broken-down base without blotting first.
Shade Selection for Different Skin Tones

Rare Beauty’s Soft Pinch Liquid Blush line now spans over 20 shades across matte and dewy finishes. Picking the wrong one doesn’t ruin the look, but the right one makes the formula work significantly better.
Skin undertone matters more than skin depth here. A warm-toned shade on a cool undertone can make the face look sallow. A cool pink on a warm complexion tends to look disconnected from the skin rather than flushed.
| Skin Tone | Recommended Shades | Finish to Try |
|---|---|---|
| Fair to light | Hope (nude mauve), Cheer (light warm pink) | Dewy |
| Light to medium | Happy (cool pink), Joy (muted peach) | Dewy or Matte |
| Medium to tan | Joy (muted peach), Grace (warm rose) | Matte or Dewy |
| Deep | Love (terracotta), Truth (mauve maroon) | Matte |
Personal stylist Marcia Crivorot notes that seasonal color palettes are a useful guide here: warm spring and autumn tones do well with Joy and Love, while cooler summer and winter palettes suit Hope and Truth better.
Rare Beauty “Hope” in a nude mauve with a dewy finish was Sephora’s top-selling blush shade in 2024, per YipitData, making it a reliable starting point for anyone buying the formula for the first time.
For fair skin: sheer applications work best. One very small dot blended lightly gives a natural flush without overwhelming light complexions.
For deep skin: build with two dots and give extra blend time. Terracotta and deep berry shades have enough pigment weight to show on deeper skin tones without looking washed out.
Pairing blush shade selection with the right lip color ties the look together. Warm blush tones pair naturally with warm lipstick colors, while cool rose and mauve blush shades work well alongside nude or berry lip options. For cooler-toned looks, lipstick shades for cool undertones in dusty rose or soft plum complement the blush without competing with it.
FAQ on How To Apply Rare Beauty Blush
How much Rare Beauty blush should I use?
One small dot per cheek. The Soft Pinch Liquid Blush is highly pigmented, so a pea-size amount is already too much. Start with less than you think you need, blend fully, then assess before adding more.
Do I apply Rare Beauty blush before or after powder?
Always before powder. Liquid formulas layer best on top of other liquids, directly over foundation or skin tint. Apply setting powder and powder blush after the liquid blush has set for about 30 seconds.
What is the best tool to apply Rare Beauty blush?
A damp beauty sponge gives beginners the most control. A stippling brush works well for a more precise, airbrushed finish. Fingers are also effective since warmth helps the formula melt into skin naturally.
How do I blend Rare Beauty blush without streaks?
Dot the product onto the cheekbone first. Never swipe the applicator directly across skin. Use tapping motions to press and diffuse the pigment outward. Work quickly since the formula sets fast.
Can I apply Rare Beauty blush without foundation?
Yes. The formula works directly over moisturized skin. Make sure skin is fully hydrated first. Dry patches will grab the pigment unevenly, so a light moisturizer or primer underneath helps the blush blend smoothly.
Which Rare Beauty blush shade works for fair skin?
Hope (nude mauve) and Cheer (light warm pink) are the most flattering for fair to light skin tones. Both have enough pigment to show without overwhelming lighter complexions. The dewy finish works especially well on fair skin.
How do I make Rare Beauty blush last longer?
Set it with translucent powder using a pressing motion, then finish with a setting spray. For oily skin, blot the T-zone before touching up. Layering a powder blush on top also significantly extends wear time throughout the day.
Can I use Rare Beauty blush for draping?
Yes. The liquid formula blends so seamlessly it suits the draping technique well. Apply a dot on the cheekbone and blend upward along the temple. Deeper shades like terracotta or muted rose work best for this placement.
What is the correct blush placement for a round face?
Place the blush high on the cheekbones and blend upward toward the temples. Avoid applying it to the apples of the cheeks on a round face shape, as that widens the face rather than creating a lifted effect.
How do I fix over-applied Rare Beauty blush?
Act fast while the product is still wet. Press a clean damp sponge over the area to diffuse and absorb excess pigment. Once the formula dries down, it grips the skin and becomes much harder to correct or remove.
Conclusion
This conclusion is for an article presenting how to apply Rare Beauty blush as a skill that comes down to three things: the right amount of product, the right tools, and the right placement for your face shape.
The Soft Pinch Liquid Blush rewards a light hand and a fast blend. Prep your skin well, apply before any powder, and set with a translucent powder or setting spray to lock in the flush.
Shade selection matters too. Matching your blush to your skin tone and undertone makes the buildable pigment work with your complexion rather than against it.
Get the technique right once, and this formula becomes one of the easiest parts of your face makeup routine.

She started writing on the site after fielding the same questions from clients and friends often enough to just write the answers down: which red won't turn orange on a warm undertone, how to keep lipstick from feathering into fine lines, why a "12-hour" formula rarely survives dinner.
Every review on the site follows the same rule she uses with paying clients: wear it first, then decide if it's worth recommending.
- How to Choose Setting Powder for Your Skin Type - August 1, 2026
- How Long Does Eyeliner Last Before It Expires? - July 28, 2026
- What Is Contour and How Do You Apply It? - July 25, 2026


