

Summarize this article with:
Acne affects roughly 50 million Americans every year, yet most people covering breakouts with makeup are still doing it the wrong way.
Learning how to cover acne with makeup is less about finding the right product and more about understanding the right technique. The order of application, the formula you choose, and how you prep your skin beforehand all determine whether your coverage holds or falls apart by noon.
This guide covers everything: skin prep, color correcting for redness, choosing a non-comedogenic foundation, spot concealing active breakouts, setting for long wear, and removing makeup without triggering new breakouts.
What Covering Acne with Makeup Actually Means

Acne affects roughly 50 million Americans every year, according to MDacne. That number includes teenagers, adults in their 30s, and plenty of people who have been dealing with breakouts for over a decade.
And most of them have tried makeup at some point. Not to hide who they are. Just to get through the day without thinking about their skin every five minutes.
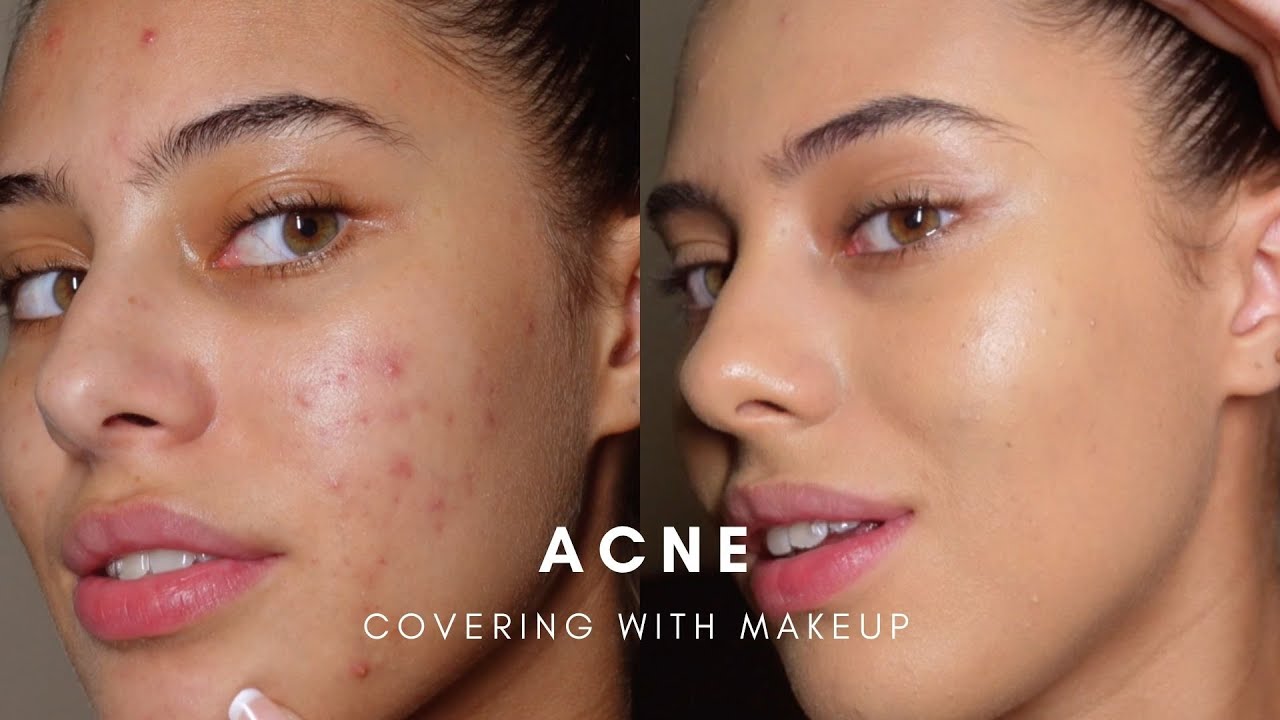
But “covering” acne means something specific. It does not mean erasing it completely or making skin look like a filter. What it actually means is reducing the visual contrast between a blemish and the surrounding skin so the breakout stops commanding attention.
There is a difference between concealing, covering, and treating. Concealing targets a single spot. Covering addresses the whole face, including redness, uneven texture, and post-acne marks. Treating is what your dermatologist handles. Makeup sits firmly in the first two categories.
That said, what makeup can do when applied correctly is genuinely useful. A well-executed full coverage makeup routine on acne-prone skin can neutralize redness, smooth the appearance of textured areas, and hold for 8 to 10 hours without irritating active breakouts.
What it cannot do: flatten raised pimples, heal active inflammation, or replace skincare. Expecting otherwise sets you up for heavy, cakey layers that actually make things look worse.
The other thing worth knowing upfront: skin prep determines 80% of the result. The best full-coverage foundation in the world performs badly on unprepared skin. Most people reach for more product when the issue is actually the surface underneath.
A 2024 global study published in the Journal of the American Academy of Dermatology found that 1 in 5 people between 25 and 39 currently has clinically diagnosed acne (Pierre Fabre / JAAD, 2024). Adult acne is not a teenage problem. It is a skin reality for a large portion of the adult population, and makeup for acne-prone skin has become a serious and well-developed category because of it.
The anti-acne makeup market was valued at $13.75 billion in 2024 and is projected to nearly double by 2032, growing at a CAGR of 8.7% (Future Market Report, 2024). That kind of growth does not happen unless the products are actually working for real people.
So this is not about covering up a flaw. It is about having a reliable technique when you need one.
Skin Prep Before Applying Any Makeup

Skip this step and everything after it falls apart. Prep is not optional when covering acne-prone skin.
Residue from skincare products left on the skin surface causes foundation to pill, slide, and break down within hours. A clean, fully absorbed base is non-negotiable before any makeup application.
Why Moisturizer Matters Even on Oily Skin
This one surprises people. Oily, acne-prone skin still needs moisture. Skipping it causes the skin to overproduce sebum, which breaks down makeup faster and worsens the look of textured areas.
The key is formula. Lightweight, oil-free, non-comedogenic moisturizers like La Roche-Posay Toleriane Double Repair or Neutrogena Hydro Boost Gel work on acne-prone skin without congesting pores.
Wait for it to fully absorb, typically 5 to 10 minutes, before touching primer. Rushing this is one of the most common reasons makeup looks patchy by midday.
How to Prime Acne-Prone Skin
Primer does three things for acne coverage: it smooths surface texture, creates adhesion for foundation, and extends wear time on oily or combination skin.
Silicone-based vs. water-based primers for breakouts:
- Silicone-based (like Smashbox Photo Finish): fills the appearance of pores and surface texture, creates a smooth canvas, works best for oily skin
- Water-based (like e.l.f. Putty Primer): more breathable, preferred for sensitive or acne-prone skin that reacts to silicones, better under water-based foundations
Matching primer type to foundation type matters. Silicone-based primer under a water-based foundation causes separation and pilling. Same formula base = better adhesion.
Spot-priming active breakouts with a small flat brush before full-face priming adds a focused layer of adhesion exactly where coverage needs to last longest.
Let primer set for 60 to 90 seconds before applying foundation. Skipping this wait time is what causes that sliding, uneven look on bumpy or textured skin.
Color Correcting for Acne and Redness
Color correction is the step most people skip, and it is the reason their foundation alone never looks quite right. Foundation layers color on top of color. If there is red underneath, it shows through.
Color theory fixes this. Green neutralizes red. A small amount of green corrector pressed directly onto an active red pimple or a patch of redness before foundation dramatically reduces how much coverage product you need on top.
Corrector Colors by Concern
| Concern | Corrector Color | Best For |
|---|---|---|
| Active red pimples | Green | All skin tones |
| Post-acne dark marks (lighter skin) | Peach | Fair to medium skin tones |
| Post-acne dark marks (deeper skin) | Orange | Medium to deep skin tones |
| Dull, grayish post-acne discoloration | Salmon / red | Deep skin tones |
The amount of corrector needed is much less than most people use. A tiny dot, pressed (not rubbed) onto the target area, is enough. Rubbing spreads it and creates a muddied, visible layer under foundation.
Application tool matters here. A small, flat concealer brush gives the most precision on individual spots. Fingertip application works for broader areas of redness like the cheeks, where warmth from the finger helps blend edges seamlessly.
Correctors go on after primer, before foundation. That order keeps them anchored in place and allows foundation to sit cleanly on top without disturbing the color-neutralizing layer underneath.
Choosing the Right Foundation for Acne-Prone Skin
Foundation is where most acne coverage decisions get made, and also where most mistakes happen. The wrong formula does not just fail to cover. It actively makes acne worse.
The global non-comedogenic foundation market was valued at $2.4 billion in 2024 and is growing steadily because consumers are getting smarter about what goes on their skin (Research Intelo, 2024). The demand is there because the need is real.
Formula Types That Work on Acne-Prone Skin
Full-coverage liquid foundations are the workhorse for acne coverage. They provide enough pigment to neutralize redness and discoloration in one to two layers without requiring excessive product buildup.
What to look for:
- Non-comedogenic formula (check the label, though note the FDA does not regulate this term)
- Oil-free or oil-controlling finish for oily and combination skin
- Buildable coverage for flexible layering
- No denatured alcohol in the first five ingredients (drying and irritating on active breakouts)
Products that consistently perform well on acne-prone skin: Estee Lauder Double Wear (matte, long-wear), NARS Natural Radiant Longwear Foundation (medium-to-full, satin finish), Dermablend Flawless Creator (buildable, designed for skin concerns).
Finish Types: What Actually Works
Matte finishes control shine and hold better through sebum breakthrough on oily skin. Satin finishes work well for combination or normal-dry skin with acne. Dewy finishes are generally avoided on oily, acne-prone skin because shine can emphasize texture.
That said, if you have dry, acne-prone skin (common in people using prescription retinoids or benzoyl peroxide treatments), a dewy or satin finish prevents that chalky, flaky look that matte foundations produce on dry patches around active blemishes.
How to Apply Foundation Over Acne
Method makes a significant difference on textured skin.
Stippling, which means pressing product into skin rather than dragging it across, is the key technique. Dragging a brush across a raised pimple picks up the edges, creates streaks, and removes coverage from the center of the blemish.
- Damp beauty sponge: best for buildable coverage on textured skin, presses product into surface without disturbing layers underneath
- Flat foundation brush: good for controlled layering in specific areas
- Stippling brush: pressed in a tapping motion, not dragged
Start with a thin layer across the whole face. Then build coverage specifically over breakout areas with a second targeted layer. This approach avoids the cakey buildup that happens when heavy product is applied uniformly everywhere.
Concealing Individual Pimples
Foundation covers the face. Concealer handles the spots that still stand out after.
Most people apply concealer before foundation. For acne coverage, it actually works better after. Foundation takes care of general redness and discoloration, and then concealer only needs to do targeted spot work. Less product overall, cleaner result.
Picking the Right Concealer Formula
This is where formula really matters. Thick, very dry concealers crack and flake over raised pimples because the skin surface underneath is uneven. Cream or balm-textured concealers flex with the skin’s surface and stay put longer on active breakouts.
What to use:
- Cream or full-coverage balm concealer (NARS Radiant Creamy Concealer, Tarte Shape Tape for drier types)
- Color should match skin tone exactly or go one shade lighter for a slight brightening effect on dark marks
- Avoid anything labeled “drying” or with high alcohol content near active breakouts
What to avoid: Liquid concealers with a very watery consistency. They migrate into pores and crease around textured areas within an hour.
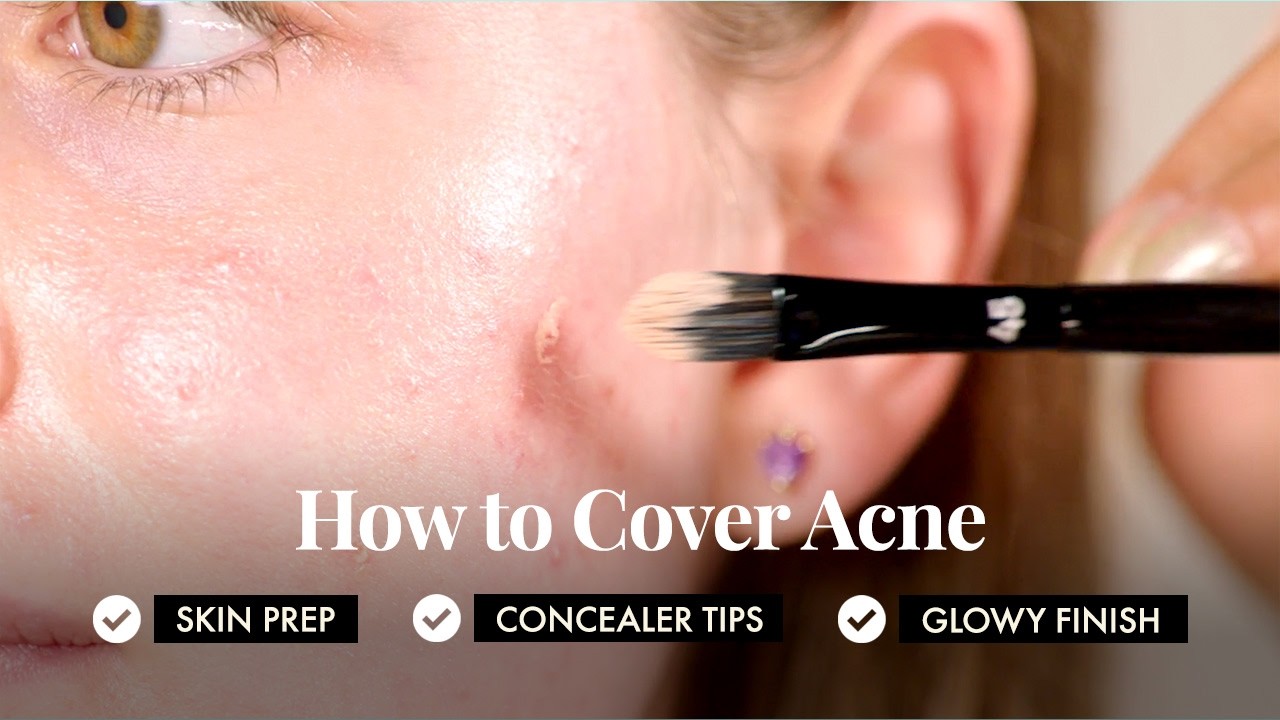
The Application Technique That Actually Sticks
Apply with a small, stiff concealer brush, not a finger. The brush allows precise placement directly on the blemish without spreading product around it unnecessarily. Fingers warm up product and reduce its staying power.
Press the concealer onto the spot. Do not rub. Then gently tap the edges to blend into the surrounding foundation without removing coverage from the center.
Set immediately with a small amount of loose translucent setting powder pressed over the top. This locks the concealer in place and prevents migration throughout the day. Skipping this step is why concealer disappears off a pimple within two hours.
One thing that took me a while to figure out: if the pimple has a visible white head, the concealer will not hold regardless of technique. Lightly pressing a clean tissue against the area first removes surface moisture, giving the product something to grip.
Setting Makeup on Acne-Prone Skin
Setting is the difference between coverage that lasts until noon and coverage that holds until midnight. On acne-prone skin, this step is not optional.
A 2025 study found that 51.1% of acne patients reported low self-esteem related to their skin condition (Journal of Neonatal Surgery, 2025). That number reflects how much skin confidence matters in daily life, which makes reliable, long-lasting coverage genuinely worth getting right.
Loose Powder vs. Pressed Powder for Acne Coverage
Loose translucent powder is better for setting individual blemishes and areas with heavy concealer. It is finely milled, which means it does not emphasize texture the way denser pressed powders can.
Pressed powder works for quick touch-ups throughout the day and for setting broad areas like the T-zone. The density provides slightly more coverage on its own.
Laura Mercier Translucent Setting Powder remains one of the most reliably non-comedogenic setting options for acne-prone skin. It sets without adding visible texture and does not contain ingredients that commonly trigger breakouts.
The Baking Technique on Active Breakouts
Baking, which means pressing a generous amount of loose powder over concealer and letting it sit for 5 to 10 minutes before brushing off excess, works well for high-coverage areas like active blemishes and post-acne dark marks.
It should only be used on the specific spots that need maximum staying power. Baking across the entire face on acne-prone skin causes a cakey, heavy finish that emphasizes rather than hides texture.
Setting Spray as the Final Lock
A light mist of setting spray after all powder is applied does two things: it melts the powdery finish into the skin for a more natural look, and it creates a barrier that reduces sebum breakthrough on oily skin.
Urban Decay All Nighter is one of the longer-wearing options. For applying makeup for oily skin, a setting spray specifically formulated for oil control is worth the investment, especially in warmer months when sebum production increases.
Hold the spray 8 to 10 inches from the face and mist in an X and T pattern. Two light mists are more effective than one heavy application, which can streak powder and displace coverage.
Makeup Ingredients to Avoid on Acne-Prone Skin

The term “non-comedogenic” is not regulated by the FDA. A product can carry that label and still contain pore-blocking ingredients (Curology, 2025).
Over 120 ingredients used in cosmetics have been identified as comedogenic, meaning they are scientifically linked to clogged pores and product-induced acne (Skin Nutritious, 2023).
Most people are using at least one of them daily without knowing it.
High-Risk Ingredients by Category
| Ingredient | Found In | Comedogenic Rating |
|---|---|---|
| Isopropyl myristate | Foundations, concealers | 5 (highest) |
| Coconut oil | Natural moisturizers, primers | 4 |
| Lanolin | Moisturizing formulas | 4 |
| Algae extract | Serums, tinted moisturizers | 5 |
| Isopropyl palmitate | Foundations, creamy formulas | 4 |
Ratings are based on the Fulton comedogenicity scale (Society of Cosmetic Chemists, 1989), still the primary reference used in cosmetic formulation today.
Fragrance and Synthetic Dyes
Fragrance is one of the most common skin irritants in makeup products. It sits at approximately 3.5 on the comedogenic scale and can trigger inflammation around active breakouts, making redness worse and coverage harder to maintain (LAMAV, 2024).
Synthetic dyes, particularly red pigment (also listed as D&C Red or FD&C Red), are found in blushes, lip products, and some foundations. Skin Type Solutions notes these as a specific trigger in foundations for acne-prone skin.
If you are doing makeup for sensitive skin, fragrance-free and dye-minimal formulas are not optional. They are the baseline.
How to Actually Read a Label
Ingredients are listed in descending order by concentration. A comedogenic ingredient near the top of the list presents more risk than the same ingredient near the bottom.
Practical steps:
- Copy the full ingredient list from the brand’s website or Sephora/Ulta product pages
- Paste into CosDNA.com or CLEARSTEM’s free pore-clogging checker
- Flag any ingredient rated 3 or above in the acne column
Patch testing new products on the jaw or inner arm for 48 to 72 hours before full-face use is worth doing, especially when switching foundations.
Safe carrier oils for acne-prone skin if moisturizing ingredients are needed: jojoba, squalane, and safflower oil are confirmed non-comedogenic (Skin Nutritious, 2023). Most other natural oils were not tested in the foundational 1989 study and cannot be confirmed safe for acne-prone skin.
Removing Acne Makeup Without Causing More Breakouts

Sleeping in makeup is one of the most direct routes to new breakouts. Full-coverage foundation and concealer sit on the skin surface for hours, and if not fully removed, they trap sebum, bacteria, and dead skin cells in pores overnight.
The American Academy of Dermatology explicitly recommends removing all makeup before bed, every night, without exception (AAD, 2018). Not a groundbreaking rule. But consistently skipped.
The Double Cleansing Method for Heavy Coverage
Why single cleansing is not enough after full-coverage acne makeup:
Heavy coverage foundation and long-wear concealer are oil-based or film-forming formulas. Water-based cleansers do not break them down fully. Residue remains in pores even after a thorough wash.
Double cleansing solves this.
Step 1, oil-based first: A cleansing balm or oil (DHC Deep Cleansing Oil, Clinique Take the Day Off Balm) dissolves the foundation, color corrector, and setting powder. Massage in dry, circular motions for 60 seconds before adding water to emulsify.
Step 2, water-based cleanser: A gentle, pH-balanced foaming cleanser removes the oil emulsion and any remaining residue. For acne-prone skin, look for formulas containing salicylic acid or niacinamide.
Bioderma recommends this specific sequence for acne-prone skin: oil or balm first, then gel-based water cleanser second (Bioderma, 2025). The order matters. Reversing it reduces effectiveness.
Micellar Water as First Step
Micellar water works as a first-pass removal tool before double cleansing. It does not replace the full routine for heavy acne makeup, but it lifts surface product and reduces friction during cleansing, which matters on skin that is already inflamed.
Bioderma Sensibio H2O is consistently recommended for sensitive and acne-prone skin. It does not contain alcohol or fragrance and its formula is gentle enough to use around active breakouts without causing additional irritation.
For acne-prone and oily skin, the sequence recommended by dermatologists is: micellar water first, then cleansing oil, then water-based cleanser. Three steps at night after full-coverage application is not excessive. Incomplete removal is what causes problems.
What Not to Use
Makeup wipes are a poor choice for acne coverage removal. They spread product around the skin surface, push residue into pores rather than lifting it away, and often contain preservatives and detergents that irritate active breakouts (Skin MPLS, 2024).
According to Bioderma, all skin types should avoid cleansers containing heavy fragrance or sulfate-based surfactants, especially acne-prone skin that is already compromised.
Long-Wear Tips for All-Day Acne Coverage
Coverage that starts strong and disappears by 2pm is a technique problem, not a product problem. Usually.
The foundation segment dominates acne makeup purchases at a 45.3% market share, according to Future Market Report 2024. That investment is only worth it if the application holds through a full day.
Touch-Up Strategy That Does Not Smear Coverage
The instinct when makeup fades is to add more. That approach layers new product over broken-down foundation and creates a patchy, uneven result.
The correct sequence for midday touch-ups on acne-prone skin:
- Blot first with oil-blotting paper or a clean tissue, pressing (not rubbing) the T-zone and any oily areas
- Dust a small amount of loose translucent setting powder over blotted areas only
- Spot-apply concealer only on areas where coverage has visibly faded, not full-face
- Finish with one light mist of setting spray to re-melt layers together
Dermatologists at the AAD specifically caution against rubbing blotting paper across the face, as this redistributes oil and bacteria into areas that were still clean (AAD, 2018).
When a Pimple Bleeds or Weeps Under Makeup
Active papules and pustules sometimes weep under makeup, which breaks down coverage directly over the blemish. This is the one situation where removing and reapplying is the right call.
What to do:
Clean the specific area gently with a cotton swab and micellar water. Let it fully dry. Apply a thin layer of primer over that spot only, wait 60 seconds, then re-apply concealer and set with powder.
Trying to cover a weeping blemish without cleaning it first just means layering product on moisture. It will not hold regardless of technique.
The Role of Skincare Underneath Long-Wear Makeup
Long-wear, full-coverage formulas perform better when the skin underneath is properly moisturized. Dehydrated skin creates a broken surface that disrupts even film-forming foundations.
People using prescription acne treatments like tretinoin or benzoyl peroxide often have dry, flaky patches. These need to be addressed with a barrier-supporting moisturizer before prepping skin before makeup, otherwise foundation settles into dry patches and emphasizes them.
The process of layering makeup over prescription-treated skin requires patience. Let each skincare layer absorb completely. Rushing the prep phase is the main reason coverage looks uneven on skin that is also dealing with dryness from acne treatments.
FAQ on How To Cover Acne With Makeup
What type of foundation works best for acne-prone skin?
A full-coverage, non-comedogenic liquid foundation with a matte or satin finish works best. Look for oil-free formulas. Estee Lauder Double Wear and Dermablend are reliable options that hold without congesting pores or breaking down over active breakouts.
Should I apply concealer before or after foundation?
Apply concealer after foundation for acne coverage. Foundation handles overall redness and discoloration first. Concealer then only needs to target spots still showing through, which means less product, less caking, and longer-lasting results on textured skin.
Does makeup make acne worse?
It can, if the formula contains comedogenic ingredients like isopropyl myristate, lanolin, or coconut oil. Non-comedogenic, fragrance-free formulas applied on clean skin and fully removed at night do not worsen acne for most people.
How do I stop my foundation from looking cakey over pimples?
Use a damp beauty sponge and stipple product onto textured areas instead of dragging. Build coverage in thin layers. Avoid over-applying in one pass. Setting with finely milled loose powder rather than pressed powder also reduces caking significantly.
What does a green color corrector do for acne?
Green neutralizes red. Pressing a small amount of green corrector directly onto active red pimples before foundation reduces the amount of coverage product needed on top. It works on all skin tones and cuts down visible redness dramatically.
How do I make acne coverage last all day?
Prime first, set with loose powder, and finish with a long-wear setting spray like Urban Decay All Nighter. Midday, blot oily areas before touching up. Avoid touching your face. Layering technique and a proper primer base matter more than foundation brand.
Can I cover a pimple that has a white head?
Concealer will not grip a weeping or open whitehead. Press a clean tissue gently against it first to remove surface moisture. Let it dry fully, then prime the spot, apply cream concealer, and set immediately with translucent powder to lock it in.
What is the correct order for applying makeup over acne?
Cleanser, moisturizer, primer, color corrector, foundation, concealer, setting powder, setting spray. Each layer needs time to absorb or set before the next goes on. Rushing the sequence is the most common reason coverage breaks down within a few hours.
How do I remove full-coverage acne makeup without breaking out?
Use the double cleansing method: a cleansing balm or oil first to dissolve the makeup, followed by a gentle water-based cleanser. Bioderma Sensibio H2O as a first pass helps. Never use makeup wipes. Incomplete removal overnight is a direct cause of new breakouts.
Which makeup ingredients should I avoid if I have acne?
Avoid isopropyl myristate, coconut oil, lanolin, algae extract, and synthetic fragrance. These are high on the comedogenic scale. Check every product at CosDNA.com before buying. The “non-comedogenic” label is unregulated and does not guarantee a formula is actually pore-safe.
Conclusion
This conclusion is for an article presenting how to cover acne with makeup as a skill built on layers: the right prep, the right formula, the right technique.
Color correcting redness, choosing a non-comedogenic foundation, spot concealing with a cream formula, and setting for long wear all work together. Miss one step and the others underperform.
Patch test new products. Check ingredient lists. Use the double cleansing method every night without exception.
Acne-prone skin can hold full coverage beautifully. It just requires more intention than most makeup routines. Get the sequence right, and the results follow.

- What Is Skin Tint and Why Everyone Is Obsessed - July 11, 2026
- What Is Foundation and How Do You Choose One? - July 6, 2026
- How to Make Blush Last Longer - July 3, 2026


