

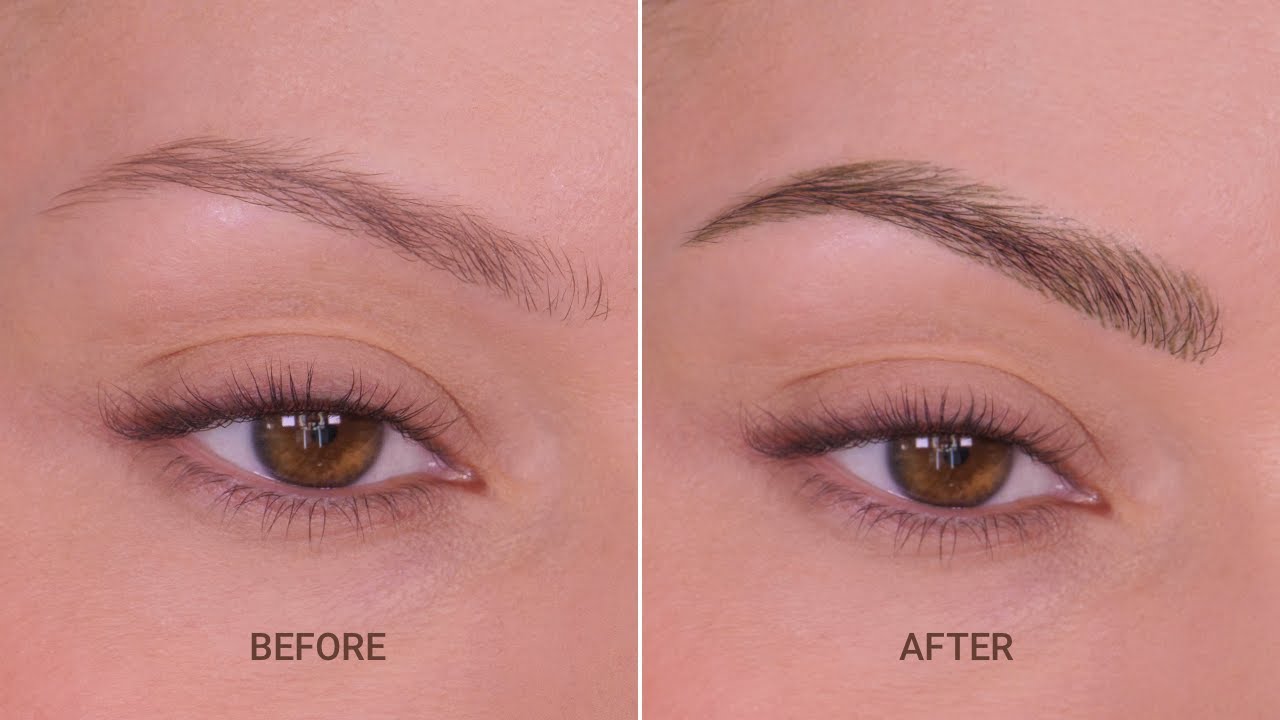
Your brows shape your entire face. A good brow pencil can fill sparse areas, define the arch, and create hair-like strokes that look completely natural.
It is the most widely used brow product on the market, and for good reason. No brush required, no learning curve, and it works on every brow type.
This guide covers everything: how brow pencils work, how to choose the right shade and formula, how to apply them correctly, and what to look for when buying one.
What Is a Brow Pencil

A brow pencil is a cosmetic tool used to fill, define, and shape eyebrows. It deposits pigment onto skin and brow hairs through direct contact, letting you add color and structure where your natural brows are sparse, uneven, or faint.
The tip is the whole point, literally. A fine, precise tip lets you draw marks that look like actual brow hairs rather than a smudged block of color. That distinction separates a brow pencil from almost every other brow product on the market.
Most brow pencils fall into one of two forms: a standard wood-encased pencil that needs sharpening, or a retractable mechanical twist-up. The formula inside is typically a wax-and-pigment blend, sometimes with powder components mixed in for a drier, softer finish.
Eyebrow pencils held a 35.6% market share in 2023, making them the top-selling brow product category globally, according to Market.us research. That is not a coincidence. They are accessible, require no extra tools, and work fast.
The product sits at the intersection of ease and precision. You do not need a separate brush or an angled applicator. Pick it up, draw, blend with the spoolie end, done.
How a Brow Pencil Works
The mechanics are simple. Friction from the tip against skin and hair transfers pigment with each stroke. The waxy base grips both the skin surface and existing brow hairs, which is why the color stays put rather than sliding around.
Pigment transfer relies on pressure and angle. Light pressure produces a soft, hairlike mark. More pressure deposits a heavier line. This is why the same pencil can create a natural everyday arch or a more defined, graphic look depending on how you use it.
The spoolie on the opposite end serves two functions. It blends freshly applied strokes so they look less drawn-on, and it moves product into the brow hairs themselves for a more even finish. Skipping the spoolie step is one of the most common mistakes, and it shows.
Waterproof formulas add polymer-based or silicone-based compounds to the wax blend. These create a stronger bond to the skin that resists humidity and sweat. The tradeoff is that they can feel slightly stiffer and are harder to remove at the end of the day.
The Role of the Tip
Tip width determines the entire look. An ultra-fine micro tip, usually 0.4mm or less, draws strokes narrow enough to pass as individual hairs. A wider or angled tip covers more ground quickly but produces marks that read as fill rather than hair simulation.
Retractable pencils hold their tip width consistently. Sharpenable pencils can go finer as you sharpen, but the angle of the point changes depending on how you cut it, which affects the line quality. Most professional brow artists I’ve worked around prefer retractable for this reason alone.
How Pigment Builds Up
Brow pencil is a layering product. One pass gives you a light deposit. Two or three passes on the same area deepen the color and fill in gaps between existing hairs. This buildable quality is what makes it versatile for both sparse and fuller brow types.
The key is starting light, especially at the front of the brow. The inner portion of the brow should always be the softest part. Heavy product at the front of the brow looks harsh and draws the face inward.
Brow Pencil Formulas and Textures
The formula inside a brow pencil changes how it feels, how it applies, and how long it stays on. Not all pencils are the same even when they look identical from the outside.
| Formula Type | Texture | Best For | Key Trait |
| Wax-based | Creamy, smooth | Dry to normal skin | Blendable, forgiving |
| Powder-wax hybrid | Drier, softer | Oily skin, natural finish | Softer pigment payoff |
| Waterproof polymer | Firm, precise | Active wear, humid climates | Long wear, transfer-resistant |
| Hard wax blend | Firm, controlled | Detailed hair strokes | Maximum precision |
Shu Uemura’s Hard Formula pencil is a good example of the hard wax category. It has been a professional favorite for over 25 years because the firm texture allows exceptional control when drawing individual hair strokes.
Wax concentration affects blendability. Higher wax content means creamier application and easier blending, but also faster fading on oily skin. Lower wax with more powder creates a drier finish that grips better on oily skin types but requires a lighter hand to avoid patchiness.
Iron oxide pigments provide the color in almost all brow pencils. These are the same pigments used across most eye makeup products, rated safe for use near the eye area. The concentration of iron oxides relative to the wax base determines how saturated the color looks on skin.
Waterproof vs. Standard Formulas
Standard brow pencils typically last 6-8 hours on normal skin. Waterproof versions extend that to 10-12 hours and resist smudging from sweat, humidity, or light contact.
The tradeoff: waterproof formulas are harder to remove and can feel less comfortable on dry skin. They also tend to set faster, which means you have a shorter window to blend before the product becomes difficult to move.
Brow Pencil Shades and How to Choose One

Shade selection is where most people go wrong. The most common mistake is choosing a shade that matches the darkest part of your brows exactly, which results in a flat, heavy look.
The general starting point: go one shade lighter than your natural brow color for a soft, natural result. Go one shade darker only if your brows are very fair and you want definition that reads clearly on camera or from a distance.
Matching to Hair Color
Hair color is the primary reference point, but skin undertone matters too.
- Ash blonde to light brown hair: taupe or soft brown with cool undertones
- Medium to dark brown hair: brunette or dark brown, avoiding anything with red unless your hair has warm tones
- Red or auburn hair: auburn pencil, not dark brown, which pulls too cold
- Black hair: soft black or dark brown, rarely true black unless you want a dramatic finish
- Gray or white hair: gray or taupe, never brown, which looks disconnected from natural coloring
Warm skin undertones (golden, olive, bronze) pair better with warm-toned browns. Cool undertones (pink, beige, fair) work better with ash or taupe shades. Neutral undertones have the most flexibility.
Common Shade Mistakes
Going too dark is the most frequent error. The second most frequent is buying a warm brown for naturally ash-toned brows, which creates an orange cast under certain lighting.
Test the shade at your brow, not your wrist. The skin at the inner wrist is not representative of your face’s undertone or coloring. Swipe the pencil lightly along your existing brow hairs in store or check the swatch against your hairline.
Brow Pencil vs. Other Brow Products

A brow pencil is one of several formats available. Where it fits compared to the others depends on the finish you want, your skill level, and your skin type.
| Product | Finish | Best Use Case | Skill Level |
| Brow pencil | Natural, defined | Sparse brows, daily use | Beginner-friendly |
| Brow powder | Soft, diffused | Full brows, soft fill | Beginner-friendly |
| Brow pomade | Bold, sculpted | Defined arches, thick brows | Intermediate |
| Brow gel | Groomed, natural | Setting and taming hairs | All levels |
Knowing what brow gel actually does helps clarify where the pencil fits. Gel grooms and sets existing hairs. The pencil adds color and structure where hairs are missing. They solve different problems, which is why they work well together.
The same goes for understanding brow pomade. Pomade is great for architectural, bold brows, but it requires an angled brush and more practice to apply without looking overdone. For someone starting out, a pencil is significantly easier to control.
Pencil vs. Powder
Pencil = precision. Powder = softness. That is basically the whole comparison.
Powder applied with an angled brush gives a diffused, shadow-like fill. It works well on brows that are mostly full with just a few gaps. It does not simulate individual hairs. Pencil draws actual strokes, which makes it the better choice for sparse or uneven brows.
Some people use both. Pencil to outline the shape and fill sparse patches, powder to add depth and blend everything together. That layering approach tends to look the most natural and lasts the longest.
Pencil vs. Pomade
Pomade delivers bolder pigment and longer wear. It also takes more skill. You need an angled brush, a clean spoolie, and a steady hand to avoid overdoing the front of the brow.
A brow pencil forgives mistakes more easily. You can blend away a line that is too heavy. Pomade sets faster and is harder to correct once applied. Anastasia Beverly Hills’ DIPBROW Pomade is probably the most well-known version of this format, and even experienced users admit it takes some getting used to.
How to Use a Brow Pencil

Application order matters. Start at the arch, not the inner corner. The arch and tail are where you can be most precise because the brow shape is already established there. The inner portion of the brow requires the lightest touch and comes last.
Mapping the Brow Shape Before Filling
Before drawing anything, locate three reference points using the pencil held vertically as a guide.
- Start point: Hold the pencil vertically alongside the nose. Where it meets the brow is where the brow should begin.
- Arch point: Angle the pencil from the nose through the outer edge of the iris. That intersection marks the arch.
- End point: Angle the pencil from the nose to the outer corner of the eye. The tail of the brow ends here.
Mapping takes ten seconds. It prevents the two most common brow errors: starting too far in (which closes the face) and ending the tail too short or too low.
Stroke Techniques for Natural vs. Defined Looks
Natural look: short, upward strokes that follow the direction of hair growth. Vary the pressure slightly so strokes are not perfectly uniform. Real brow hairs are not uniform.
Defined look: use the pencil to draw a clean lower edge along the brow tail, then fill inward with strokes. The sharp lower edge creates the structured, sculpted look associated with a more made-up finish.
After filling, use the spoolie to brush brows upward and outward. This step blends strokes into the natural hairs and removes any excess product that looks heavy or cake-like. Do not skip it.
Avoid pressing hard at the front of the brow. The inner section should always look lighter and more diffused than the rest. That gradation is what separates a natural-looking brow from one that reads as drawn on.
Brow Pencil for Different Brow Types
The right technique for a brow pencil changes completely depending on what you are starting with. Applying to full, thick brows is a different task from building structure on sparse ones.
Sparse or overplucked brows need the most work. A micro-tip pencil, anything under 0.5mm, is the right tool here. The fine point allows strokes narrow enough to simulate individual hairs on bare skin, not just fill in between existing ones.
Thin or Sparse Brows
Brow pencils designed for sparse brows typically combine a finer tip, more pigmented formula, and better adhesion to bare skin compared to standard versions, according to beauty testing data from eyeandpen.com.
Key approach: draw strokes at the front of the brow first to establish the shape, then fill the body and tail. Do not start at the arch. The front sets the entire frame of the face and if you overfill it first, everything that follows looks heavy.
After filling, press lightly with a clean finger or use the spoolie to press strokes into the skin. This helps pigment bond to bare skin areas rather than sitting on top and fading faster.
Thick or Full Brows
Thick brows need a lighter approach. The goal is adding depth and shading, not rebuilding shape from scratch.
Technique shift: use a slightly wider or angled tip and sweep through the brow with a softer hand. The existing hair does most of the visual work. The pencil just darkens the overall brow and fills any gaps near the tail or arch.
Over-filling thick brows looks obviously painted on. One or two light passes through the middle and tail are usually enough. Benefit’s Goof Proof Pencil is popular for this reason. Its wider angled tip fills faster without the precision you do not need when your brows are already full.
Asymmetrical Brows
Most people have some asymmetry. The arch on one side sits higher, or one tail ends shorter than the other.
Pencil fix for asymmetry:
- Low arch: draw strokes slightly above the natural arch line to lift the shape
- Short tail: extend the tail downward and outward with a hairlike stroke, keeping it lighter than the rest
- Uneven starts: build up the sparser front with short, upward strokes, keeping the inner corner feathered
Do not try to make both brows match exactly. Brows are sisters, not twins. The goal is balance at a glance, not a mirror image.
Straight vs. Arched Brows
Straight brows are common in East Asian facial structures and have been a prominent trend throughout 2024 and into 2025, according to brow trend reports from RevitaLash and Madluvv.
Stroke direction matters here. For a straight brow, keep strokes horizontal rather than angled upward at the arch. For a more arched look, focus strokes upward at the arch point to push the visual peak higher. A pencil is one of the only brow products that lets you control this direction precisely.
What to Look for in a Brow Pencil

Most people pick up the first pencil they see in their shade. That works, but knowing what actually separates a good pencil from a mediocre one saves time and money.
| Feature | What to Check | Why It Matters |
| Tip width | 0.4–1.5mm for hair strokes; wider for fill | Determines look: natural vs. filled |
| Formula type | Wax-based vs. waterproof polymer | Affects wear, blendability, skin type fit |
| Spoolie quality | Dense, firm bristles vs. flimsy | Poor spoolie ruins application finish |
| Pigment build | Buildable vs. saturated single-pass | Buildable = more control, less mistakes |
| Retractable vs. Sharpenable | Retractable keeps consistent tip | Sharpenable goes finer but angle varies |
Eyebrow pencils range from about $2 at drugstores to over $50 from prestige brands, according to BestReviews. The price gap mostly reflects formula quality, pigment concentration, and tip mechanism, not just branding.
Tip Width: The Most Overlooked Factor
Benefit’s Precisely, My Brow Pencil has a 1.5mm tip. Their Goof Proof version has a wider angled tip. Both are from the same brand, but they produce completely different results. Tip width is the single feature that most affects the final look, more than shade or formula.
For hair-stroke simulation: 0.4mm-0.9mm. For faster all-over fill: 1mm-2mm angled. For both in one: some pencils include a dual-sided design or a micro tip with an attached angled side.
Spoolie Brush Quality
Cheap spoolies are stiffer, less dense, and move product around rather than blending it in. A good spoolie has firm but flexible bristles that can grab excess pigment and soften strokes without pulling the hair.
Worth checking before buying: fan the spoolie bristles with your finger. If they feel sparse or stiff like a mascara wand from 2005, the blending step is going to be frustrating. The spoolie is used after nearly every stroke, so a bad one affects the entire application.
Waterproof Formula: When It Is Worth It
Waterproof formulas make sense if you have oily skin, live in a humid climate, or need brows to hold through physical activity. They are not necessary for everyone.
Maybelline’s TattooStudio Brow Pencil claims up to 36 hours of wear, and independent testing found it holds well through swimming with minimal fading. For standard everyday wear, a non-waterproof formula with a quality wax base is often more comfortable and easier to remove without dragging the skin.
How Long a Brow Pencil Lasts
Two separate things: how long the product stays on your face during the day, and how many months a single pencil lasts before running out.
Wear Time on Skin
Standard brow pencils typically last 6-8 hours on normal to dry skin. Oily skin shortens that significantly, often to 3-5 hours without a setting product layered on top.
Waterproof formulas extend wear to 12 hours or more. Some products claim 24-36 hours, though factors like skin type, how much you touch your face, and humidity all reduce that in practice.
Layering a clear brow gel over a pencil is one of the most effective ways to extend wear. The gel seals the pencil pigment and prevents transfer. NYX Professional Makeup’s brow gels are formulated as up to 30-hour hold and work well over most pencil formulas, according to L’Oreal Makeup.com.
Product Lifespan Per Pencil
A brow pencil used daily typically lasts 2-3 months, according to data from The Brow Technicians. That range shifts depending on how much product you apply and how hard you press.
Three things that shorten a pencil’s life fast:
- Heavy application pressure, which wears the tip down faster
- Sharpening a traditional pencil too aggressively, which removes usable product
- Not capping it after use, which dries out wax-based formulas
Retractable pencils avoid the sharpening waste problem entirely. You expose exactly as much product as you need. The tradeoff is that you cannot make the tip finer than the mechanism allows.
Storage and Product Care
Store brow pencils horizontally or cap-down if possible. Heat breaks down the wax binder in many formulas, which causes the tip to soften and apply too thickly or break off. Keeping them away from direct sunlight and out of a hot car extends their usable life noticeably.
Signs a brow pencil has degraded: the color looks different from when you bought it, the formula drags instead of gliding, or the tip breaks during normal use without heavy pressure. At that point, the formula has broken down and the product is worth replacing regardless of how much product appears to be left.
Pairing a brow pencil with other eye makeup works best when the brow step comes first. Doing brows last risks getting eyeshadow fallout or concealer on a freshly filled arch, which softens the edges and shortens wear time considerably. It is one of those sequencing details that makes a real difference when you know it.
FAQ on What Is Brow Pencil
What is a brow pencil used for?
A brow pencil fills in sparse areas, defines the arch, and shapes the eyebrow outline. It deposits pigment through fine strokes that mimic natural brow hairs, adding structure and color where the brow is thin or uneven.
Is a brow pencil the same as an eyeliner?
No. Brow pencils use a drier, waxier formula designed to grip brow hairs and skin. Eyeliner formulas are softer and more pigmented. Using eyeliner on brows often looks harsh and fades faster.
What is the difference between a brow pencil and brow powder?
A brow pencil draws precise, hair-like strokes. Brow powder gives a softer, diffused fill. Pencil suits sparse brows better. Powder works well on fuller brows that just need subtle depth added between hairs.
How do I choose the right brow pencil shade?
Go one shade lighter than your natural brow color for a soft result. Match the undertone too. Warm hair needs warm brown, cool hair needs ash or taupe. Test the shade against your hairline, not your wrist.
Can a brow pencil work on sparse brows?
Yes. It is actually the best product for sparse brows. A micro-tip pencil under 0.5mm draws strokes narrow enough to simulate individual hairs directly on bare skin, filling gaps without looking drawn on.
How long does a brow pencil last on skin?
Standard formulas last 6-8 hours on normal skin. Waterproof versions hold 12 hours or longer. Oily skin reduces wear time. Layering a clear brow gel over the pencil extends the brow color and prevents transfer throughout the day.
Do I need a spoolie with a brow pencil?
Yes. The spoolie blends strokes into natural hairs, removes excess pigment, and softens harsh lines. Skipping it leaves brows looking drawn on. Most pencils include one built in. If yours does not, use a separate spoolie brush.
What is the difference between a retractable and a sharpenable brow pencil?
Retractable pencils twist up and maintain a consistent tip width. Sharpenable pencils can go finer but depend on how you cut them. Retractable is easier for daily use. Sharpenable holds more product and is more cost-effective over time.
Is a brow pencil or brow pomade better for beginners?
A brow pencil is easier to start with. It requires no separate brush, blends forgivingly, and corrects easily. Brow pomade gives bolder results but demands more skill and practice to avoid overdoing the color and density.
How do I make my brow pencil last longer throughout the day?
Apply to clean, dry skin. Use light strokes and build in layers. Set with a clear brow gel after filling. On oily skin, choose a waterproof formula. Avoid touching your brows mid-day, as finger oils break down the wax binder faster.
Conclusion
This conclusion is for an article presenting what is brow pencil, a cosmetic tool that remains the top-selling brow product category for good reason.
It covers more ground than any other single brow product. Precise hair stroke technique, shade selection, formula differences, brow type adjustments, and wear time all come down to understanding how the tool actually works.
The right micro brow pencil, used with the right pressure and a quality spoolie, produces results that look nothing like makeup at all.
Whether you are dealing with sparse brows, uneven eyebrow symmetry, or simply want cleaner brow definition day to day, a brow pencil handles all of it.
Start with a buildable wax-based formula, match your undertone carefully, and blend every stroke before it sets.

She started writing on the site after fielding the same questions from clients and friends often enough to just write the answers down: which red won't turn orange on a warm undertone, how to keep lipstick from feathering into fine lines, why a "12-hour" formula rarely survives dinner.
Every review on the site follows the same rule she uses with paying clients: wear it first, then decide if it's worth recommending.
- How to Choose Setting Powder for Your Skin Type - August 1, 2026
- How Long Does Eyeliner Last Before It Expires? - July 28, 2026
- What Is Contour and How Do You Apply It? - July 25, 2026


